As you know by default the kubernetes provide a “local-path” storage. However, this local storage has many limitation:
-
Node Affinity: When using local-path storage, the volume created is tied to the specific node where the pod runs. If that node goes down for maintenance or any other reason, the pods won’t be able to start on other nodes because they won’t find their volumes.
-
Not Network Storage: Local-path storage is not network-based. The volume remains local to the K3s node where the pod executes. It doesn’t allow data sharing across nodes.
-
Not Suitability for Production: While local-path storage is suitable for small, single-node development clusters, it’s not recommended for production-grade multi-node clusters.
What is Longhorn?
Longhorn, an innovative open-source project by Rancher Labs, offers a reliable, lightweight, and user-friendly distributed block storage system for Kubernetes.
- High Availability: Longhorn replicates storage volumes across multiple nodes in the Kubernetes cluster, ensuring that data remains available even if a node fails.
- Cost-Effective: Traditional external storage arrays can be expensive and non-portable. Longhorn offers a cost-effective, cloud-native solution that can run anywhere.
- Disaster Recovery: Longhorn allows you to easily create a disaster recovery volume in another Kubernetes cluster and fail over to it in the event of an emergency. This ensures that your applications can quickly recover with a defined Recovery Point Objective (RPO) and Recovery Time Objective (RTO).
Longhorn installation
Longhorn provides a straightforward method for installing the iSCSI driver and NFSv4 directly on all nodes. Follow the steps below to set up the necessary components.
-
Installing open-iscsi
The open-iscsi package is a prerequisite for Longhorn to create distributed volumes that can be shared across nodes. Ensure that this driver is installed on all worker nodes within your cluster.
Execute the following command on your cluster to install the driver
# please check the latest release of the longhorn here https://github.com/longhorn/longhorn and update the version accordingly. Current version is v1.6.0
kubectl apply -f https://raw.githubusercontent.com/longhorn/longhorn/v1.6.0/deploy/prerequisite/longhorn-iscsi-installation.yaml
After deploying the iSCSI driver, confirm the status of the installer pods using the following command:
kubectl get pod | grep longhorn-iscsi-installation

# The result
longhorn-iscsi-installation-pdbgq   1/1     Running   0          21m
longhorn-iscsi-installation-qplbb   1/1     Running   0          39m
Additionally, review the installation logs to ensure successful deployment:
kubectl logs longhorn-iscsi-installation-pdbgq -c iscsi-installation

# The result
...
IProcessing triggers for libc-bin (2.35-0ubuntu3.6) ...
Processing triggers for man-db (2.10.2-1) ...
Processing triggers for initramfs-tools (0.140ubuntu13.1) ...
update-initramfs: Generating /boot/initrd.img-6.5.0-18-generic
iscsi install successfully
Once the iscsi installed successfully, Then you can safely uninstall the above with following command.
kubectl delete -f https://raw.githubusercontent.com/longhorn/longhorn/v1.6.0/deploy/prerequisite/longhorn-iscsi-installation.yaml-
Installing NFSv4 client
To enable Longhorn’s backup functionality and ensure proper operation, the NFSv4 client must be installed on the worker nodes within your cluster.
Follow these steps to set up the necessary components:
# please check the latest release of the longhorn here https://github.com/longhorn/longhorn and update the version accordingly. Current version is v1.6.0
kubectl apply -f https://raw.githubusercontent.com/longhorn/longhorn/v1.6.0/deploy/prerequisite/longhorn-nfs-installation.yaml
After deploying the NFSv4 client, confirm the status of the installer pods using the following command:
kubectl get pod | grep longhorn-nfs-installation

# The results
NAME                                  READY   STATUS    RESTARTS   AGE
longhorn-nfs-installation-mt5p7   1/1     Running   0          143m
longhorn-nfs-installation-n6nnq   1/1     Running   0          143m
And also can check the log with the following command to see the installation result:
kubectl logs longhorn-nfs-installation-mt5p7 -c nfs-installation

# The results
...
rpc-svcgssd.service is a disabled or a static unit, not starting it.
rpc_pipefs.target is a disabled or a static unit, not starting it.
var-lib-nfs-rpc_pipefs.mount is a disabled or a static unit, not starting it.
Processing triggers for man-db (2.10.2-1) ...
Processing triggers for libc-bin (2.35-0ubuntu3.6) ...
nfs install successfully
Once the NFSv4 installed successfully, Then you can safely uninstall the above with following command.
kubectl delete -f https://raw.githubusercontent.com/longhorn/longhorn/v1.6.0/deploy/prerequisite/longhorn-nfs-installation.yaml- Installing Longhorn
- Preparing the configuration
value.yamlfile
csi:
  kubeletRootDir: "/var/lib/kubelet"
defaultSettings:
diskType: "flesystem"- Install Longhorn in the
longhorn-systemnamespace with configuration above.
# 1. added longhorn chart
helm repo add longhorn https://charts.longhorn.io
helm repo update

# 2. Installing
helm install longhorn longhorn/longhorn -f value.yaml --namespace longhorn-system --create-namespace
Once installed successfully and all the pods are up and running.
You should be able to access Longhorn UI through the longhorn-frontend service (needs port-forward or expose through nginx or cloudflare tunnel).
-
Uninstalling Longhorn
If any reason we would like to uninstall Longhorn helm then the below commands will help.
# Update `deleting-confirmation-flag` to allows uninstall longhorn
kubectl -n longhorn-system patch -p '{"value": "true"}' --type=merge lhs deleting-confirmation-flag
# Uninstall longhorn
helm uninstall longhorn -n longhorn-system
# Delete namespace
kubectl delete namespace longhorn-system
Using the Longhorn storage with Mariadb
To explore Longhorn storage capabilities, we’ll set up a MariaDB Galera multi-primary database cluster for synchronous replication and high availability. Follow these steps:
# Setup chart repo
helm repo add bitnami https://charts.bitnami.com/bitnami
helm repo update

# Install mariadb-ha
helm install mariadb-ha bitnami/mariadb-galera \
   --set global.storageClass=longhorn \
   --set rootUser.password=Pass@word1 \
   --set galera.mariabackup.password=Password1 \
   --set db.name=drunk_db \
   --namespace db --create-namespace

# Uninstall mariadb-ha
helm uninstall mariadb-ha -n db
After deployed successful, you should find three MariaDB pods running in the db namespace:
kubectl get pod -n db
# The results
NAME READY STATUS RESTARTS AGE
mariadb-ha-mariadb-galera-0 1/1 Running 0 5m6s
mariadb-ha-mariadb-galera-1 1/1 Running 0 3m44s
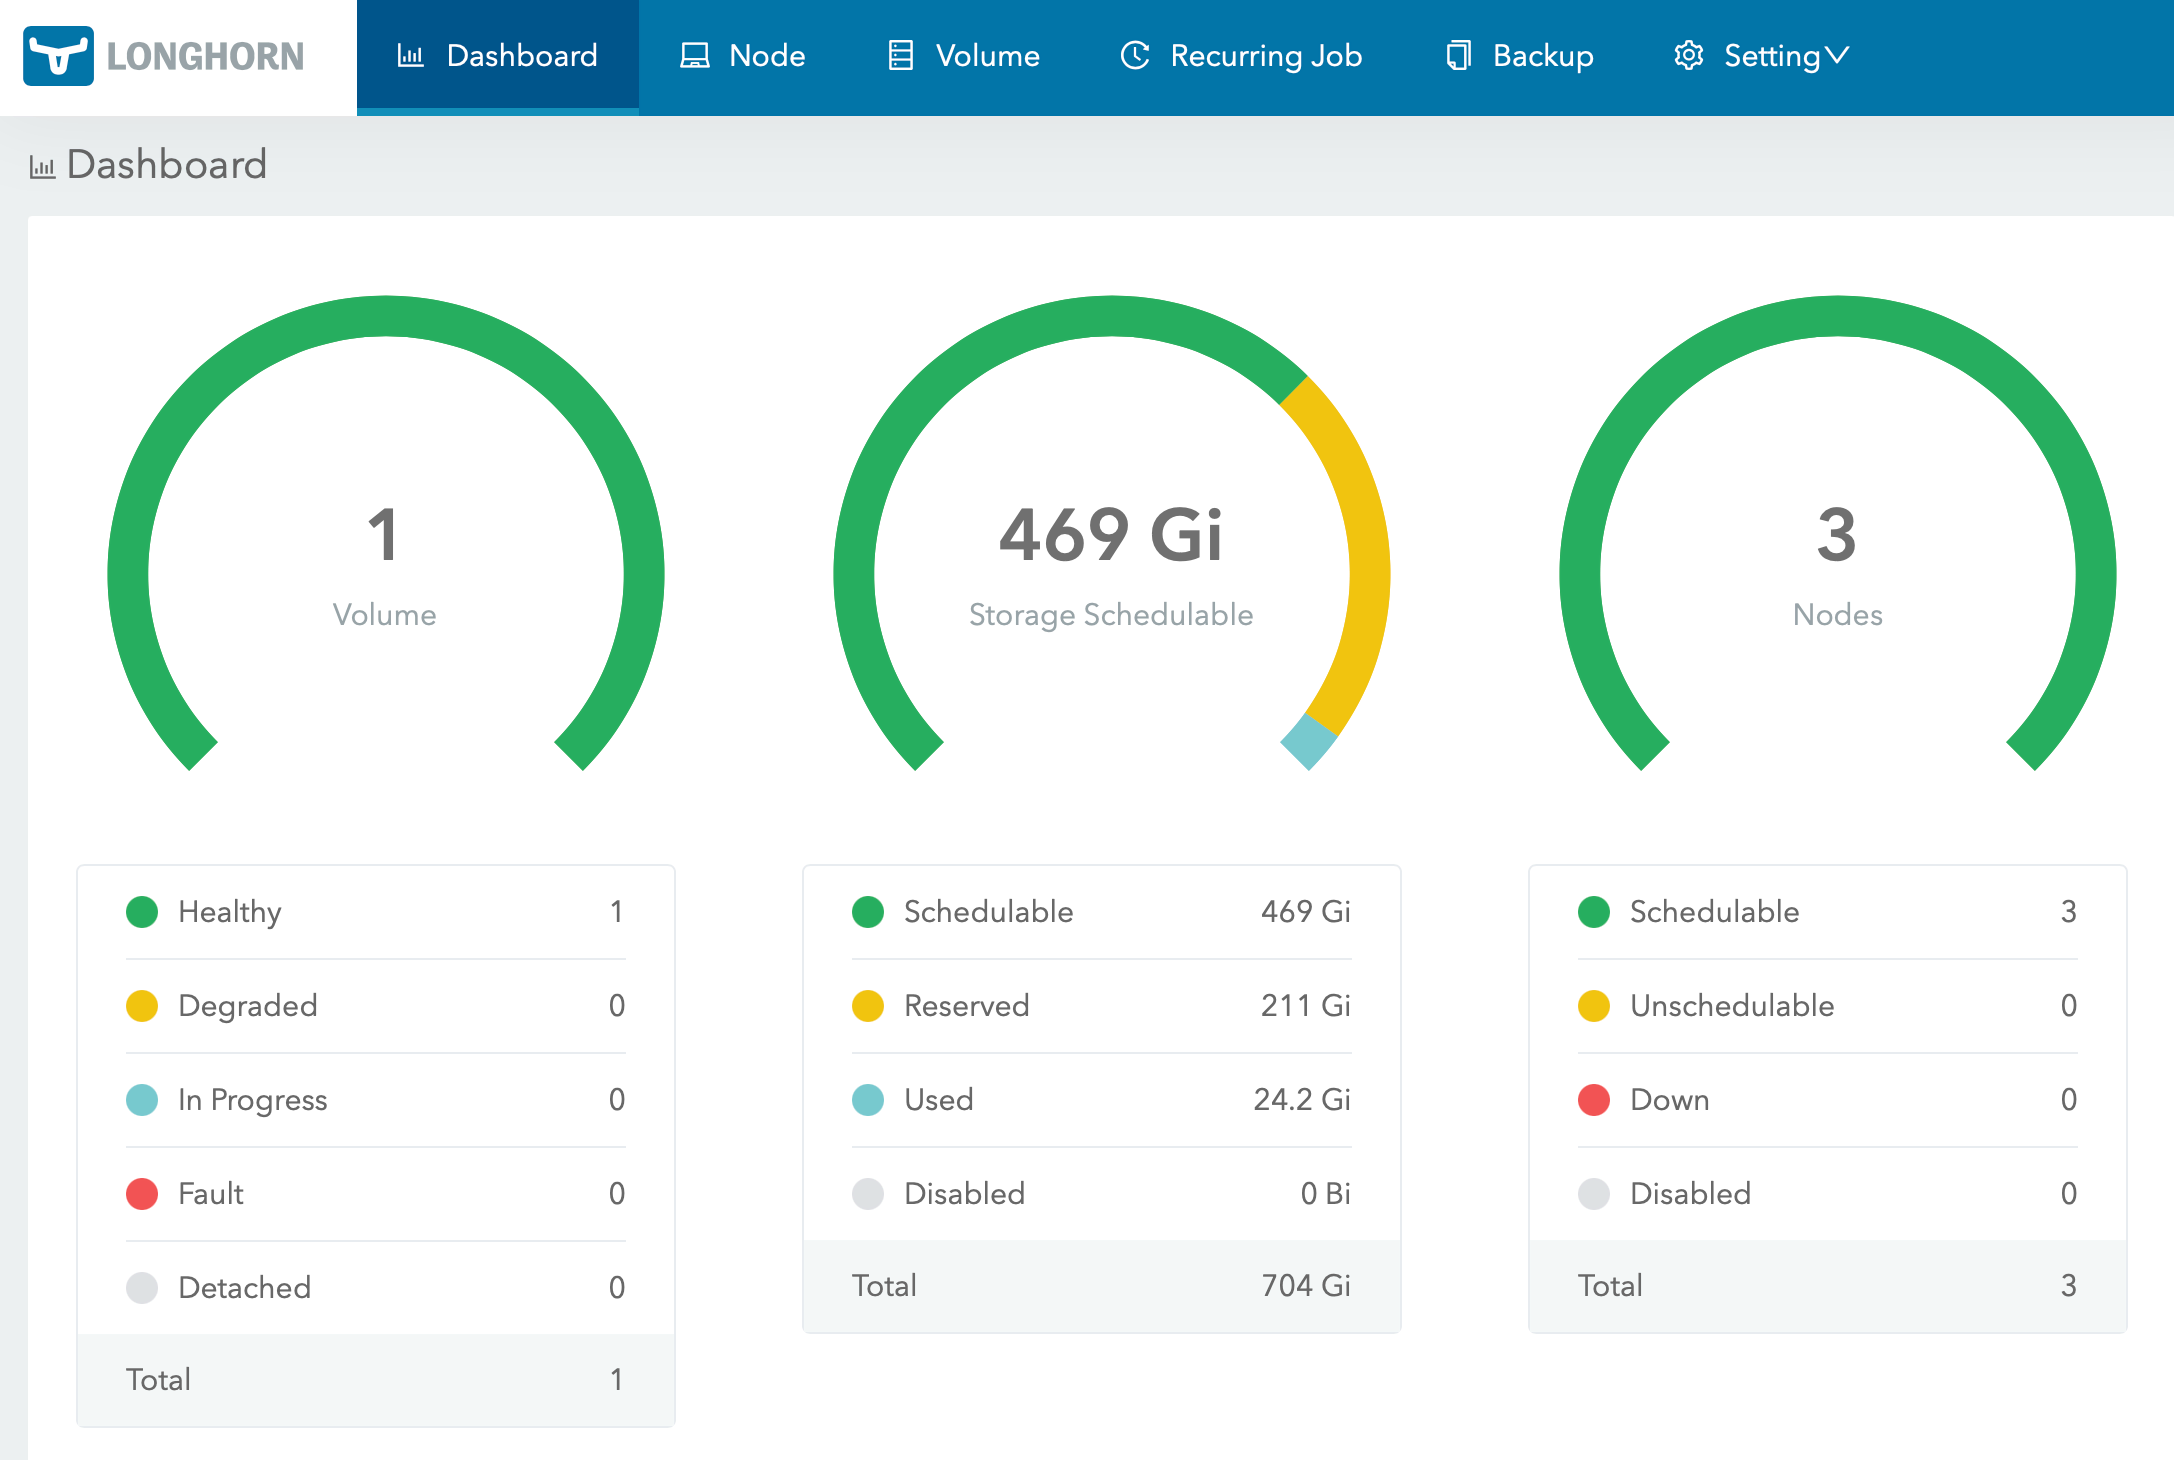
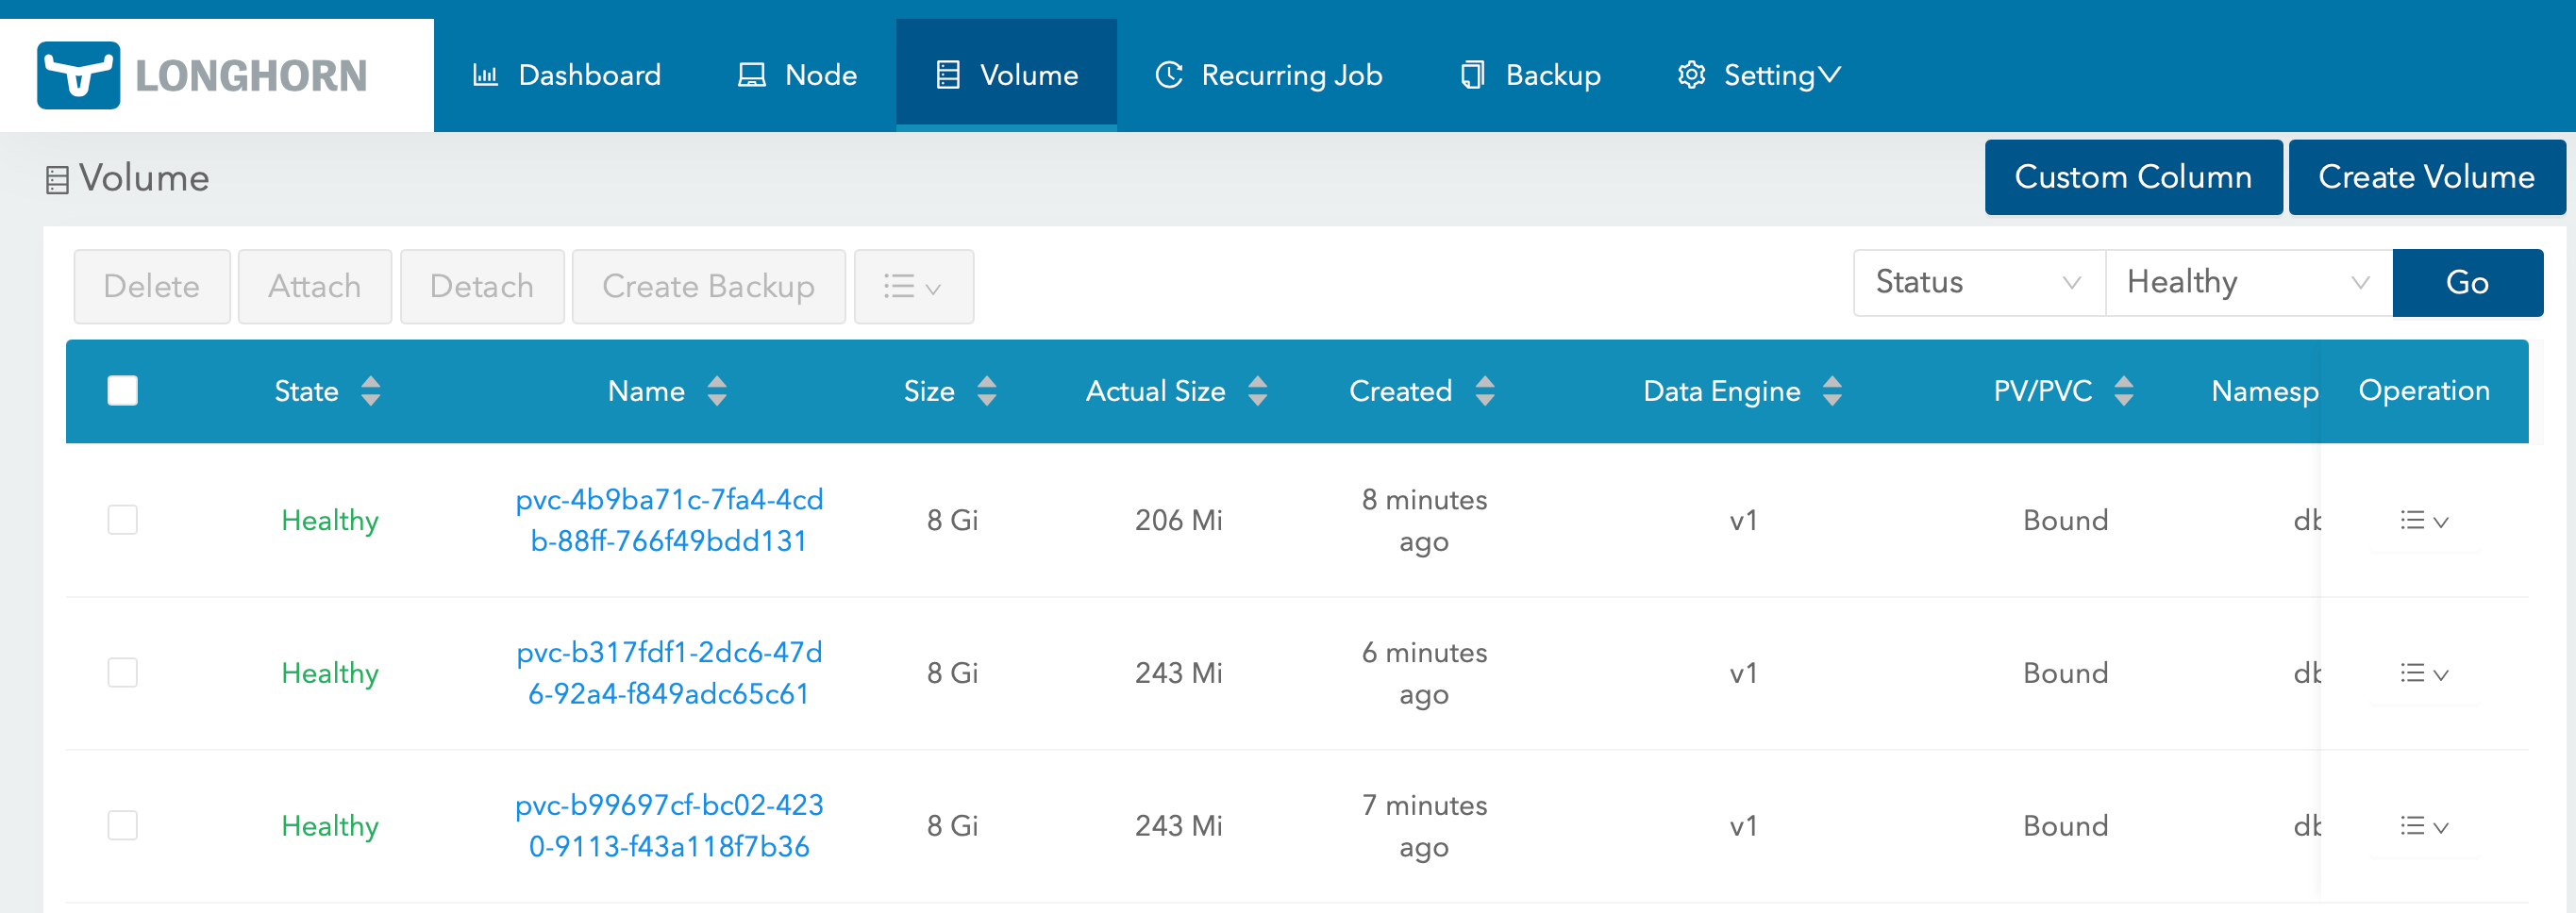
mariadb-ha-mariadb-galera-2 1/1 Running 0 2m41sYou’ll also find three persistent volumes in the Longhorn UI portal. !Longhorn Volumes
Longhorn System Backup
Longhorn supports a variety of backup targets, including Azure Storage, AWS S3, Google Storage, NFS, and SMB/CIFS. This post will initially cover the configuration for Azure Storage, with subsequent posts addressing the other backup targets.
- System Backup with Azure Storage
This section assumes that you already have Azure Storage and a Kubernetes cluster that can connect to Azure.
- Create a
longhorn-azure-blob-backup.yamlsecret with your Azure Storage Account credentials:
# Update the secret below with your Azure Storage Account credentials
apiVersion: v1
kind: Secret
metadata:
  name: longhorn-azure-blob-backup
  namespace: longhorn-system
stringData:
  AZBLOB_ACCOUNT_KEY: "YOUR_STORAGE_KEY"
AZBLOB_ACCOUNT_NAME: "YOUR_STORAGE_NAME"- Apply the secret to the cluster using the following command.
kubectl apply -f longhorn-azure-blob-backup.yaml- Next, update the backup information in the defaultSettings section of the
value.yamlfile:
csi:
  kubeletRootDir: "/var/lib/kubelet"
defaultSettings:
  diskType: "flesystem"
  backupTargetCredentialSecret: "longhorn-azure-blob-backup" #The name of the secret created above.
backupTarget: "azblob://[email protected]/" # Trailer slash is important- Upgrade the Longhorn Helm chart with the updated values using the following command:
helm upgrade longhorn longhorn/longhorn -f value.yaml --namespace longhorn-system

# You should see a message indicating that the upgrade was successful
Release "longhorn" has been upgraded. Happy Helming!
NAME: longhorn
LAST DEPLOYED: Wed Feb 28 08:57:56 2024
NAMESPACE: longhorn-system
STATUS: deployed
REVISION: 2
TEST SUITE: None
NOTES:
Longhorn is now installed on the cluster!

Please wait a few minutes for other Longhorn components such as CSI deployments, Engine Images, and Instance Managers to be initialized.

Visit our documentation at https://longhorn.io/docs/-
Once the upgrade is complete, the backup information under
Setting→Generalshould reflect the changes made.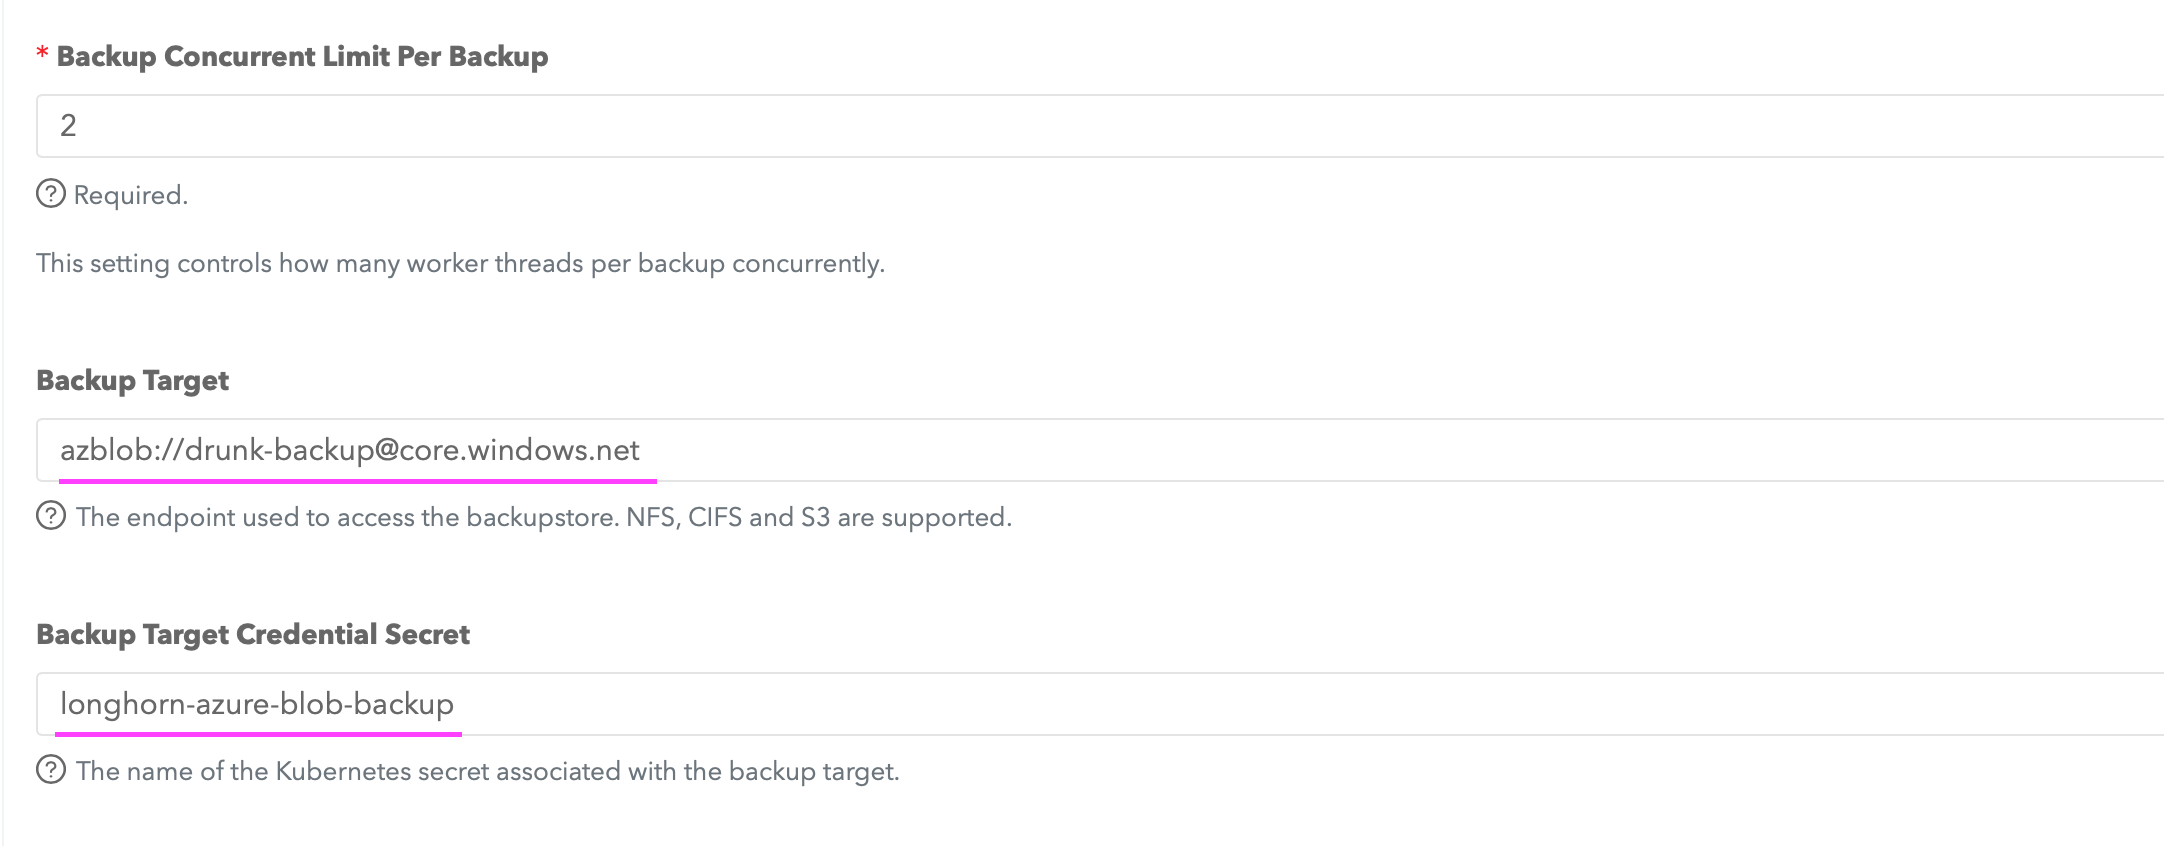
-
After creating a sys-backup under
Setting→System Backup, you should see the following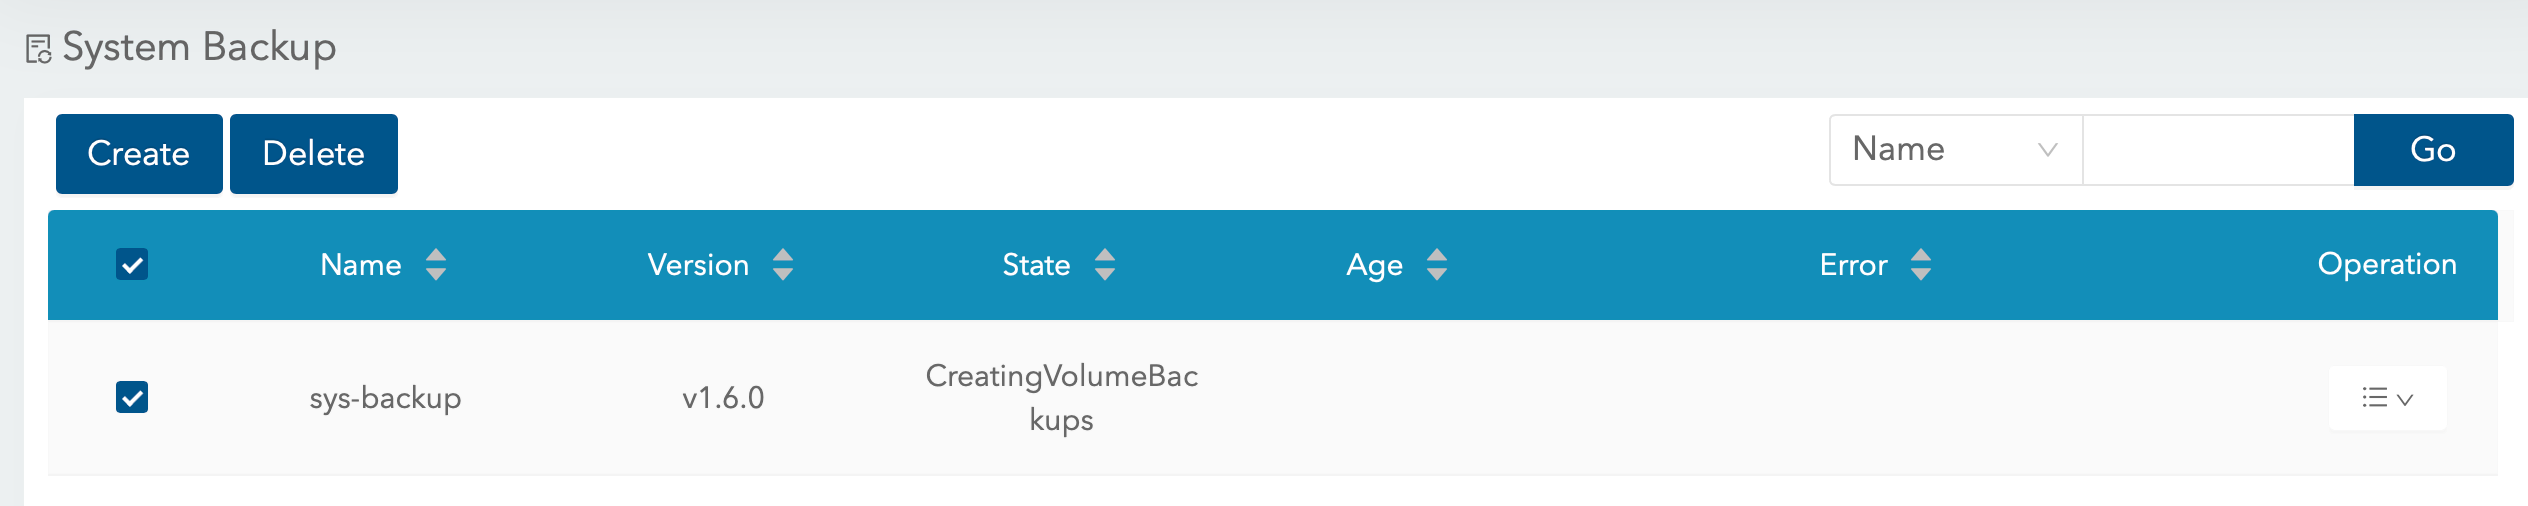
-
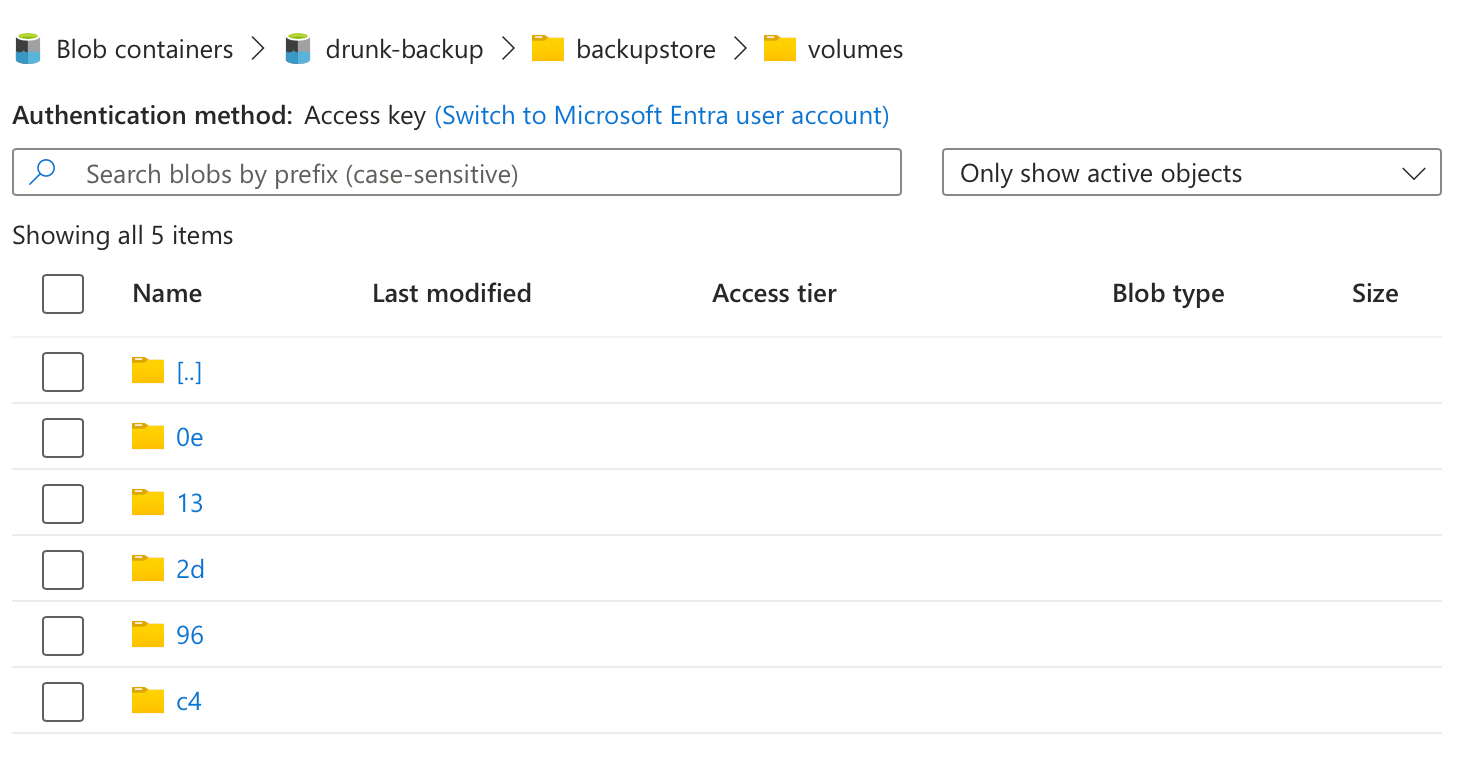
You should be able to see the data being backed up into the Azure Storage Container.
Thank you for your time! If you have any further questions, feel free to ask. 🌟✨🎁
Steven GitHub