In our previous article, we were successfully installed NGINX on Kubernetes.Now, we’re going to take NGINX for a spin and use it to host the Outline VPN on Kubernetes and open up our connection ports.
You’re probably aware that by default, Outline VPN changes the client port each time a new connection is made. It can be a bit of a challenge when we need to expose the ports through NGINX and get the outbound port on the whitelist at the firewall level.
However, there is a feature that allows us to modify the Outline VPN’s default configuration during deployment. With this little tweak, we can get all connections to pass through a single port and manage to expose both the management and client ports through NGINX. Stick with us as we walk you through this process.
Install Outline VPN
Before proceeding with the installation of the Outline, it’s essential to define some variables as follows:
- Management Port (60000): This port facilitates the connection between the Outline Manager and the VPN server.
- Client Port (40000): This port is assigned for client devices to establish a connection with the VPN server.
- Hostname (vpn.drunkcoding.net): This DNS (Domain Name Server) allows client devices to communicate with the VPN server from the public internet.
- Let’s start with a new Outline-system namespace creation.
kubectl create namespace outline-system- Create a Self-sign certificate
To install Outline VPN, a required certificate plays multiple crucial roles:
-
Server Authentication: This certificate is key in verifying the VPN server you’re connecting to is the genuine one.
-
Data Encryption: This certificate establishes the encryption for all data transmissions between your device and the VPN server. If someone happens to intercept the data, they won’t be able to decipher it due to this encryption.
-
Secured Connection Assurance: This essential certificate ensures the connection between the client devices and the VPN server is both private and secure. This is particularly crucial when connecting from insecure networks like public Wi-Fi.
Let’s generate a self-signed certificate. It can be accomplished through various methods, each tailored to specific environments.
Here, we’ll be using OpenSSL as an example. The commands illustrating this process are detailed below:
# 1. Create private key
openssl genrsa -out private.key 2048

# 2. Create a Certificate Signing Request (CSR) using the private key with some parameters as below:
#-----
# - Country Name (2 letter code) [AU]:VN
# - State or Province Name (full name) [Some-State]:VN
# - Locality Name (eg, city) []:HCM
# - Organization Name (eg, company) [Internet Widgits Pty Ltd]:drunkcoding
# - Organizational Unit Name (eg, section) []:DCN
# - Common Name (e.g. server FQDN or YOUR name) []:vpn.drunkcoding.net
# - Email Address []:[email protected]

# - Please enter the following 'extra' attributes
# - to be sent with your certificate request
# - A challenge password []:123456
# - An optional company name []:DCN
openssl req -new -key private.key -out csr_request.csr

# 3. Create a self-signed certificate
openssl x509 -req -days 365 -in csr_request.csr -signkey private.key -out cert.crt
Once the certificate is generated, following command to import into kubernetes cluster.
kubectl create secret tls tls-outline-vpn-imported --cert=cert.crt --key=private.key --namespace=outline-system- Deploy Outline Service with following
outline-deployment.yamlfile.
- PersistentVolumeClaim: A PersistentVolumeClaim named outline-vpn-claim is created which requests storage is being created in the namespace outline-system to store the configuration of Outline VPN.
- Deployment: A Deployment named outline-vpn is being created in the namespace outline-system. With this Deployment, a Pod is created with a container that uses the image quay.io/outline/shadowbox:stable. The container defines two TCP ports (40000, 60000) to expose.
- Service: A Service named outline-vpn is configured to expose the Pods and expose the ports (40000 and 60000) for both TCP and UDP protocols.
# 1. PersistentVolume
apiVersion: v1
kind: PersistentVolumeClaim
metadata:
name: outline-vpn-claim
namespace: outline-system
status:
phase: Bound
accessModes:
- ReadWriteOnce
capacity:
storage: 5Gi
spec:
accessModes:
- ReadWriteOnce
resources:
requests:
storage: 5Gi
#TODO: Remember to change `storageClassName` according to your environment.
storageClassName: local-path
volumeMode: Filesystem
---
#2. Pod Deployment
apiVersion: apps/v1
kind: Deployment
metadata:
name: outline-vpn
namespace: outline-system
spec:
replicas: 1
selector:
matchLabels:
app: outline-vpn
name: outline-vpn
template:
metadata:
labels:
app: outline-vpn
name: outline-vpn
spec:
volumes:
- name: server-config-volume
emptyDir: {}
- name: shadowbox-config
persistentVolumeClaim:
claimName: outline-vpn-claim
- name: tls
secret:
secretName: tls-outline-vpn-imported
items:
- key: tls.crt
path: shadowbox.crt
- key: tls.key
path: shadowbox.key
defaultMode: 420
containers:
- name: outline-vpn
image: quay.io/outline/shadowbox:stable
ports:
- containerPort: 40000
protocol: TCP
- containerPort: 60000
protocol: TCP
env:
- name: SB_API_PORT
value: "60000"
- name: SB_API_PREFIX
value: b782eecb-bb9e-58be-614a-d5de1431d6b3
- name: SB_CERTIFICATE_FILE
value: /tmp/shadowbox.crt
- name: SB_PRIVATE_KEY_FILE
value: /tmp/shadowbox.key
volumeMounts:
- name: server-config-volume
mountPath: /cache
- name: shadowbox-config
mountPath: /opt/outline
- name: shadowbox-config
mountPath: /root/shadowbox
- name: tls
readOnly: true
mountPath: /tmp/shadowbox.crt
subPath: shadowbox.crt
- name: tls
readOnly: true
mountPath: /tmp/shadowbox.key
subPath: shadowbox.key
lifecycle:
postStart:
exec:
command:
- /bin/sh
- "-c"
- >-
echo
'{"rollouts":[{"id":"single-port","enabled":true}],"portForNewAccessKeys":40000,"hostname":"vpn.drunkcoding.net"}'
>
/root/shadowbox/persisted-state/shadowbox_server_config.json;
imagePullPolicy: Always
restartPolicy: Always
terminationGracePeriodSeconds: 30
strategy:
type: RollingUpdate
rollingUpdate:
maxUnavailable: 25%
maxSurge: 25%
revisionHistoryLimit: 10
progressDeadlineSeconds: 600
---
# 3. Service
apiVersion: v1
kind: Service
metadata:
name: outline-vpn
namespace: outline-system
labels:
app: outline-vpn
spec:
ports:
- name: apiport-tcp
protocol: TCP
port: 60000
targetPort: 60000
- name: apiport-udp
protocol: UDP
port: 60000
targetPort: 60000
- name: accessport-tcp
protocol: TCP
port: 40000
targetPort: 40000
- name: accessport-udp
protocol: UDP
port: 40000
targetPort: 40000
selector:
app: outline-vpn
type: ClusterIP
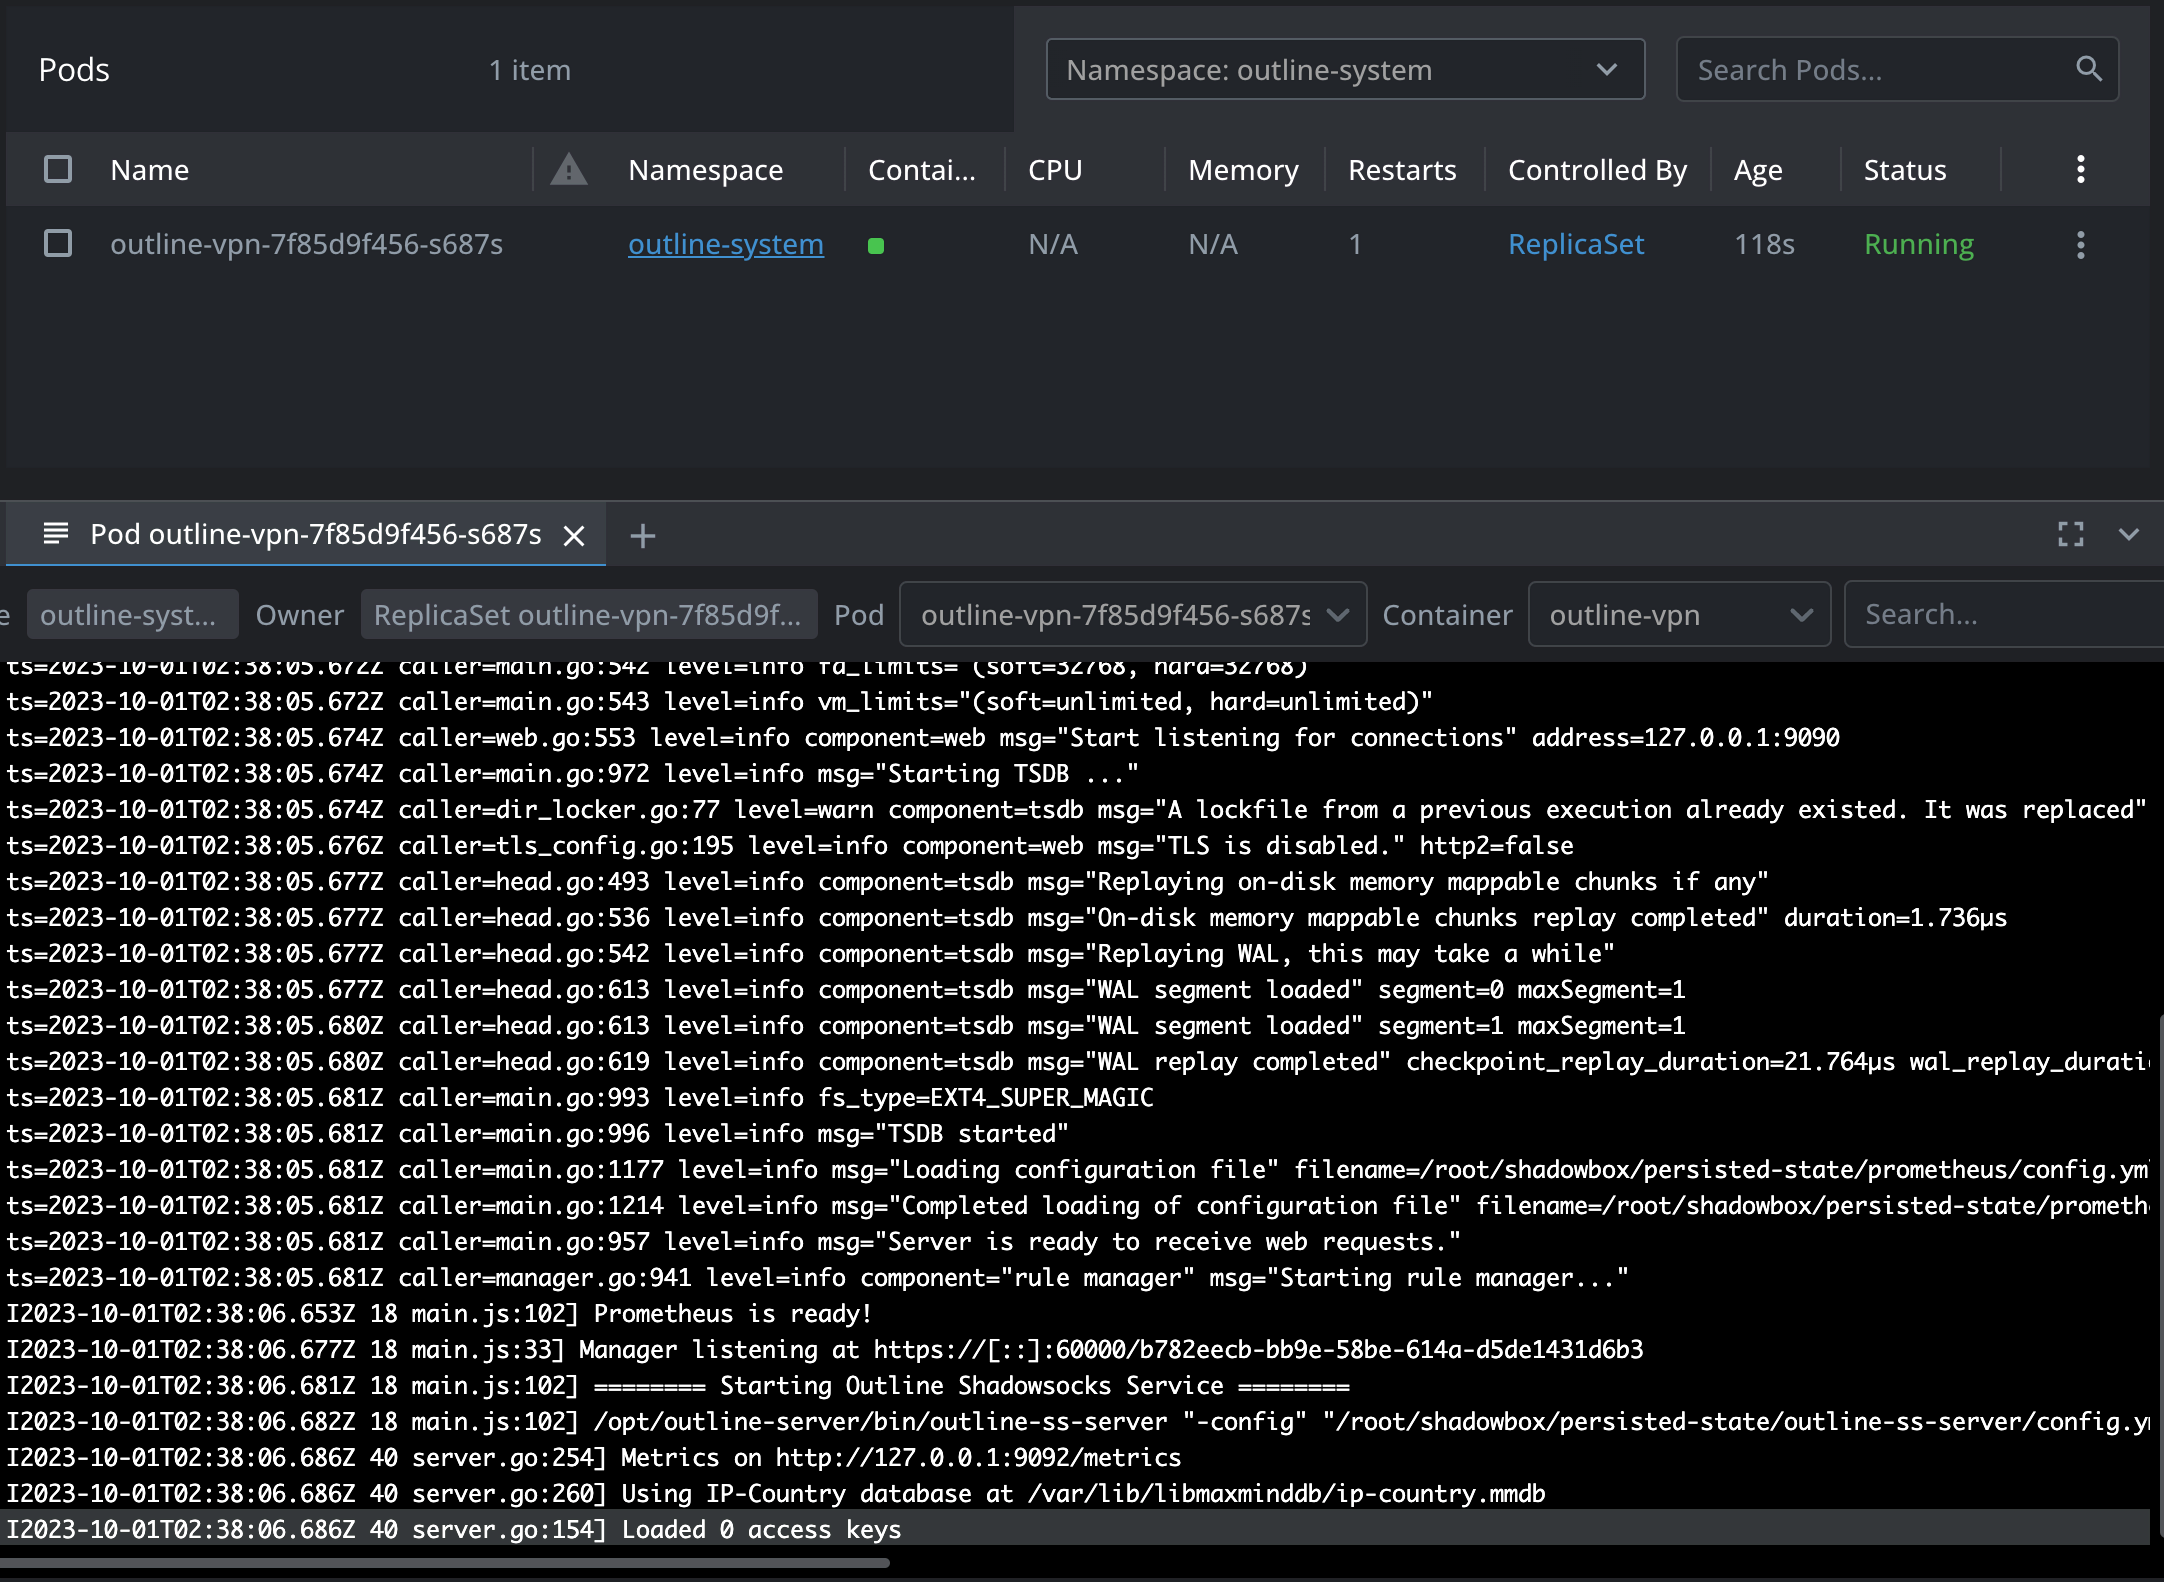
internalTrafficPolicy: ClusterApply it on the cluster:
kubectl apply -f outline-deployment.yamlUpon successful deployment, you should be able to see a pod along with its corresponding logs as in the screenshot below.
PostStart command & Environment variables explanation
In the deployment lifecycle configuration above, there is a postStart command that creates a JSON file located at /root/shadowbox/persisted-state/shadowbox_server_config.json.
The structure of the JSON object should look like this:
{
  "rollouts": [
    {
      "id": "single-port",
      "enabled": true
    }
  ],
  "portForNewAccessKeys": 40000,
  "hostname": "vpn.drunkcoding.net"
}
Let’s break down the components of the JSON configuration for the Outline VPN:
- rollouts: This has an ID ‘single-port’, indicating to the Outline VPN that client connections are to be allowed on this single port.
- portForNewAccessKeys: This represents the port number (40000), where new access keys will be created.
- hostname: This refers to the domain name or IP address of the VPN server the clients will connect to, in this case being “vpn.drunkcoding.net”.
There are also a few environment variables to acknowledge:
- SB_API_PORT: It denotes the port exposed by the Outline Management API.
- SB_API_PREFIX: It’s a random GUID to be used as a prefix on the Outline Management API.
- SB_CERTIFICATE_FILE: It points to a file, /tmp/shadowbox.crt, which corresponds to the certificate we created earlier.
- SB_PRIVATE_KEY_FILE: This points to the path of the private key file. In this case, it’s /tmp/shadowbox.key. This file matches the aforementioned certificate.
Exposing connection ports through nginx
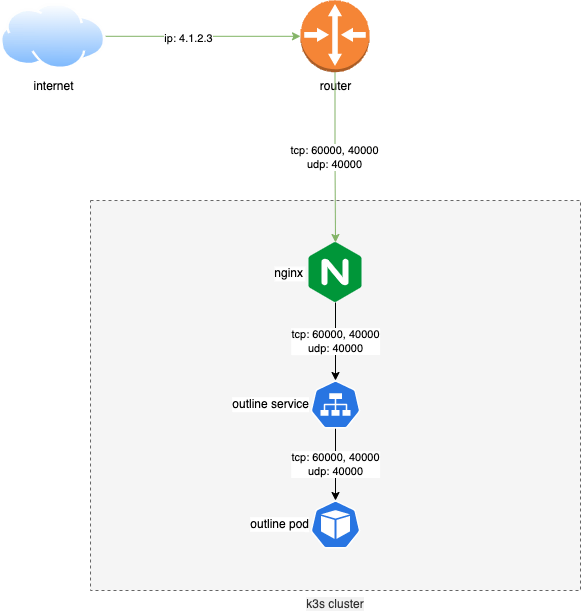
Once we’ve completed the installation as mentioned above, our Outline Container will be active and providing services on ports 60000 and 40000. Currently, this service is confined to the Kubernetes network, meaning they can’t be accessed directly from external sources, such as the internet.
In order to make these services receptive to outside connections, we’ll need to expose the ports through NGINX.
The following illustration provides a visual representation on how to do this.
To begin with, we need to update the values.yaml file from our previous NGINX deployment. This configuration will open up the needed ports.
Here’s the template:
# Refer to line 155 and 160 here for details
# https://github.com/kubernetes/ingress-nginx/blob/main/charts/ingress-nginx/values.yaml

# 1. Expose the TCP with convention tcp: 'port':'namespace/service:port'
tcp:
  60000: "outline-system/outline-vpn:60000"
  40000: "outline-system/outline-vpn:40000"

# 2. Expose the UDP with convention udp: 'port':'namespace/service:port'
udp:
  40000: "outline-system/outline-vpn:40000"

controller:
  service:
    loadBalancerIP: "192.168.1.85"
After updating the values.yaml with the correct information, re-upgrade the helm chart using the command:
# 1. To install brand new nginx
helm install nginx ingress-nginx/ingress-nginx --values values.yaml -n nginx-ingress

# 2. To update the existing nginx
helm upgrade nginx ingress-nginx/ingress-nginx --values values.yaml -n nginx-ingress

# 3. TO delete existing nginx and re-install with step 1 above.
helm delete nginx -n nginx-ingress
Managing the Outline VPN
Follow these steps to manage your Outline VPN:
Step 1: Download the Outline Manager
Download the Outline Manager from Outline’s official website.
Step 2: Prepare the Connection Configuration
Prepare the connection configuration with the following parameters:
- apiUrl: Use the following format
https://{hostname}:{management-port}/{SB_API_PREFIX}. - certSha256: This is the thumbprint of the certificate created. Use the following command to access the thumbprint:
echo SHA=$(openssl x509 -noout -fingerprint -sha256 -inform pem -in cert.crt | sed "s/://g" | sed 's/.*=//')Step 3: Generate the Configuration
Our configuration should look like this:
{
"apiUrl": "https://vpn.drunkcoding.net:60000/b782eecb-bb9e-58be-614a-d5de1431d6b3",
"certSha256": "34B3C8EB1C6EC9B5335556D7E8DC73A30152D27C66B054BAB8ACF5D11AE0C810"
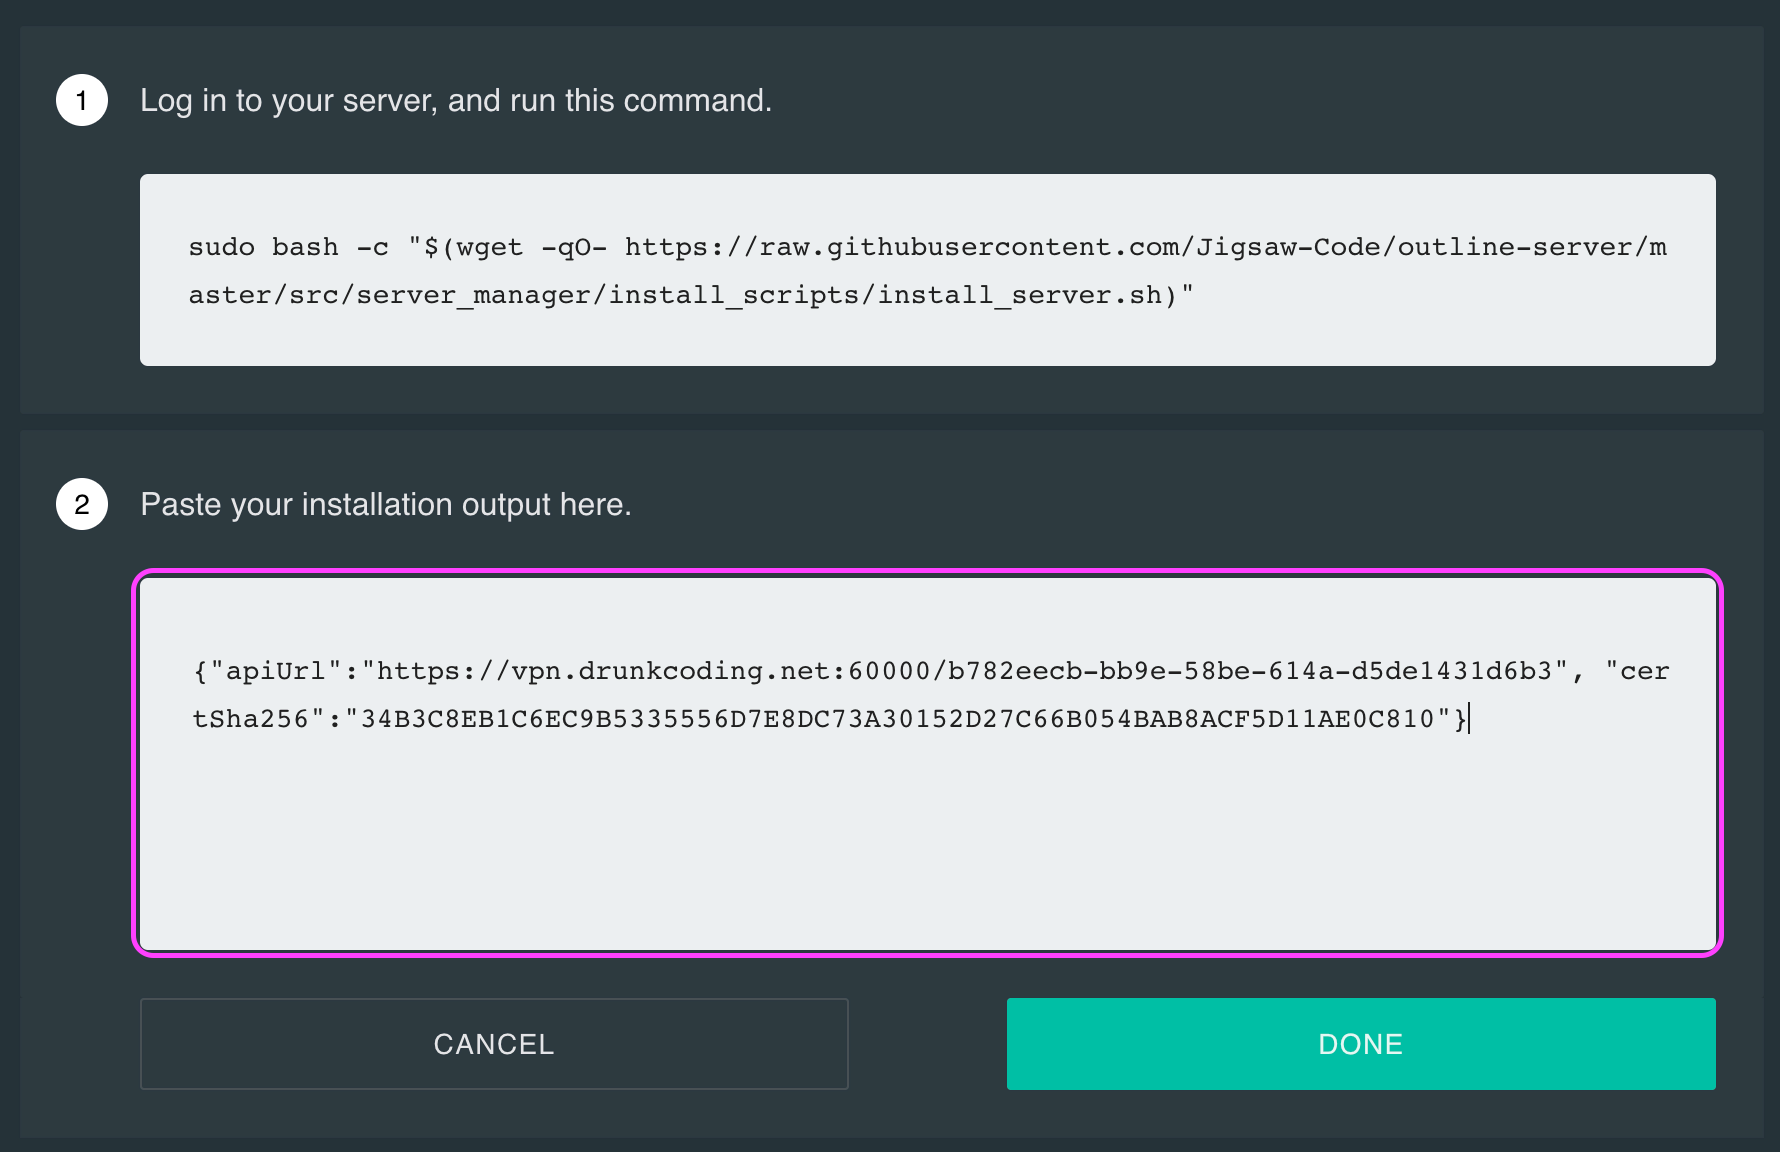
}Step 4: Setup Outline Anywhere
Open the Outline Manager App and click Setup Outline Anywhere. Paste the configuration into the second input box and click Done. .
Step 5: Connect to the Outline VPN Server
On successful configuration, you should be able to connect to the Outline VPN server as shown below:
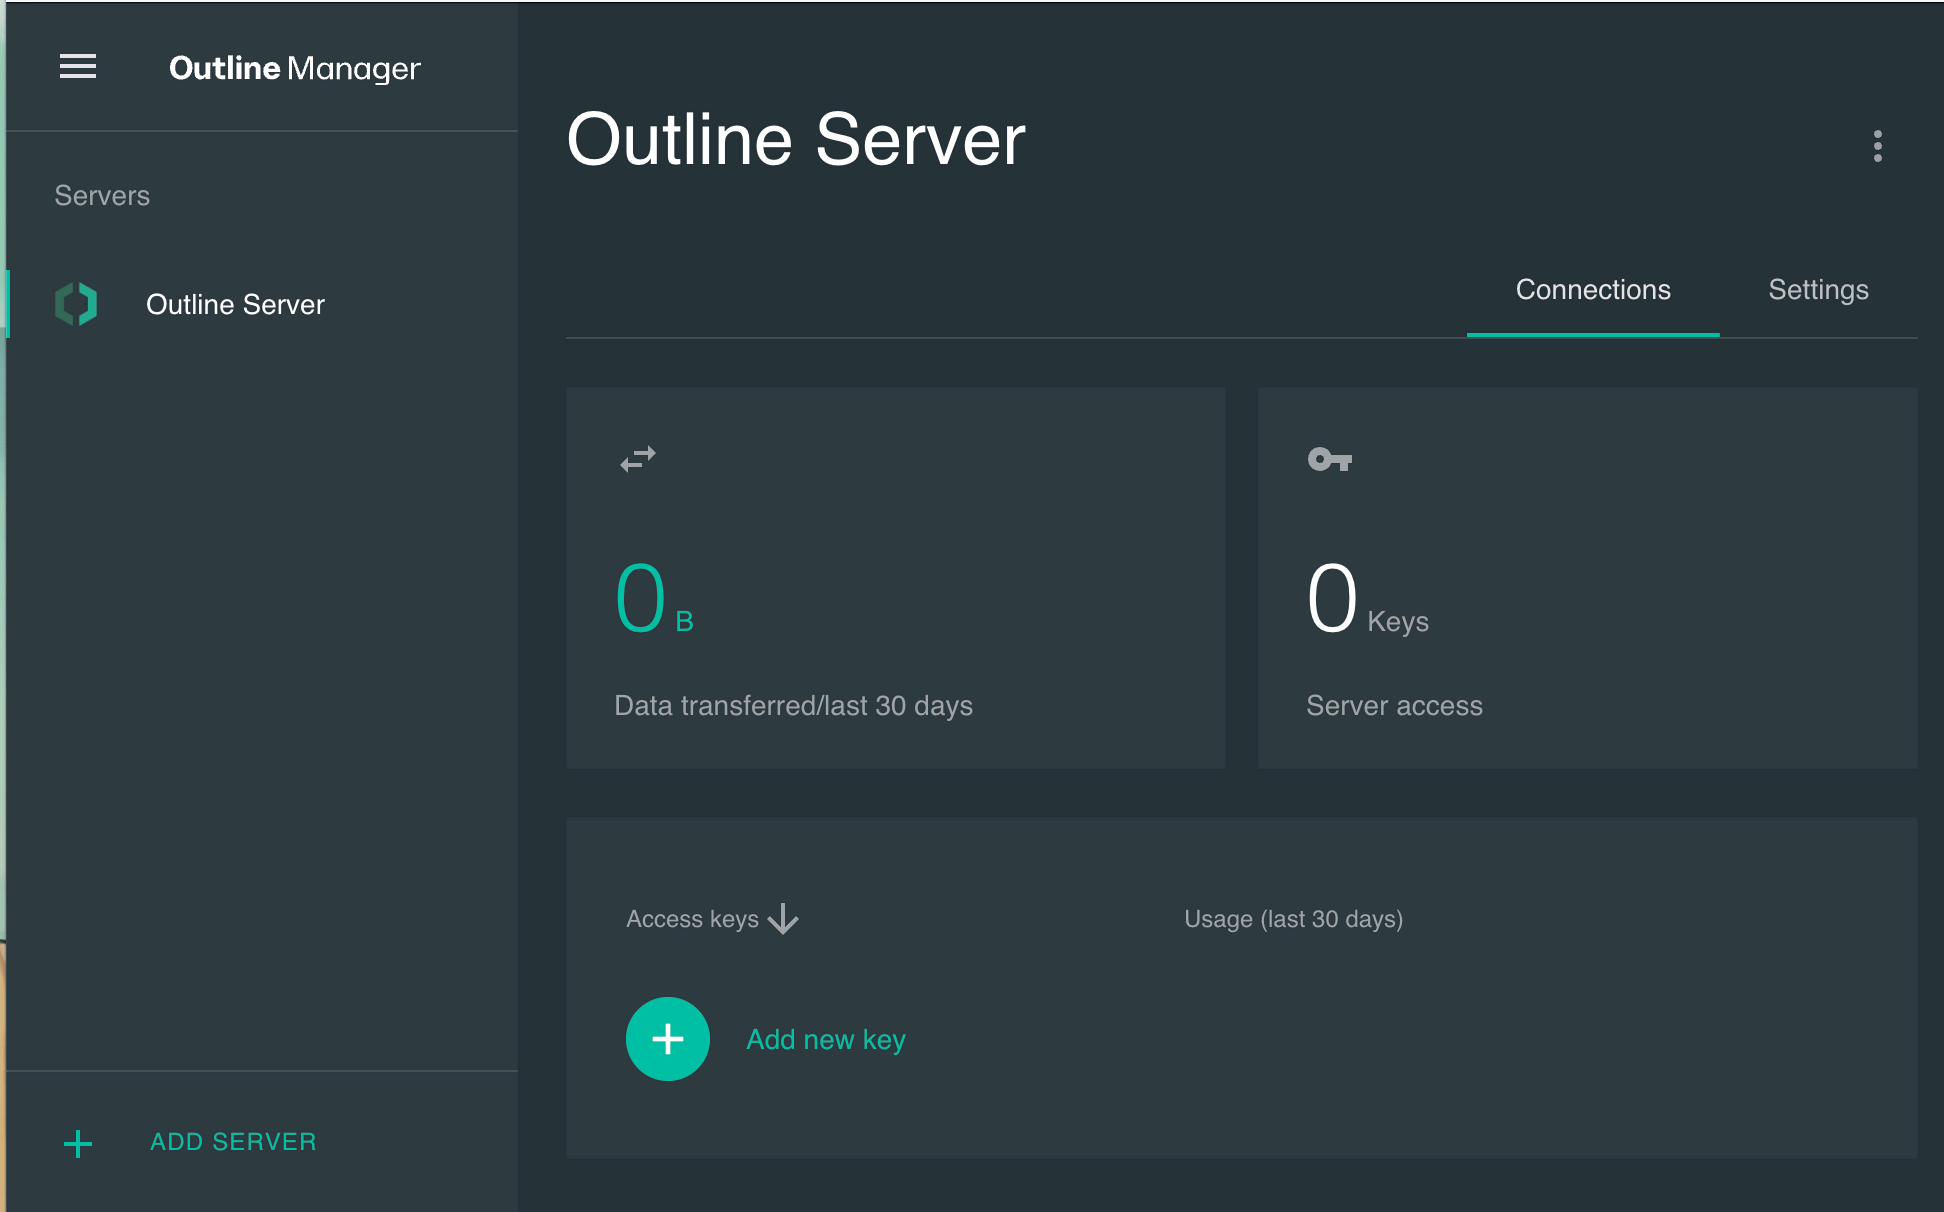
Step 6: Create a Connection
To allow the clients to connect to the server, click Add new key to create a connection and note down the access key:
ss://Y2hhY2hhMjAtaWV0Zi1wb2x5MTMwNTpQc1YxY0V0ZkhzSVFueEJFVEVsMFRF@vpn.drunkcoding.net:40000/?outline=1Getting Started with the Outline Client
To get started with the VPN, follow the steps below:
-
Begin by navigating to the Outline official website to download the client application. Be sure to select the version compatible with your platform architecture.
-
Launch the client application. Select Add Access Key, then input the access key mentioned above. Afterward, click on Add Server.

-
Proceed by clicking on the ‘Connect’ button to establish a connection.
-
To verify the VPN server’s capability, access myip.info. Upon successful connection, your public IP address should reflect the Kubernetes outbound public IP. This means the VPN server is functioning as expected.
Thank you for your time! If you have any further questions, feel free to ask. 🌟✨🎁
Steven GitHub