In the previous articles we successfully:
- Install kubernetes cluster.
- Install Ngix on cluster.
- Install SSL for Ingress with Cert-Manager or with Cloudflare SSL.
However, to expose our services to the internet, it’s essential to obtain a Static Public IP Address and configure the router/firewall to open ports 80 and 443. If for any reason we’re unable to meet these requirements, we won’t be able to expose our services online.
In addition, if our organization relies on private Kubernetes on cloud platforms such as AKS, EKS, or GKS, and we wish to expose a select set of services to the internet without jeopardizing security, we might consider using Cloudflare Tunnel.
Let’s delve into this topic further.
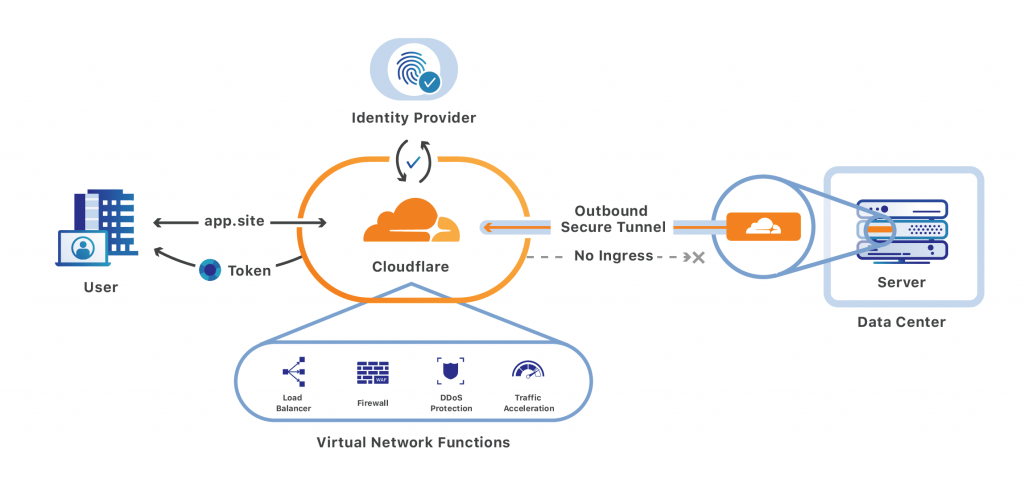
Cloudflare Tunnel Configuration
-
This guide assumes that we have followed the instructions from our previous post, and configured Cloudflare account with at least one onboarded domain.
-
The next step is to create a Cloudflare Zero Trust Account. While creating this account might require adding a payment method, please note that there are no charges for the first 50 users. You can proceed to register without any hesitation.

- Once logged in, navigate to Access => Tunnel and create a new tunnel. For the purposes of this guide, we’ll name it
pi-k3s. After creating the tunnel, make sure to copy the tunnel token that appears (similar to the one below):
eyJhIjoiYWVlMGFjYzZiYejTkz....yzCfgm7oqfnhz2DrJDKyL8PBDr9hR5FvYgDR45TxPiAxbmVW=- Finally, ensure we click the Save button to confirm the creation of the tunnel.
Kubernetes Tunnel Installation
- Create cloudflare Namespace. It’s a good practice to install the tunnel in its own namespace. Use this command:
kubectl create namespace cloudflare- Create the
cloudflare-tunnel.yamldeployment file as below:
apiVersion: v1
kind: Secret
metadata:
  name: cloudflare-tunnel
  namespace: cloudflare
  labels:
    app: cloudflare-tunnel
type: Opaque
stringData:
  # the cloudflare tunnel token here
  token: 'eyJhIjoiYWVlMGFjYzZiYejTkz....yzCfgm7oqfnhz2DrJDKyL8PBDr9hR5FvYgDR45TxPiAxbmVW='
---
apiVersion: apps/v1
kind: Deployment
metadata:
  name: cloudflare-tunnel
  namespace: cloudflare
  labels:
    app: tunnel
spec:
  replicas: 2
  selector:
    matchLabels:
      app: cloudflare-tunnel
  template:
    metadata:
      labels:
        app: cloudflare-tunnel
    spec:
      containers:
        - name: cloudflare-tunnel
          image: cloudflare/cloudflared:latest
          args:
            - tunnel
            - '--no-autoupdate'
            - run
            - '--token'
            - $(token)
          envFrom:
            - secretRef:
                name: cloudflare-tunnel
          resources:
            limits:
              cpu: 500m
              memory: 512Mi
            requests:
              cpu: 1m
              memory: 10Mi
          imagePullPolicy: Always
          securityContext:
            readOnlyRootFilesystem: true
      restartPolicy: Always
      terminationGracePeriodSeconds: 30
      dnsPolicy: ClusterFirst
      automountServiceAccountToken: false
  strategy:
    type: RollingUpdate
    rollingUpdate:
      maxUnavailable: 25%
      maxSurge: 25%
  revisionHistoryLimit: 1
progressDeadlineSeconds: 600- Install Cloudflare tunnel:
kubectl apply -f cloudflare-tunnel.yaml- Verify running pods after deployed.

- Back to the Cloudflare Zero Trust the tunnel status should be in
Healthalso.

Exposing the Application to the Internet
- Navigate to the tunnel configuration page. Under the ‘Public Host’ section, add a public host name to expose our
echo serviceto the internet. See the example below.
Note: Kubernetes internal service URLs follow the convention: http://{service-name}.{namespace}.svc.cluster.local.

-
Verify the performance of the application by visiting
https://echo.drunkcoding.net. The service should be accessible without any constraints. -
I have established two endpoints as follows and conducted a load test using Postman. The results were astonishing as the Cloudflare tunnel delivered speeds even greater than direct access via Nginx.
- echo-nginx.drunkcoding.net: This endpoint provides access to the echo application through Nginx ingress and with a public IP address.
- echo.drunkcoding.net: This endpoint offers access to the echo application through the Cloudflare tunnel.
Please see the results in the attached image.

Note: The cluster hosting this application is based in Singapore, while the test was conducted from a terminal in Vietnam.
Concluding Remarks
Leveraging Cloudflare tunnels simplifies application exposure to the internet without the necessity of below:
- A public IP Address.
- Port forwarding.
- Firewall whitelisting.
- Nginx proxy/ingress.
- A Cert-manager or Cloudflare origin server certificate.
This results in a significantly simplified infrastructure setup.
Thank you for your time! If you have any further questions, feel free to ask. 🌟✨🎁
Steven GitHub