Introduction
In this tutorial, We will walk through creating a Continuous Integration and Continuous Deployment (CI/CD) pipeline on Azure DevOps for our Pulumi projects.
Table of Contents
Open Table of Contents
Prerequisites
Ensure you have:
- An Azure DevOps account with a project.
- Pulumi extensions for Azure DevOps.
- Permissions to deploy resources in your Azure subscription.
Preparation
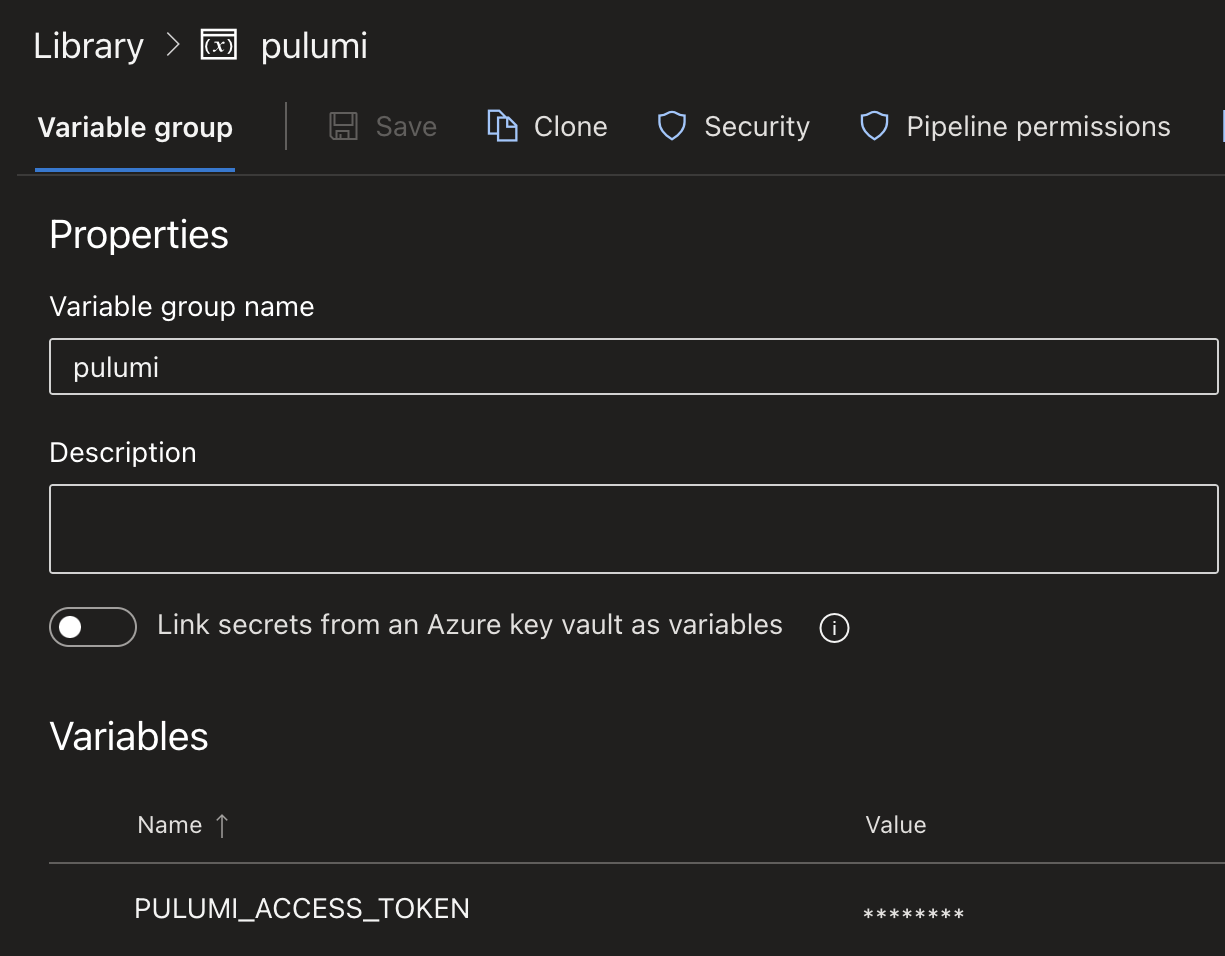
Pulumi Variable Group
Create a variable group in Azure DevOps Libraries named pulumi, and add the PULUMI_ACCESS_TOKEN variable:
Setting Up Azure Resource Management Connection
-
Navigate to Service connections in Azure DevOps and create a new Azure Workload Identity connection named
az-pulumifor Azure Resource Management: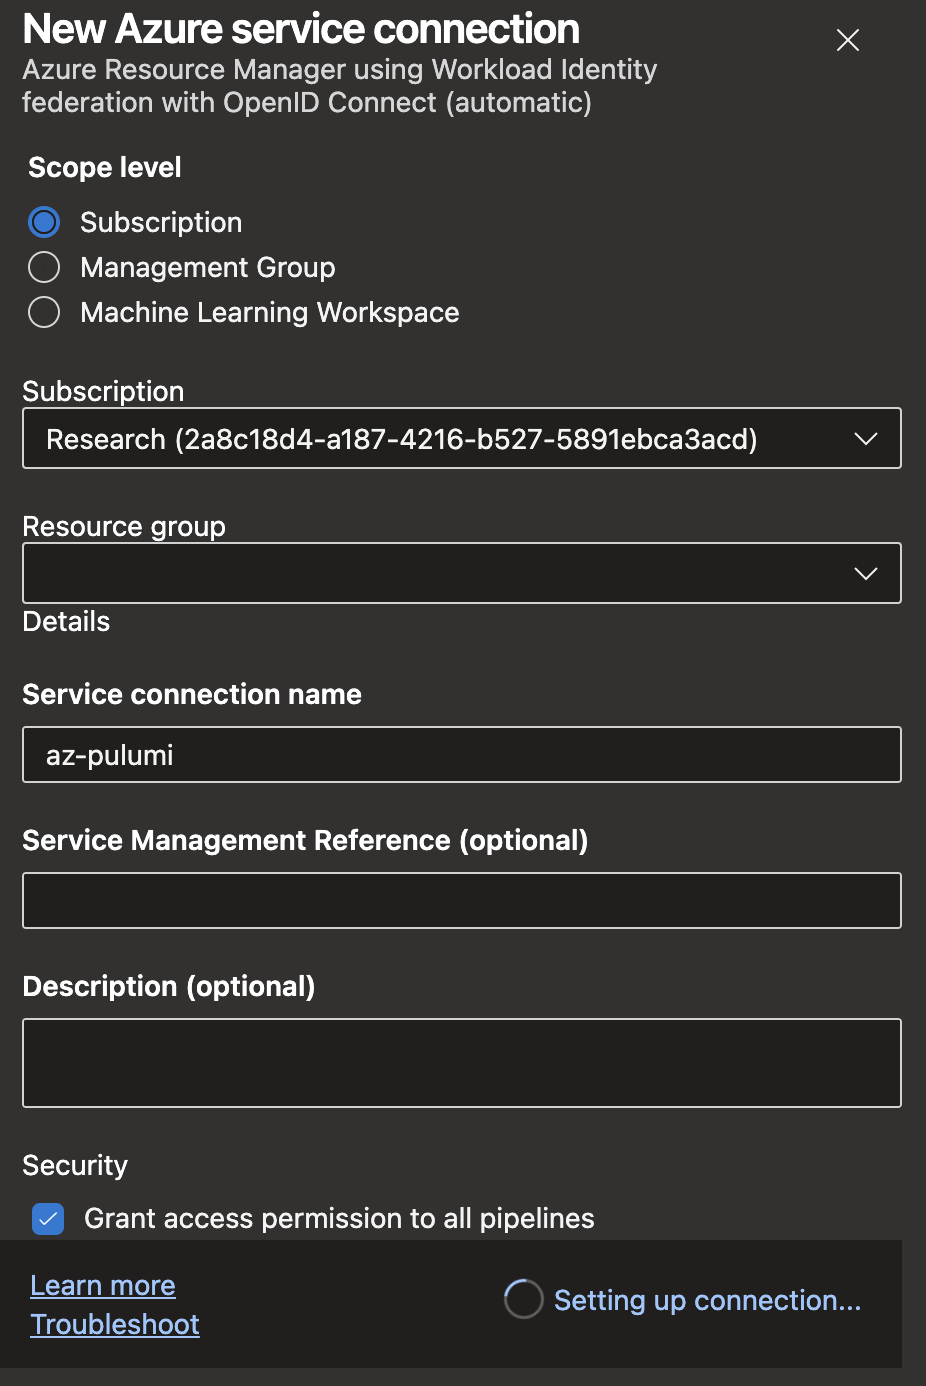
Note: Specifying a resource group is optional. This can be used to restrict the connection’s access to a specific resource group if needed.
-
Once the service connection is established, verify the app registration presence in the Azure Portal here:
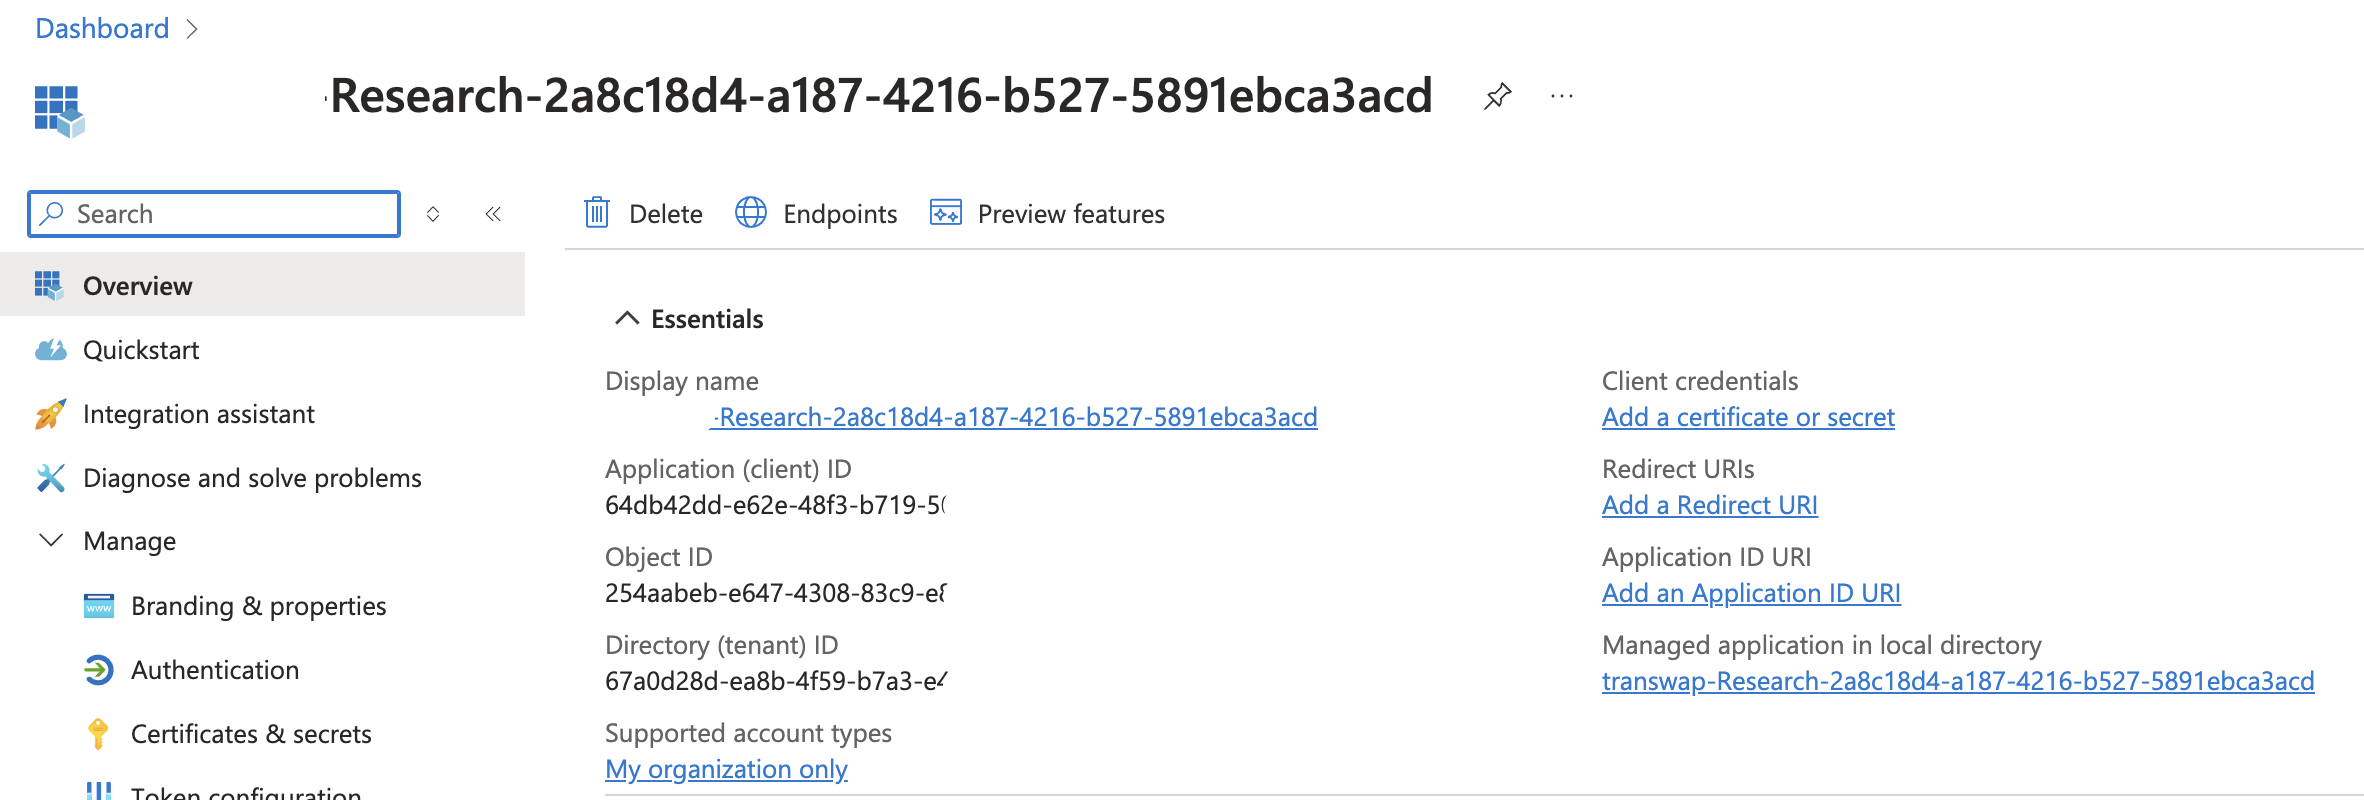
The app registration on Azure Portal
-
Ensure the app registration has enough permissions for deployment:
- As an
OwnerandKey Vault Administratorroles at the subscription level. - Microsoft Graph permissions to provide it with the necessary privileges for comprehensive deployment operations.
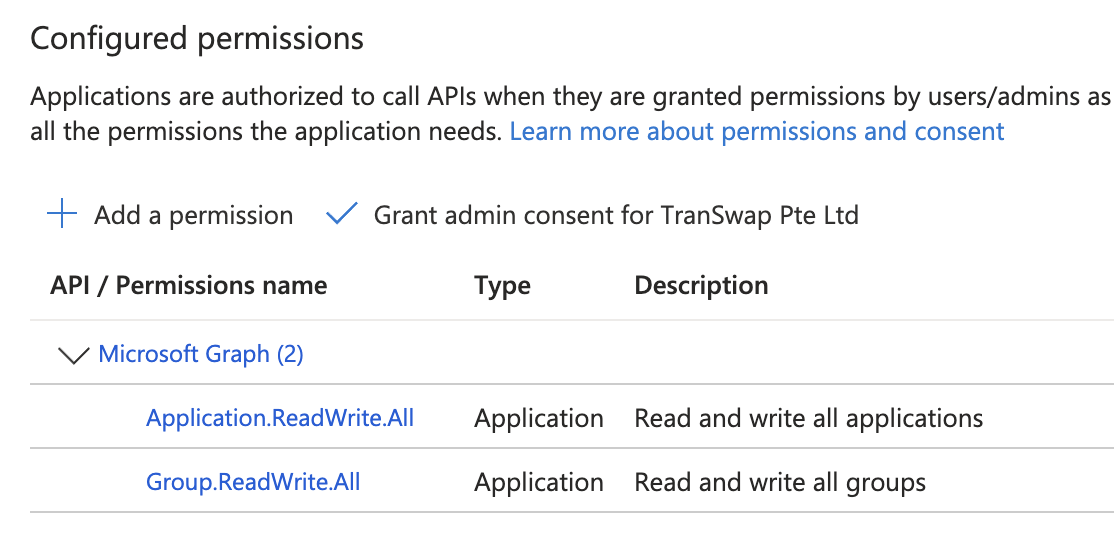
The API permission of the app registration
- As member of
AZ ROL DEV-AKS-ADMINEntra Group: This is necessary for granting the permissions for Helm deployment on AzureDevOps.
- As an
Deployment Templates
For reusability, several templates have been developed:
Build Template: build-template.yml
-
Parameters:
- stack: Specifies the target Pulumi stack.
- workDir: Defines the working directory of the Pulumi project.
-
Steps:
- Install Node.js: Install current Node LTS version.
- Setup pnpm: Configures
pnpmpackage management. - Build Commons Project: Installs dependencies and runs the build script for
az-commons. - Install Project Dependencies: Installs dependencies for the specified
workDir.
View yaml:
parameters:
- name: stack
  type: string
- name: workDir
  type: string

steps:
- checkout: self
  submodules: true
  persistCredentials: true

#install node
- task: NodeTool@0
  displayName: "install node"
  inputs:
    versionSpec: "20.x"

# setup pnpm
- script: |
    corepack enable
    corepack prepare pnpm@latest-9 --activate
    pnpm config set store-dir $(pnpm_config_cache)
  displayName: "Setup pnpm"

# build commons
- script: |
    pnpm install
    pnpm run build
  displayName: "build az-commons"
  workingDirectory: az-commons

# install current directory
- script: pnpm install
  displayName: "install ${{ parameters.workDir }}"
  workingDirectory: ${{ parameters.workDir }}
Deployment Template: deploy-template.yml
-
Parameters:
- stack: Specifies the target Pulumi stack.
- workDir: Defines the working directory of the Pulumi project.
- azureSubscription: Represents the Azure subscription connection.
-
Steps:
- Install Pulumi CLI: Install the latest version of the Pulumi CLI for Linux.
- Pulumi Refresh: Refreshes the stack if the
pulumi.refreshparameter is set to true. - Pulumi Up After Refresh: Executes
pulumi upifpulumi.refreshis true, ensuring the stack is updated after a refresh. - Pulumi Up: Executes
pulumi upto deploy the stack.
View yaml:
parameters:
- name: stack
  type: string
- name: workDir
  type: string
- name: azureSubscription
  type: string

steps:
#ensure the pulumi cli is installed
- task: Bash@3
  displayName: install latest pulumi
  inputs:
    targetType: 'inline'
    script: 'curl -fsSL https://get.pulumi.com | sh'

#Pulumi Refresh
- task: Pulumi@1
  displayName: "pulumi refresh"
  continueOnError: true
  condition: eq(variables['pulumi.refresh'], 'true')
  env:
    PULUMI_ACCESS_TOKEN: $(PULUMI_ACCESS_TOKEN)
    NODE_OPTIONS: '--max-old-space-size=8192'
  inputs:
    azureSubscription: ${{ parameters.azureSubscription }}
    command: "refresh"
    cwd: ${{ parameters.workDir }}
    stack: ${{ parameters.stack }}
    args: "--yes --skip-preview"

- task: Pulumi@1
  displayName: "pulumi up after refresh"
  condition: eq(variables['pulumi.refresh'], 'true')
  continueOnError: true
  env:
    PULUMI_ACCESS_TOKEN: $(PULUMI_ACCESS_TOKEN)
    NODE_OPTIONS: '--max-old-space-size=8192'
  inputs:
    azureSubscription: ${{ parameters.azureSubscription }}
    command: "up"
    cwd: ${{ parameters.workDir }}
    stack: ${{ parameters.stack }}
    args: "--yes --skip-preview"

#Pulumi Up
- task: Pulumi@1
  displayName: "pulumi up"
  continueOnError: false
  env:
    PULUMI_ACCESS_TOKEN: $(PULUMI_ACCESS_TOKEN)
    NODE_OPTIONS: '--max-old-space-size=8192'
  inputs:
    azureSubscription: ${{ parameters.azureSubscription }}
    command: "up"
    cwd: ${{ parameters.workDir }}
    stack: ${{ parameters.stack }}
    args: "--yes --skip-preview"
Using Pulumi refresh is essential for maintaining an accurate state. For more details, refer to this article.
Pulumi Deployment Pipeline
To establish a deployment pipeline in Azure DevOps, We’ll create a new pipeline and use the deploy.azure-pipelines.yml file.
YAML Configuration
- Trigger: The pipeline is set to trigger automatically for branches matching the pattern releases/*.
- Agent Pool: We use the ubuntu-latest agent pool for running our pipeline tasks.
- Variables: The configuration includes several key variables:
pulumi: A variable group containing essential Pulumi configuration settings.azureSubscription: The name of the Azure Resource Manager connection.pnpm_config_cache: The specified location for the pnpm cache.env_name: Dynamically derived from the branch name, determining the deployment environment.
Pipeline Structure and Flow
Our pipeline consists of four distinct deployment stages. Each stage utilizes the build-and-deploy.yml template file, with appropriate parameters passed to it.
To initiate the pipeline:
- Create a new branch named
releases/dev - Push the changes to this branch
- The pipeline will automatically trigger and run
Here’s a visual representation of the deployment sequence:
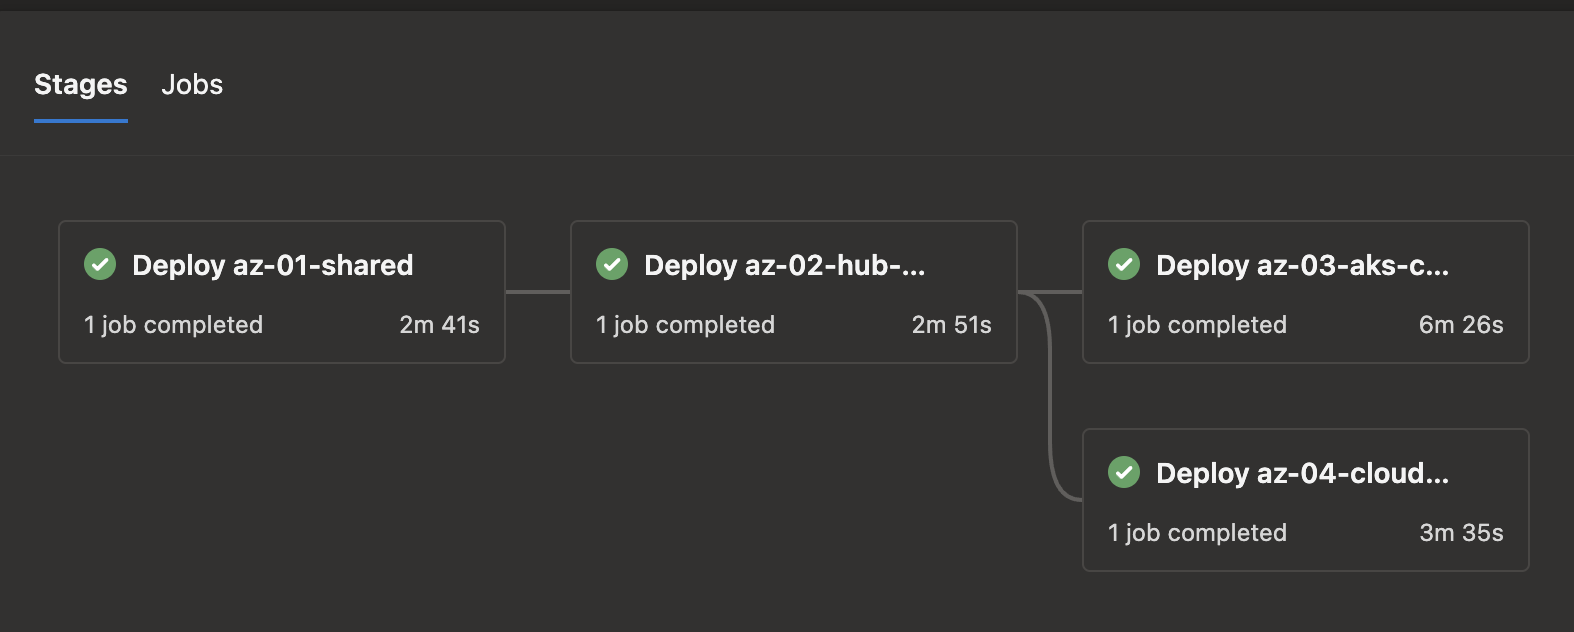
Visualization of the Deployment Pipeline Stages
The pipeline progresses through these stages in order, ensuring a systematic and controlled deployment process. Each stage builds upon the previous one, allowing for a comprehensive and structured approach to deploying our Pulumi projects.
View yaml:
trigger: none
# uncomment this to enable auto trigger.
#  branches:
#    include:
#    - releases/*
#    exclude:
#    - main
pr: none

pool:
  vmImage: ubuntu-latest

variables:
- group: pulumi
- name: azureSubscription
  value: 'az-pulumi'
- name: pnpm_config_cache
  value: $(Pipeline.Workspace)/.pnpm-store
# identity the enc based on branch name ex: dev, sandbox and prd
- name: env_name
  value: $[replace(variables['Build.SourceBranchName'], 'refs/heads/releases', '')]

stages:
# stage 1: az-01-shared
- stage: 'deploy_shared'
  displayName: 'Deploy az-01-shared'
  jobs:
  - template: build-and-deploy.yml
    parameters:
      workDir: 'az-01-shared'
      stack: $(env_name)
      azureSubscription: $(azureSubscription)

# stage 2: az-02-hub-vnet
- stage: 'deploy_hub'
  dependsOn: 'deploy_shared'
  displayName: 'Deploy az-02-hub-vnet'
  jobs:
  - template: build-and-deploy.yml
    parameters:
      workDir: 'az-02-hub-vnet'
      stack: $(env_name)
      azureSubscription: $(azureSubscription)

# stage 3: az-03-aks-cluster
- stage: 'deploy_aks'
  dependsOn: 'deploy_hub'
  displayName: 'Deploy az-03-aks-cluster'
  jobs:
  - template: build-and-deploy.yml
    parameters:
      workDir: 'az-03-aks-cluster'
      stack: $(env_name)
      azureSubscription: $(azureSubscription)

# stage 4: az-04-cloudPC
- stage: 'deploy_cloudpc'
  dependsOn: 'deploy_hub'
  displayName: 'Deploy az-04-cloudPC'
  jobs:
  - template: build-and-deploy.yml
    parameters:
      workDir: 'az-04-cloudPC'
      stack: $(env_name)
      azureSubscription: $(azureSubscription)
Pulumi Destroy Pipeline
This pipeline demonstrates how to safely destroy a Pulumi deployment stack. Exercise caution, as once a stack is destroyed, it cannot be restored.
To set up a destruction pipeline in Azure DevOps, use the danger-destroy.azure-pipelines.yml file.
The destruction states are reverted from the deployment state.
Here’s a visual representation of the deployment sequence:

Each stage in this process uses the
danger-build-and-destroy.ymlfile with the necessary parameters.
Visualization of the Destroy Pipeline
View yaml:
trigger: none
pr: none

pool:
  vmImage: ubuntu-latest

variables:
- group: pulumi
- name: azureSubscription
  value: 'az-pulumi'
- name: pnpm_config_cache
  value: $(Pipeline.Workspace)/.pnpm-store
- name: env_name
  value: $[replace(variables['Build.SourceBranchName'], 'refs/heads/releases', '')]

stages:
# stage 1: az-04-cloudPC
- stage: 'destroy_cloudpc'
  displayName: 'Destroy az-04-cloudPC'
  jobs:
  - template: danger-build-and-destroy.yml
    parameters:
      workDir: 'az-04-cloudPC'
      stack: $(env_name)
      azureSubscription: $(azureSubscription)

# stage 2: az-03-aks-cluster
- stage: 'destroy_aks_cluster'
  dependsOn: 'destroy_cloudpc'
  displayName: 'Destroy az-03-aks-cluster'
  jobs:
  - template: danger-build-and-destroy.yml
    parameters:
      workDir: 'az-03-aks-cluster'
      stack: $(env_name)
      azureSubscription: $(azureSubscription)

# stage 3: az-02-hub-vnet
- stage: 'destroy_hub_vnet'
  dependsOn: 'destroy_aks_cluster'
  displayName: 'Destroy az-02-hub-vnet'
  jobs:
  - template: danger-build-and-destroy.yml
    parameters:
      workDir: 'az-02-hub-vnet'
      stack: $(env_name)
      azureSubscription: $(azureSubscription)

# stage 4: az-01-shared
- stage: 'destroy__shared'
  dependsOn: 'destroy_hub_vnet'
  displayName: 'Destroy az-01-shared'
  jobs:
  - template: danger-build-and-destroy.yml
    parameters:
      workDir: 'az-01-shared'
      stack: $(env_name)
      azureSubscription: $(azureSubscription)
Conclusion
In this tutorial, we’ve successfully set up a CI/CD pipeline using Pulumi and Azure DevOps. This pipeline automates the deployment of infrastructure, ensuring that our environments are consistent, scalable, and easy to manage.
By leveraging Pulumi’s abilities, we can integrate infrastructure as code into our development workflows, enhancing both efficiency and reliability.
References
Next
Day 09: Synchronizing Container Images to ACR for a Private AKS Cluster Using CI/CD Pipelines.
In the next article, We explore the process of synchronizing container images with ACR for deployments in a private AKS cluster. We’ll cover how to configure and automate this synchronization using CI/CD pipelines, ensuring seamless updates and secure image management for private AKS environments.
Thank You
Thank you for taking the time to read this guide! We hope it has been helpful. Feel free to explore further and happy coding! 🌟✨
Steven | GitHub