Introduction
In the final tutorial of our series on establishing a private AKS environment on Azure with Pulumi, we confront a critical balancing act: ensuring secure access for developers and users without compromising the environment’s integrity.
While stringent security is paramount for compliance, excessive restrictions can hinder developer productivity by obstructing access to essential tools. This challenge is compounded by the rise of remote work, which necessitates robust solutions for managing devices and enforcing security policies beyond traditional network boundaries.
This is where Cloudflare WARP and its Zero Trust model come into play. WARP empowers us to grant secure, private access to corporate applications while meticulously verifying device health before connection. By routing traffic through Cloudflare’s global network, the WARP client allows for granular web filtering and robust security measures enforced by Cloudflare Gateway.
This approach offers a compelling solution for organizations with remote workforces, enhancing security while minimizing friction for users. By integrating Cloudflare Tunnel and WARP into our private AKS environment, we can strike a balance: enabling seamless developer access while upholding the integrity and security of our corporate network.
Table of Contents
Open Table of Contents
Prerequisites
Before diving into Cloudflare Tunnel and WARP, make sure you have the following set-up:
- Cloudflare Zero Trust: You need an active Cloudflare account with the Zero Trust feature enabled to set up a Cloudflare Tunnel.
- Microsoft Intune: Ensure Microsoft Intune is configured for Mobile Device Management (MDM) to manage your devices effectively.
- Test Device: We’ll demonstrate using a macOS virtual machine enrolled in the organization’s MDM. You can test with your enrolled device by following similar steps.

WARP Configuration
To begin, log into the Cloudflare Zero Trust dashboard and navigate to Settings > WARP Client and configure the following settings:
-
Device Enrollment Permissions:
-
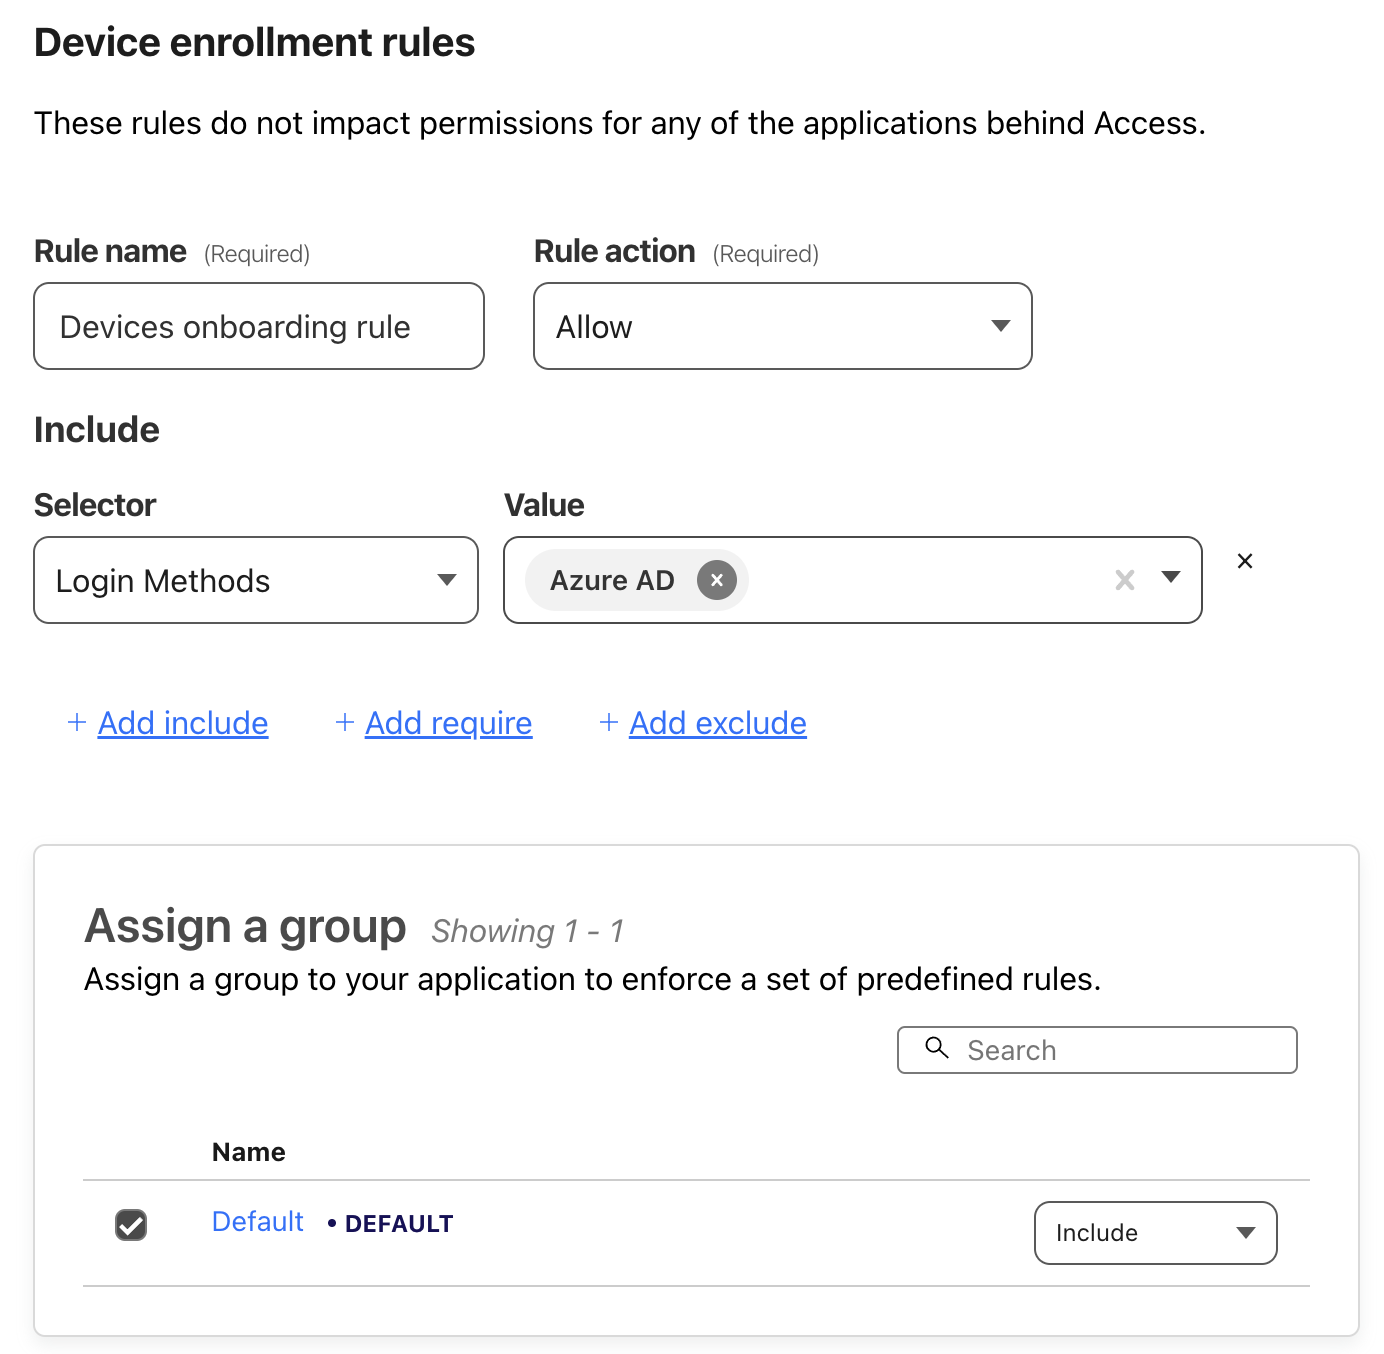
Device Enrollment Rules: Click the “Manage” button under the Device enrollment permissions section to add the necessary Device enrollment rules as depicted below.
-
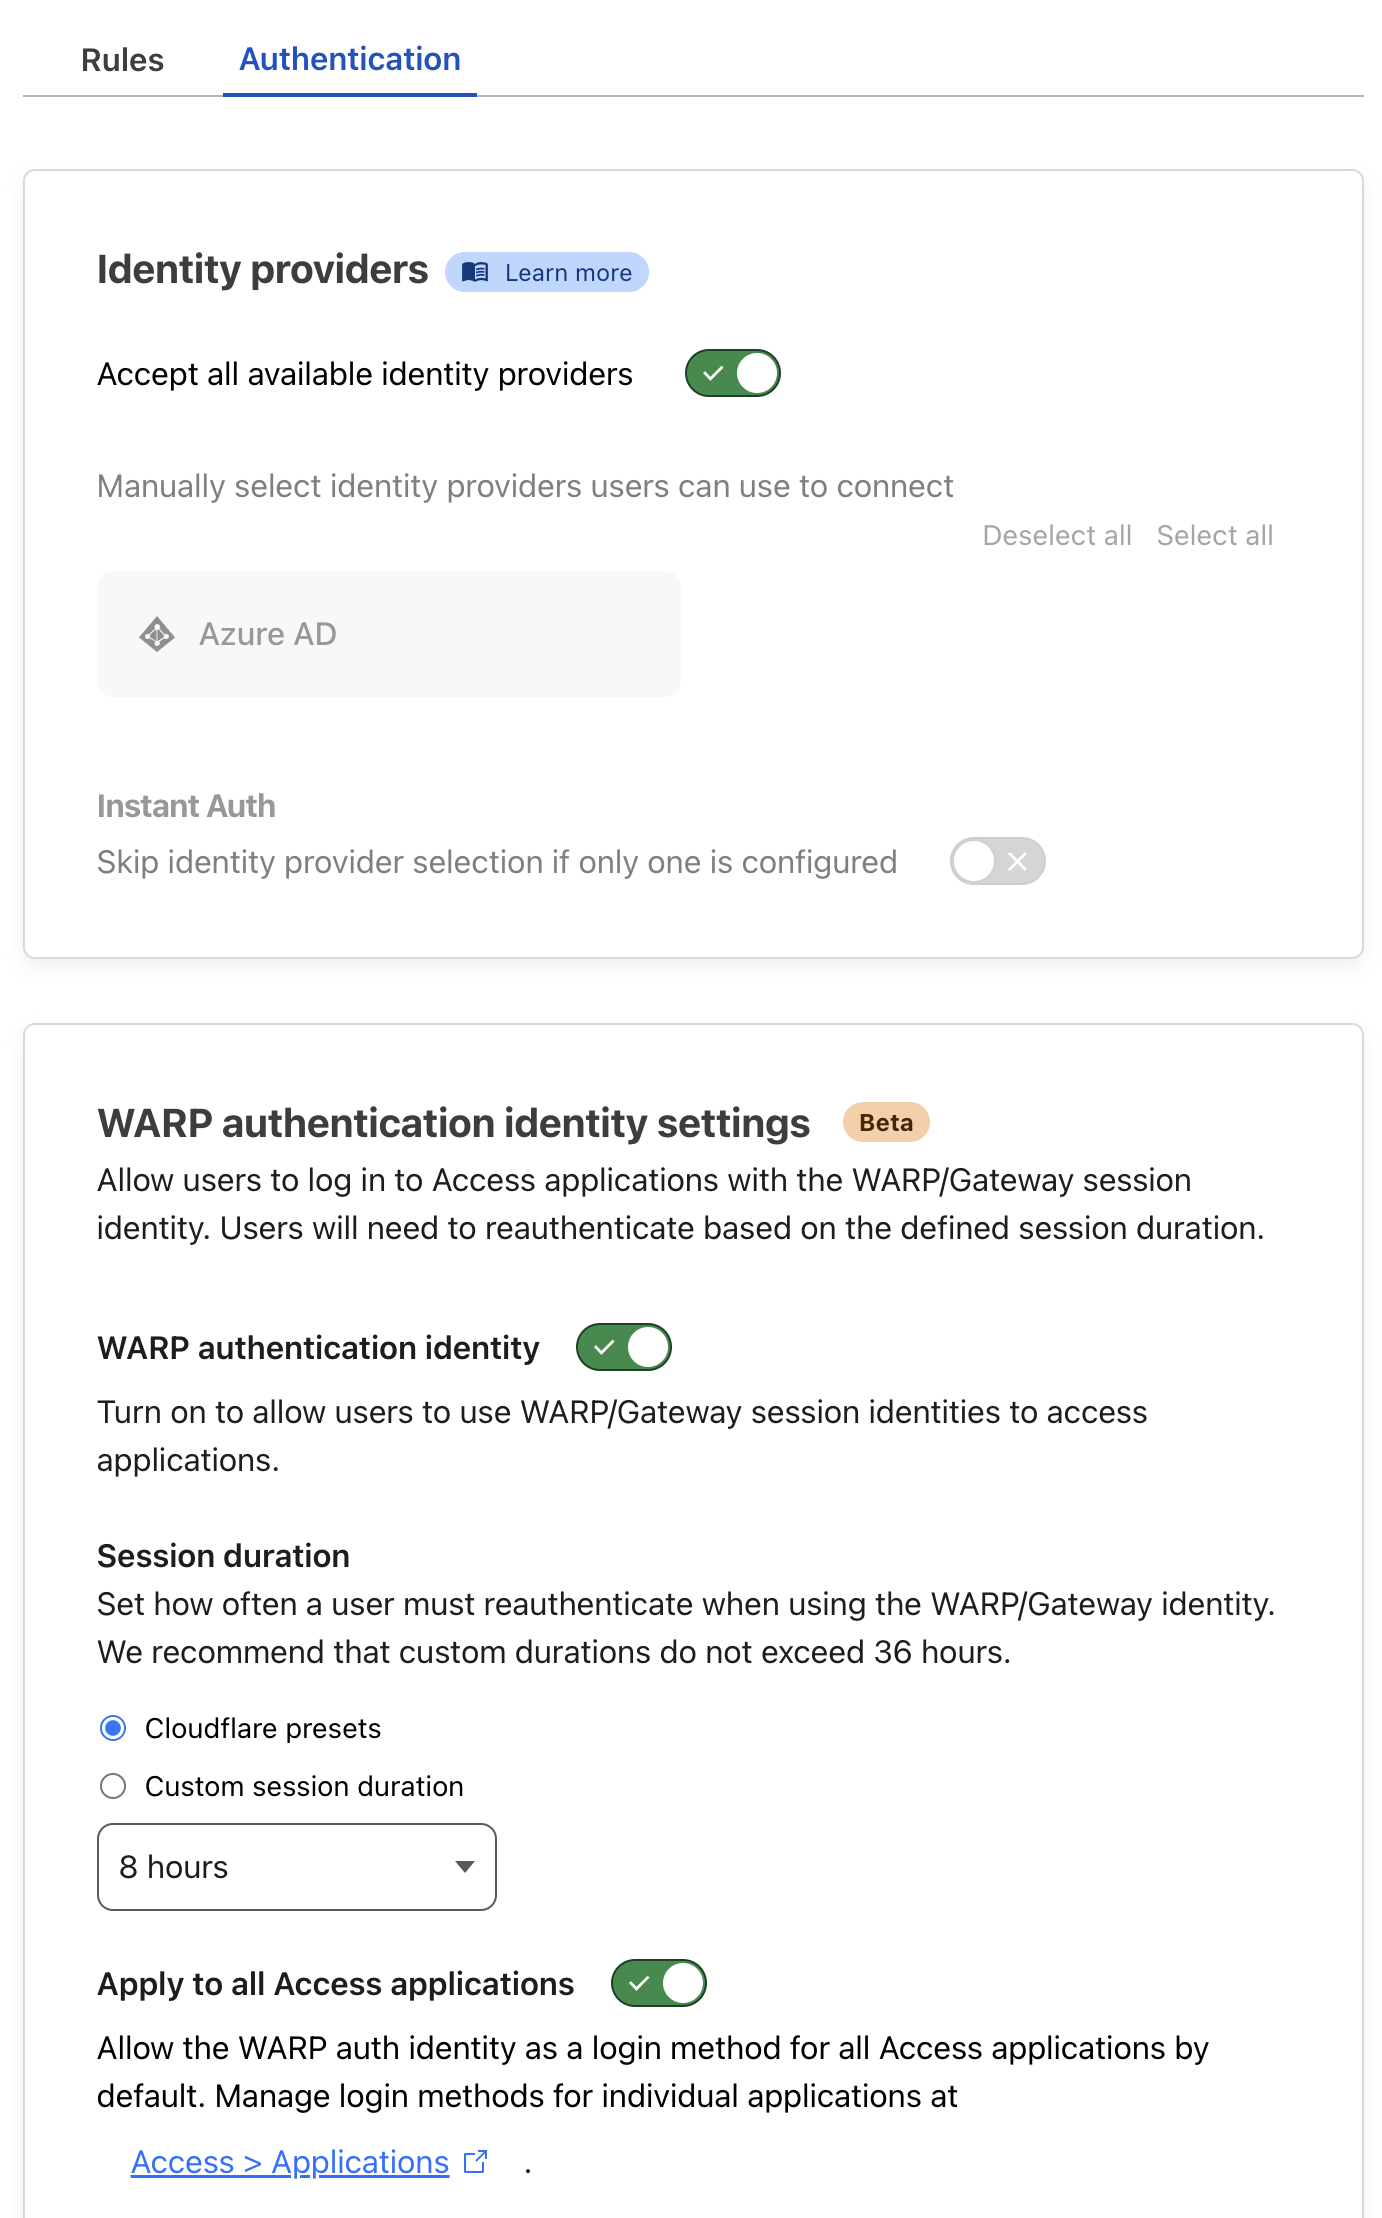
Authentication: Ensure that the authentication tab exclusively enables the Azure AD provider, with both WARP authentication identity and Apply to all Access applications activated.
-
-
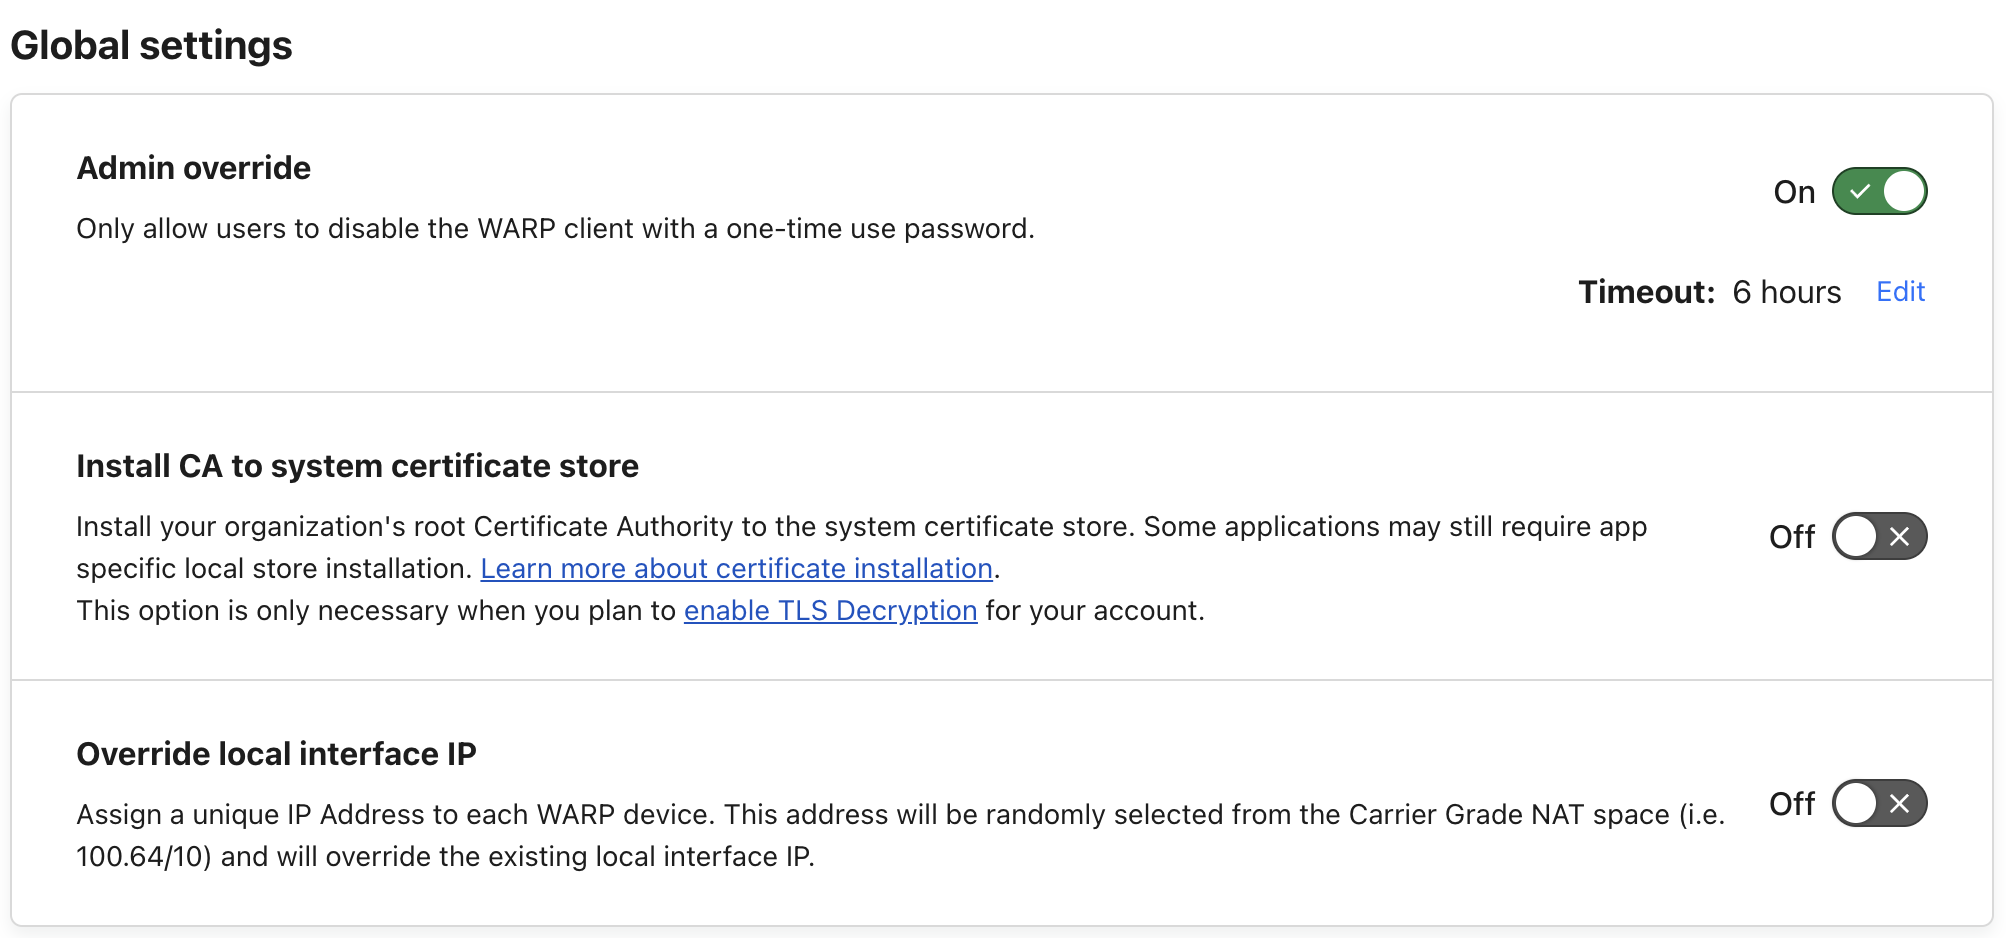
Global Settings: Activate the Admin override feature, setting the timeout appropriately—6 hours is a recommended.
-
Device Posture: This section is crucial for defining device validation rules.
- WARP Client Check: Activate both the Gateway and WARP checking rules.
- Third-Party Service Providers: Click the “Add new” button and select Microsoft Endpoint Manager. Follow the provided instructions to implement the Microsoft Intune MDM validation check.
- Service Provider Check: Create a new rule named
Device-Compliant, assigning it a value ofCompliant. Avoid selecting an operation unless the rule is intended for a specific OS.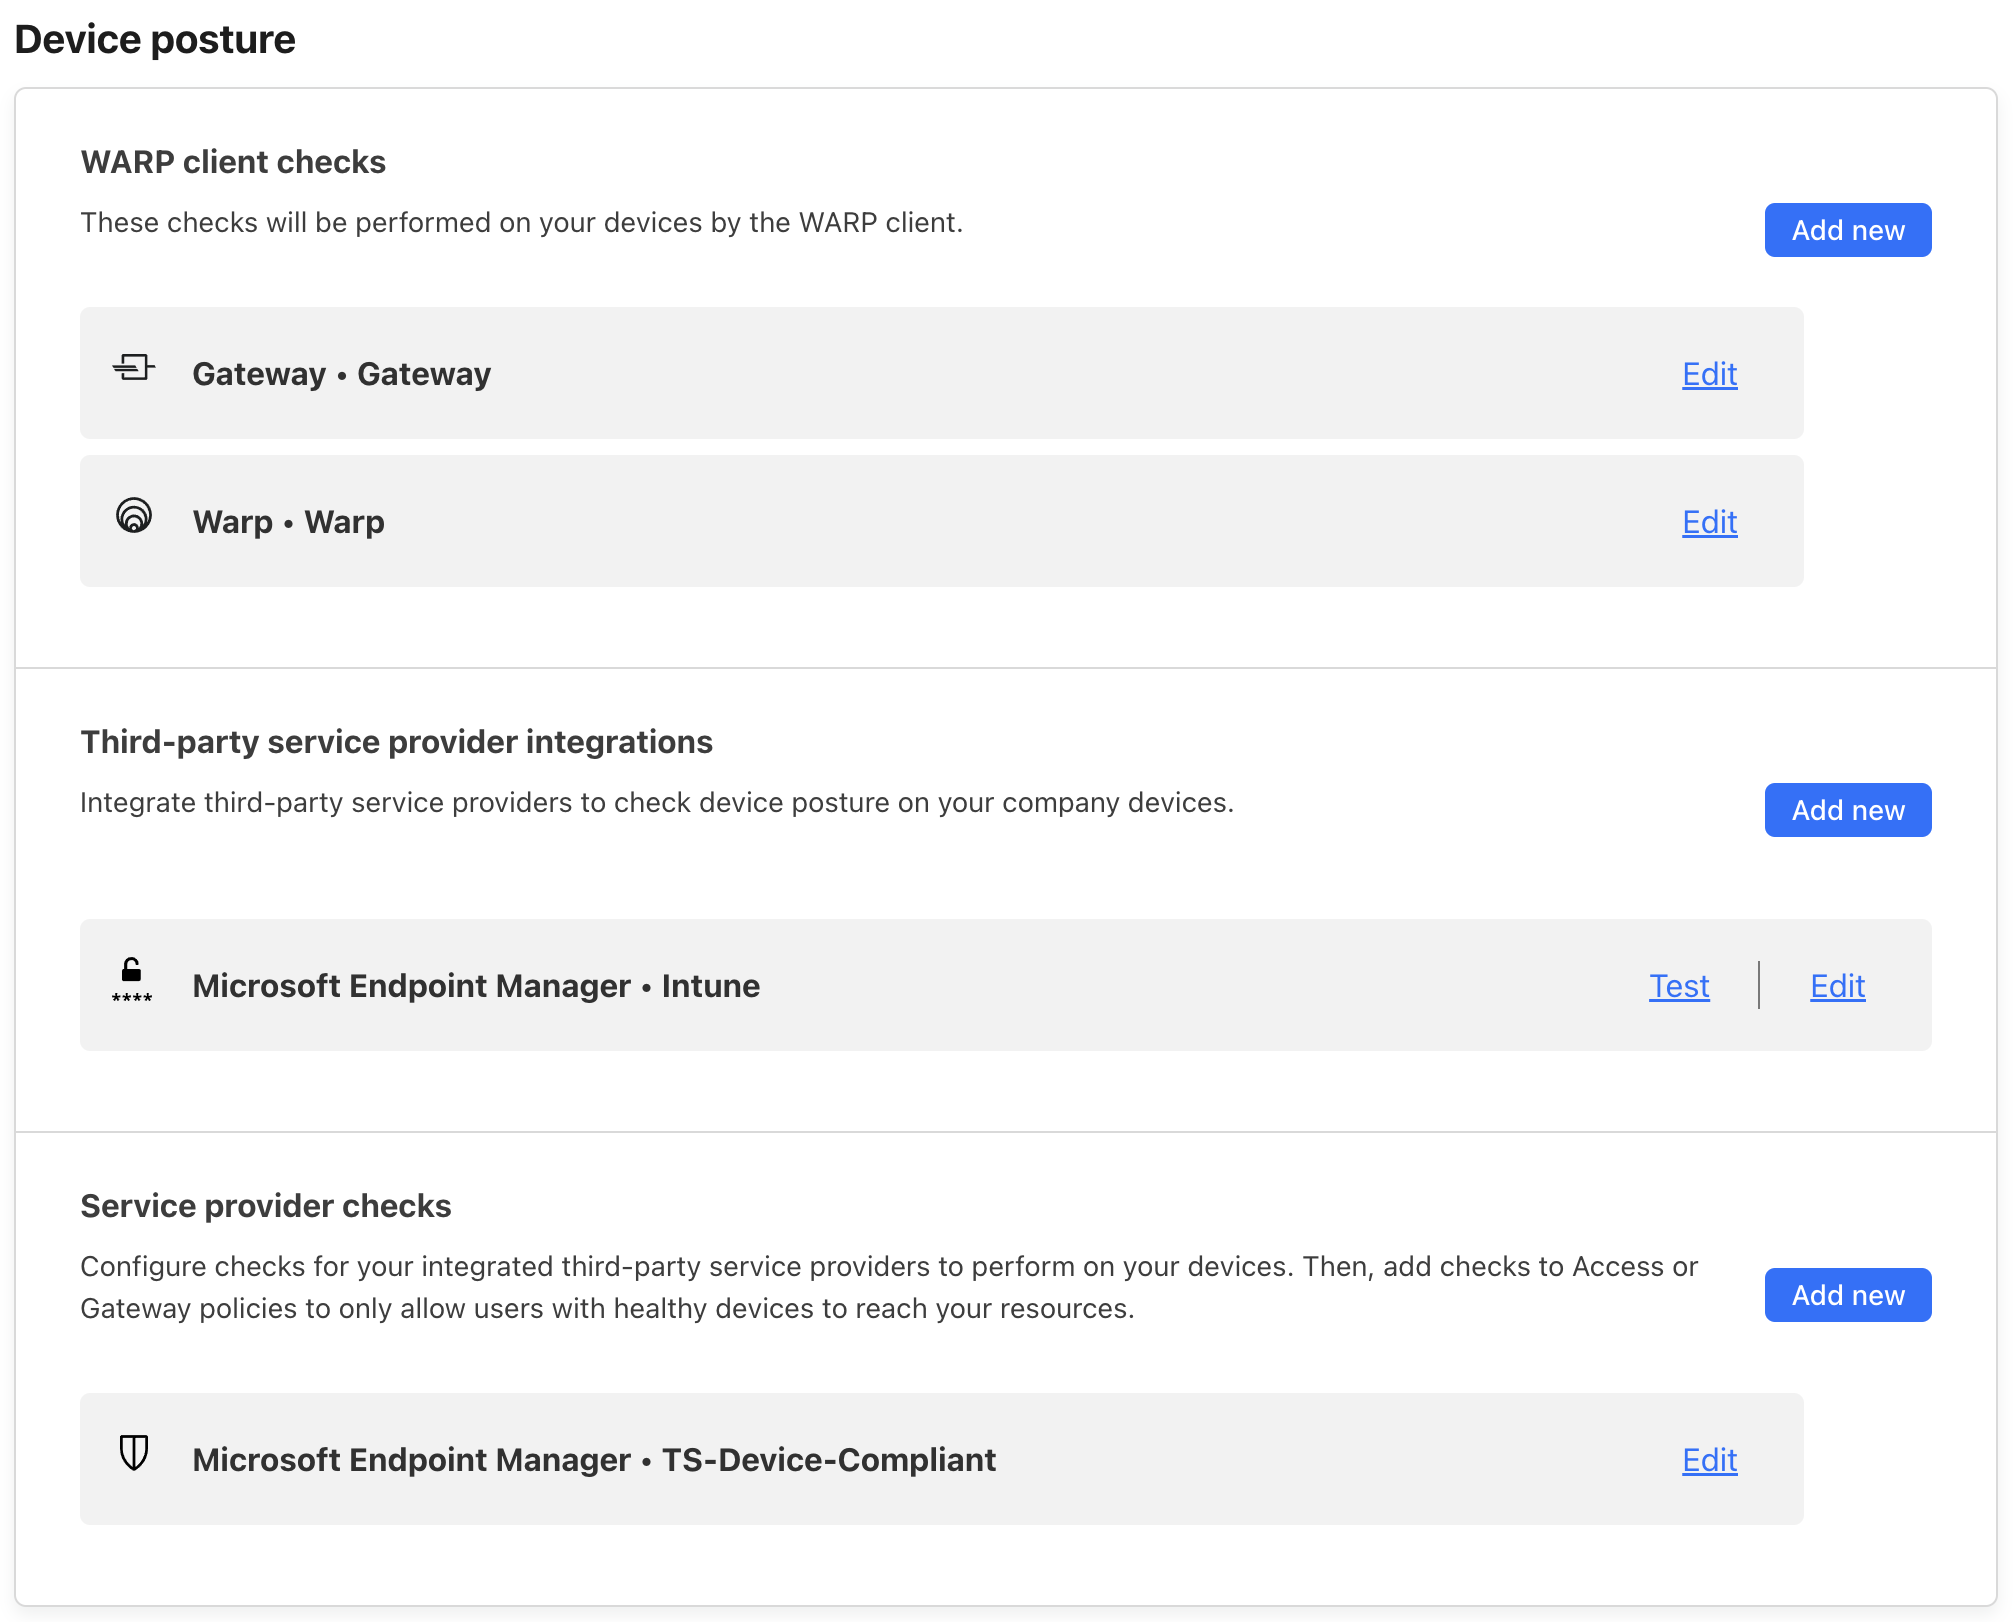
-
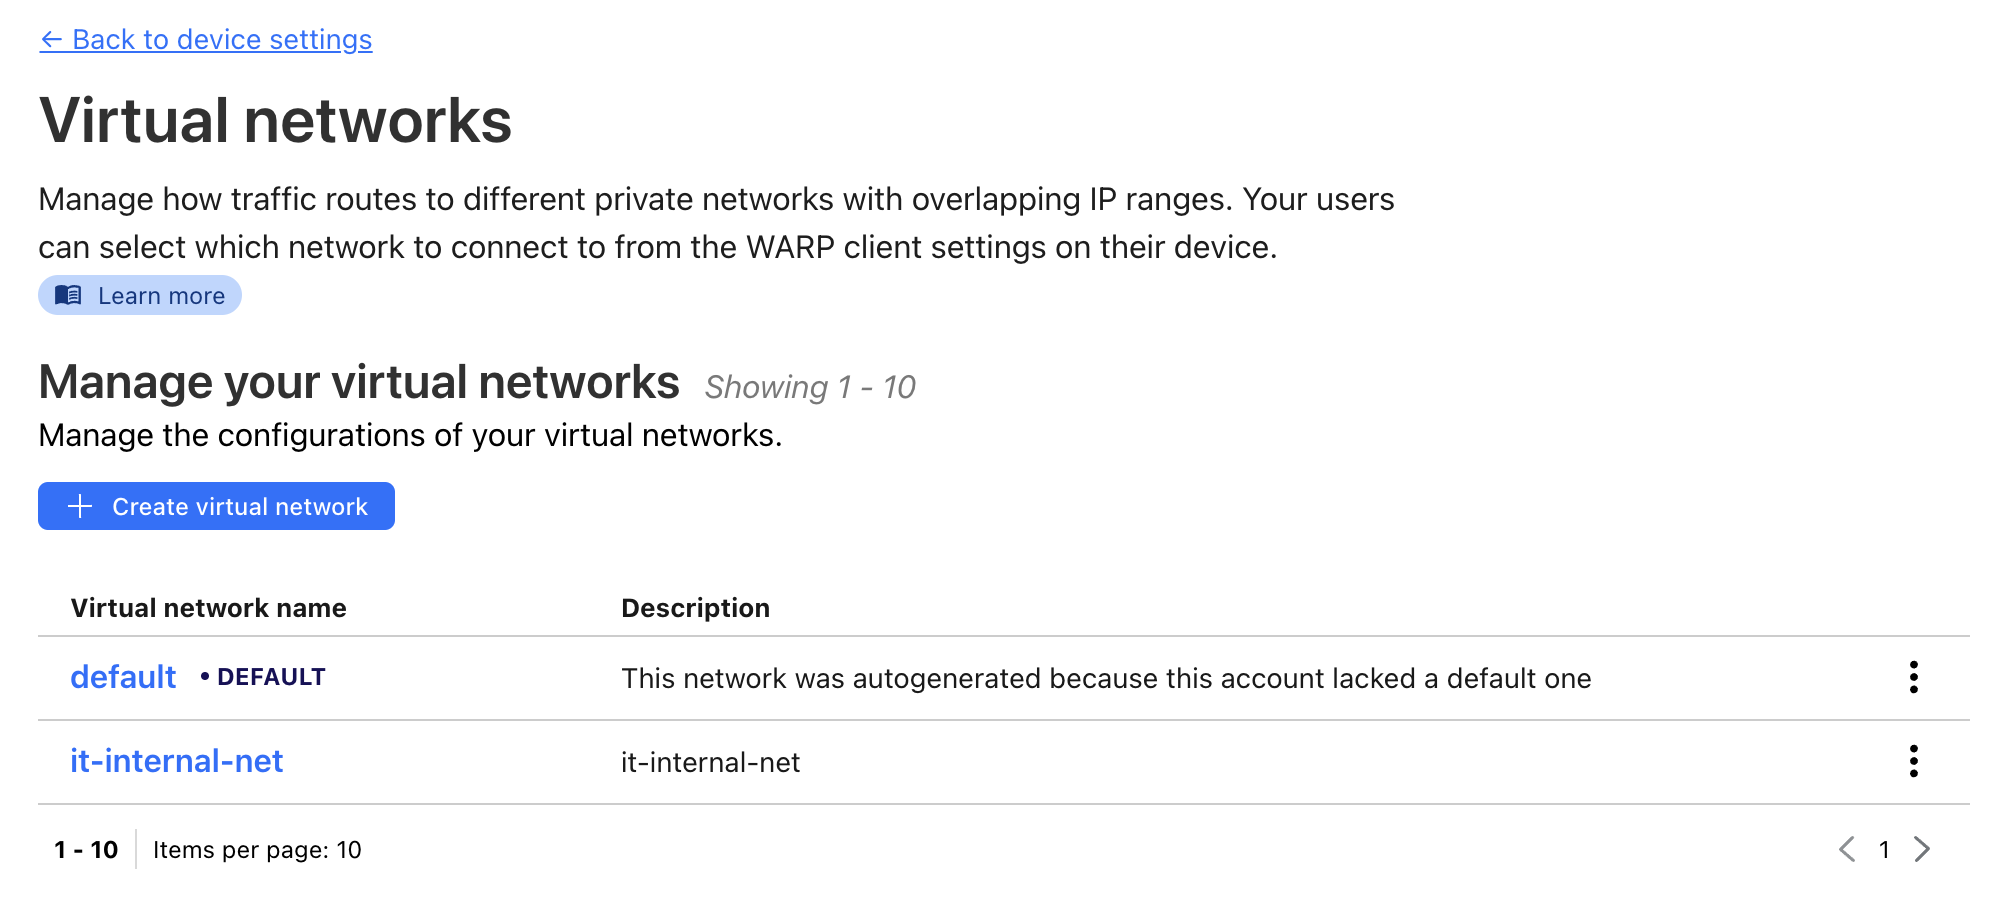
Virtual Network Configuration: Navigate to the “Virtual Network” section to establish two distinct virtual networks:
- default: This network is automatically generated by Cloudflare and serves as the primary network for organizational access, allowing connection to internal applications across the entire organization.
- it-internal-net: This is a dedicated network tailored for the IT department, providing access to specific internal services such as SSH connections to DevOps agent virtual machines.
WARP Profile Configuration
Upon navigating to Device Settings, you’ll find a default profile. This profile can be enhanced with the following customizations:
-
Configuration Options: Adjust the settings as outlined below:
- Captive Portal Detection: Enable with a 3-minute timeout. This feature allows the WARP client to temporarily deactivate when encountering a captive portal, facilitating connection to networks like those in hotels, airplanes, or other public environments.
- Lock WARP Switch: Ensure that users cannot disable the WARP switch, preventing them from disconnecting the client.
- Allow Updates: Permit local administrators to receive update notifications for the client and initiate the updates.
- Automatic Reconnection: Set to enable with a 3-minute timeout. This ensures the WARP client automatically reconnects after the specified duration.
- Service Mode: Default to Gateway with WARP. This should not be altered.

-
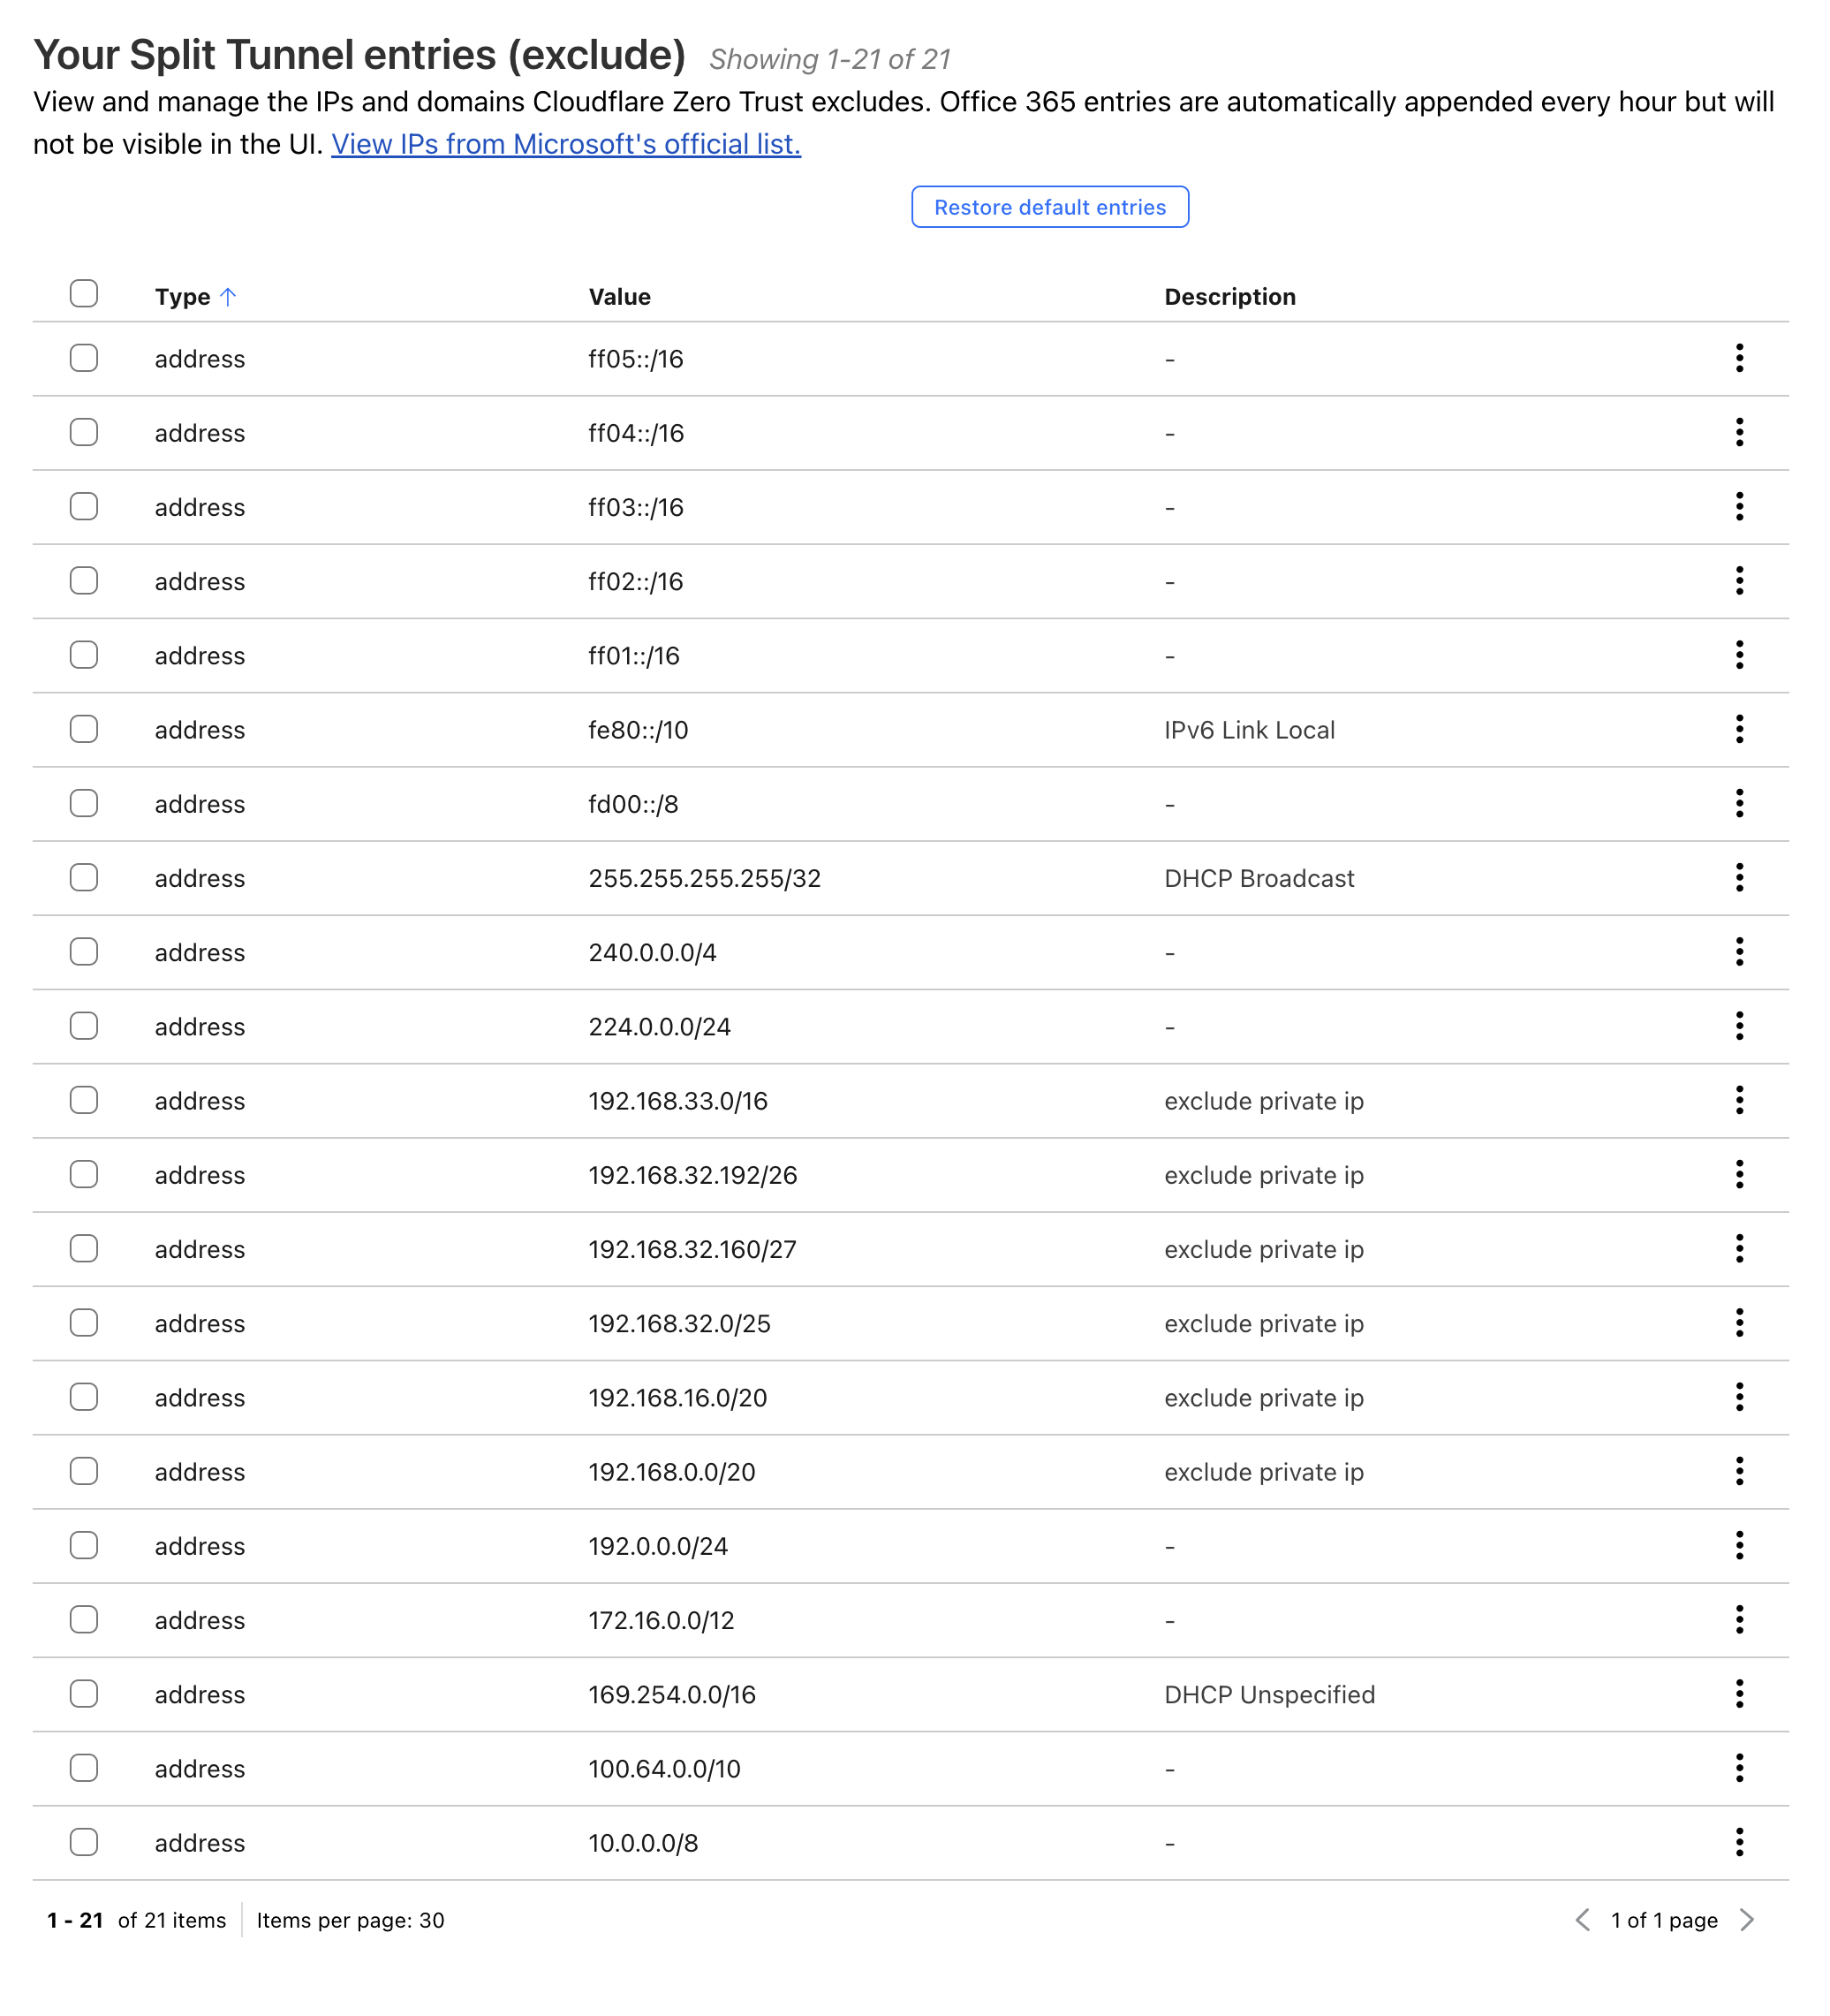
Split Tunneling: It should be in Exclude IPs and Domains mode, configure traffic routing preferences within Cloudflare Zero Trust.
By default, all private IP address spaces are excluded. To allow remote devices to access AKS and DevOps subnets, adjust the exclusion rules. Click the “Manage” button to ensure these subnets are included for access.
-
Microsoft 365 Traffic Routing: If your organization uses Microsoft 365, it’s advisable to enable direct routing for its traffic to ensure optimal performance.
WARP Team Domain Management
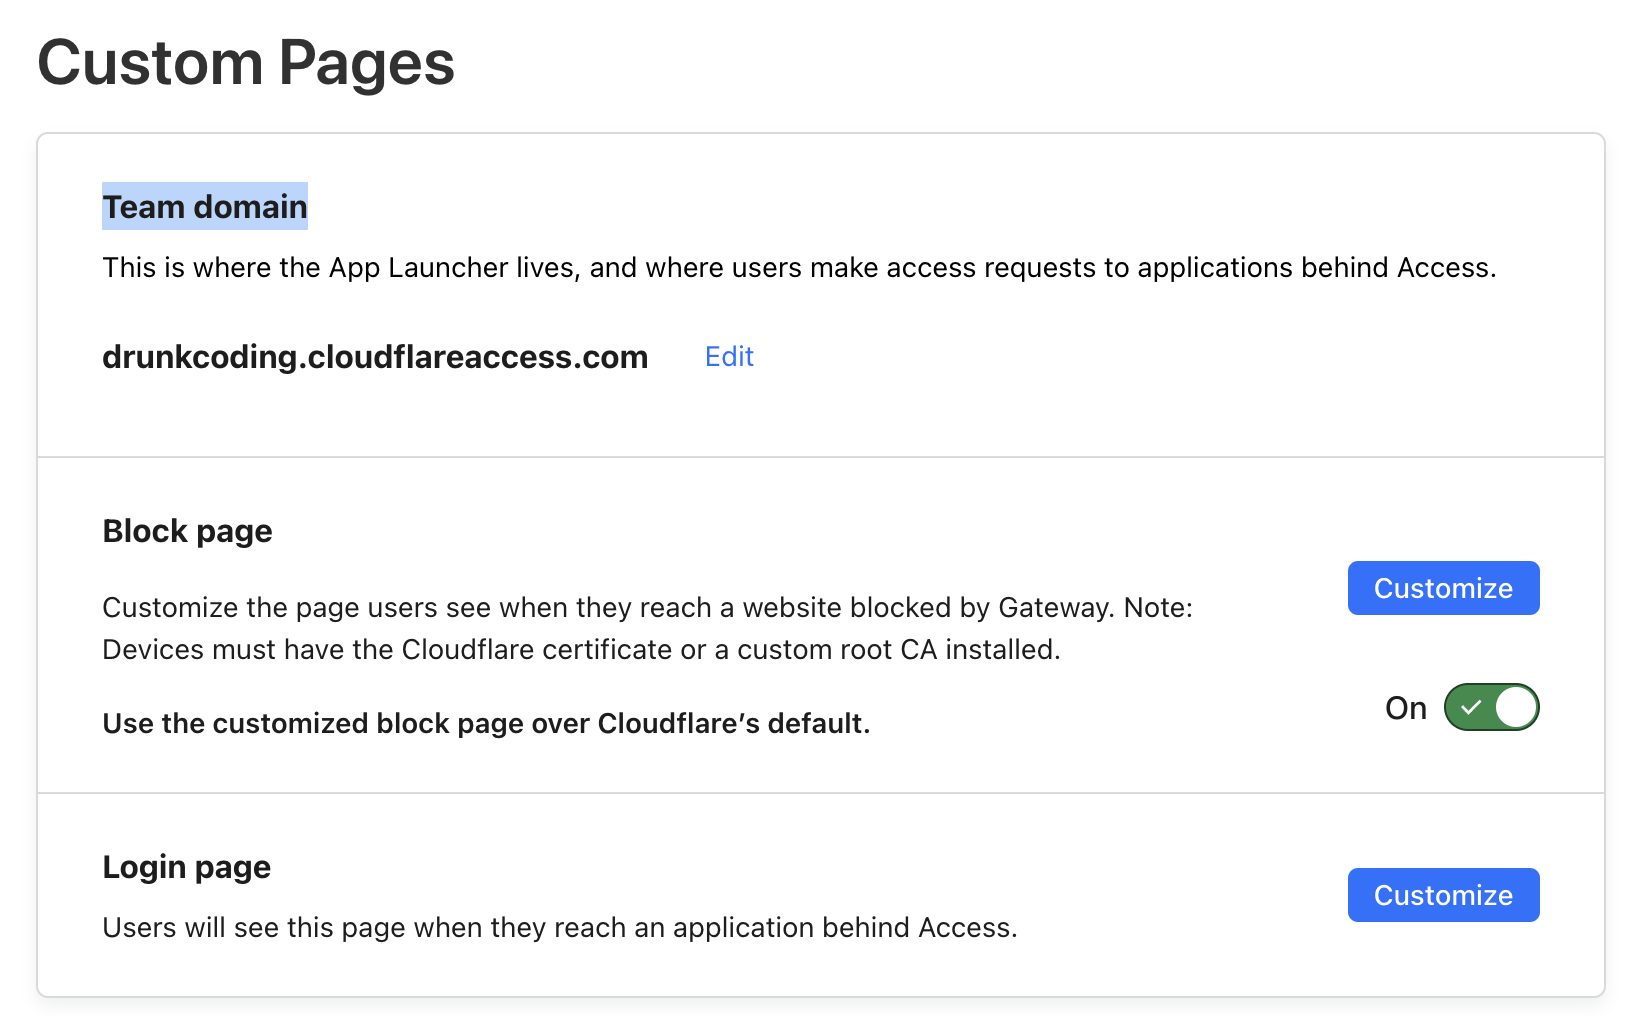
Upon registering for Cloudflare Zero Trust, you will need to specify a Team Domain. If you do not recall your current team domain or wish to modify it, head over to Settings > Custom Pages. Here, you can view and update your team domain, as well as customize the appearance of login and error pages to better fit your organization’s branding needs.
Deploying the WARP Client with Intune
-
Deploy via Intune: To streamline the deployment of the WARP Client across all devices, follow the guide here. This resource details how to onboard the WARP client app with Intune for efficient distribution to widely selected devices.
-
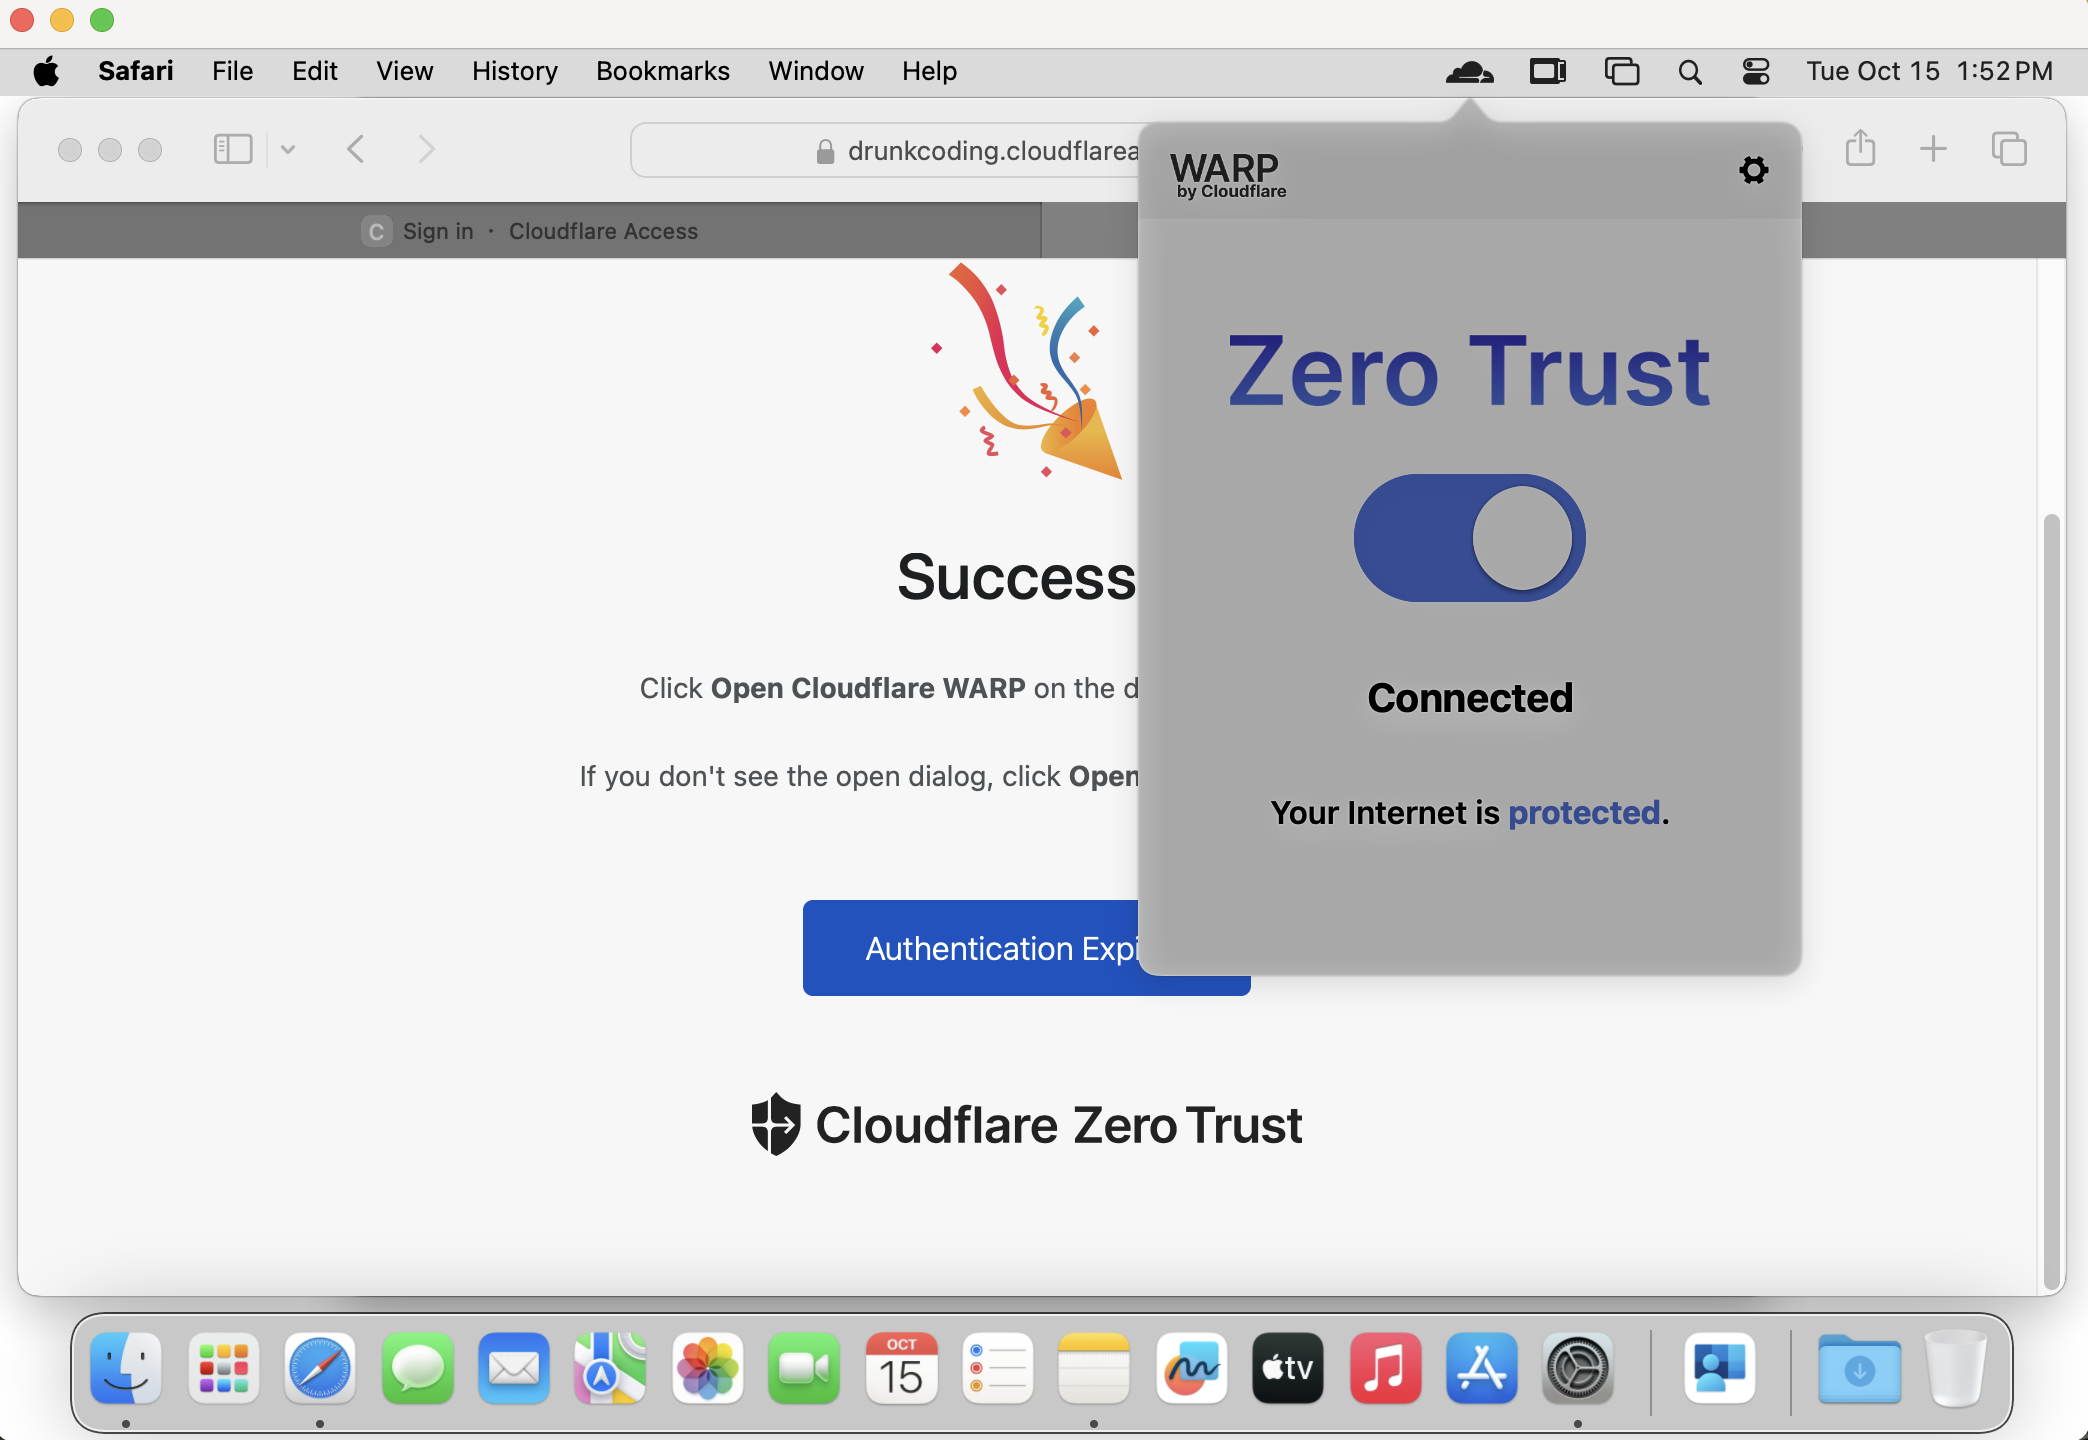
Activating WARP:
- After installing the WARP client, the Cloudflare icon will appear in the Taskbar/MenuBar, and a browser window will automatically open, prompting users to log in with Azure AD credentials.
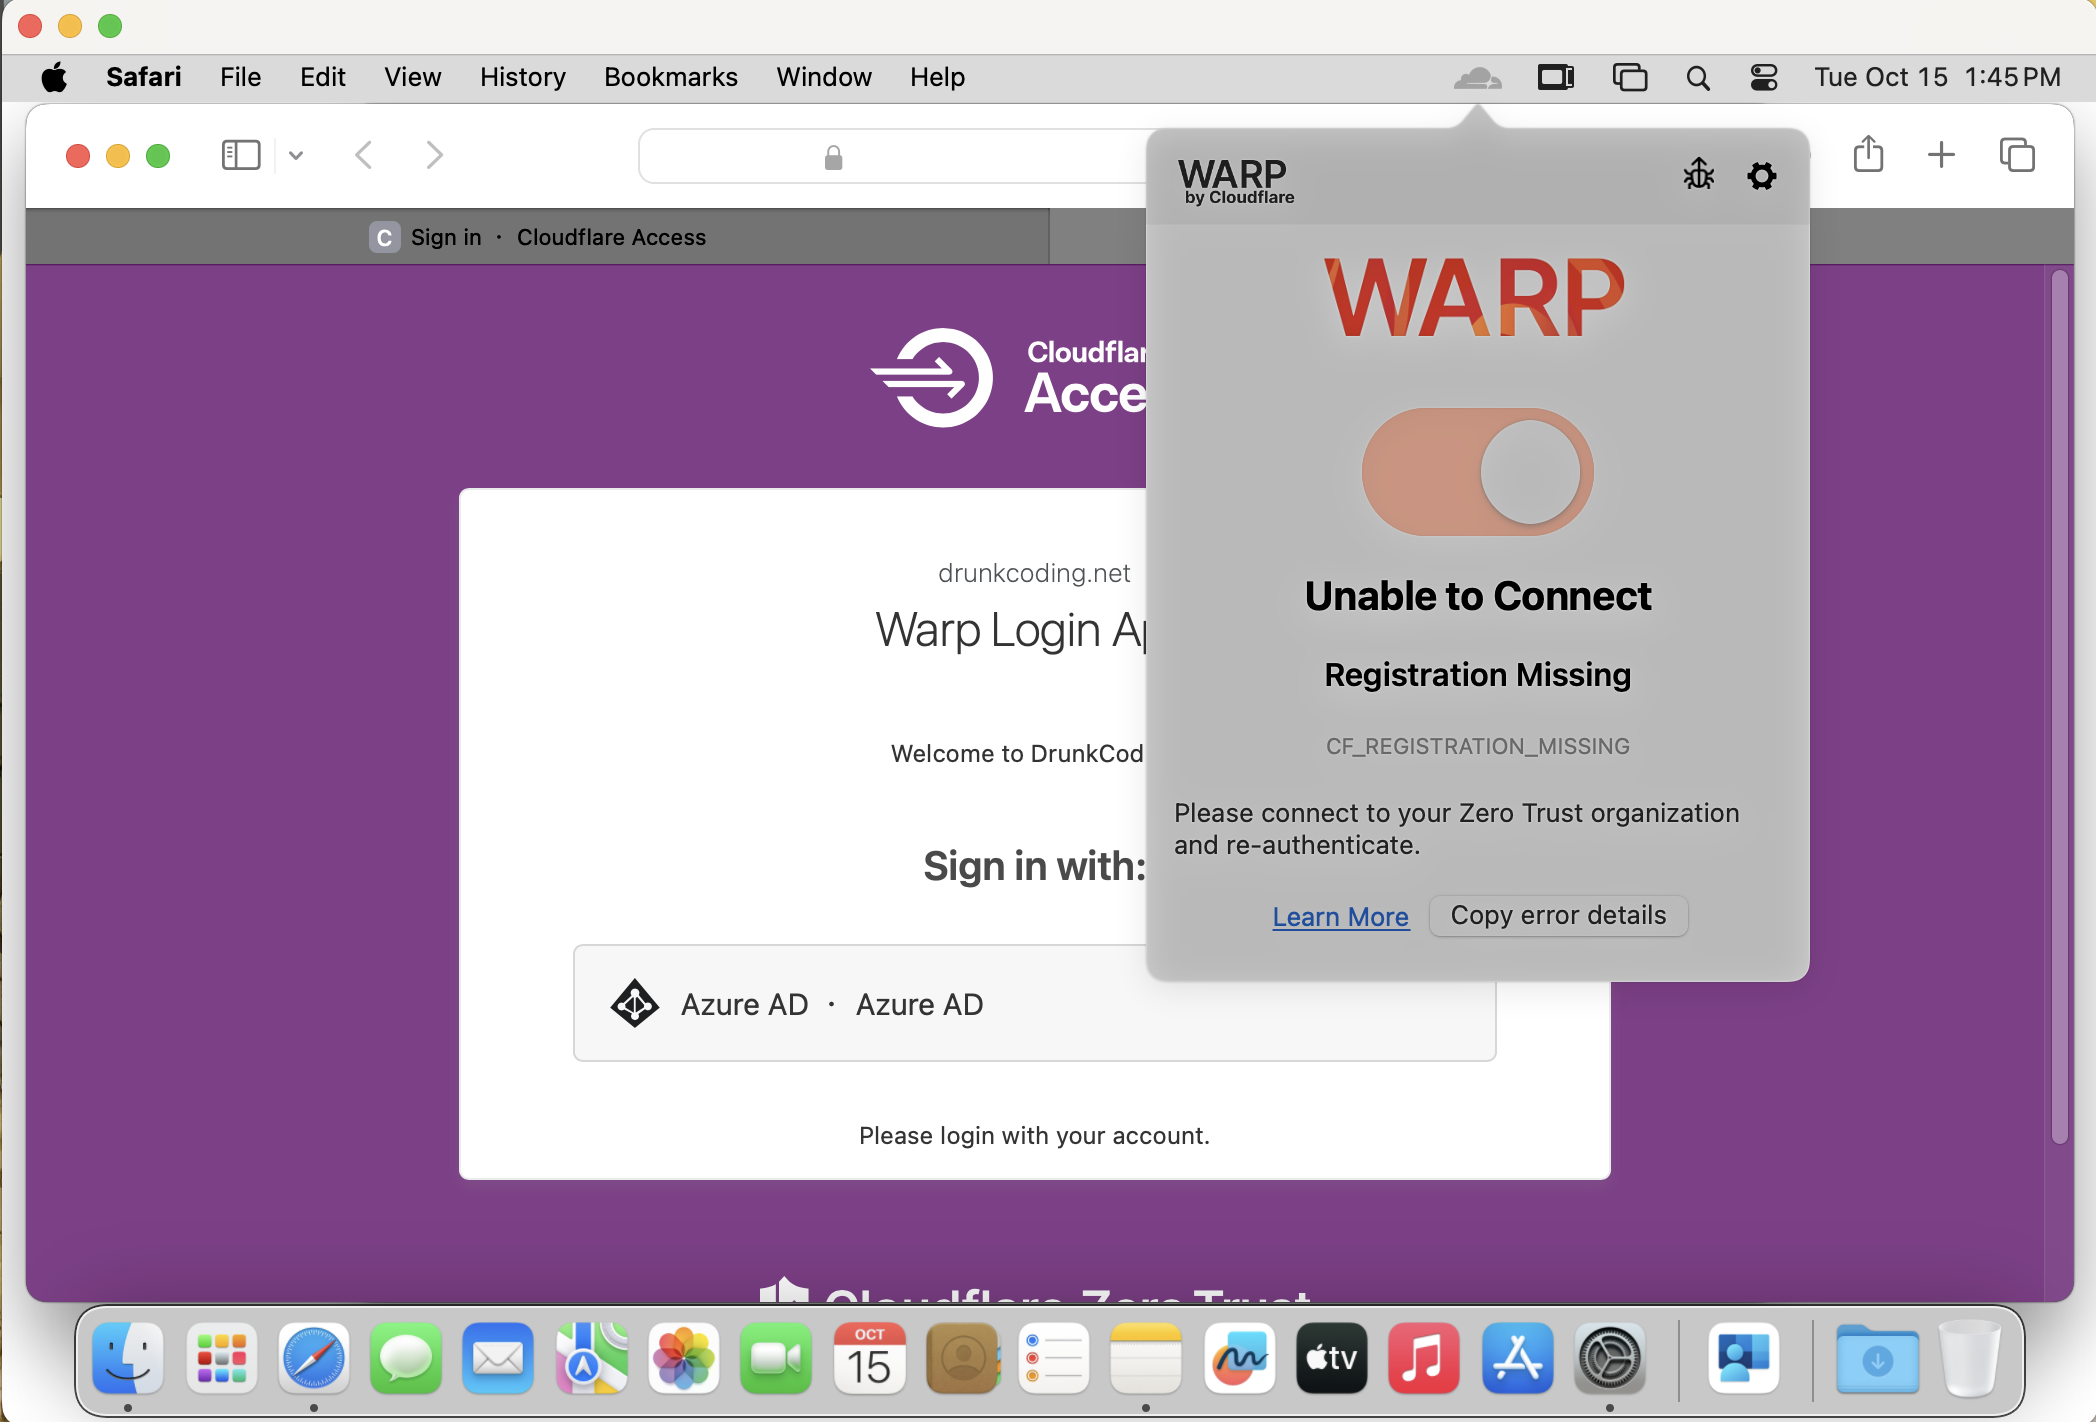
- Upon successful login, the WARP client will register the device with Cloudflare Zero Trust and display a “Protected” status, indicating that the device is secured.
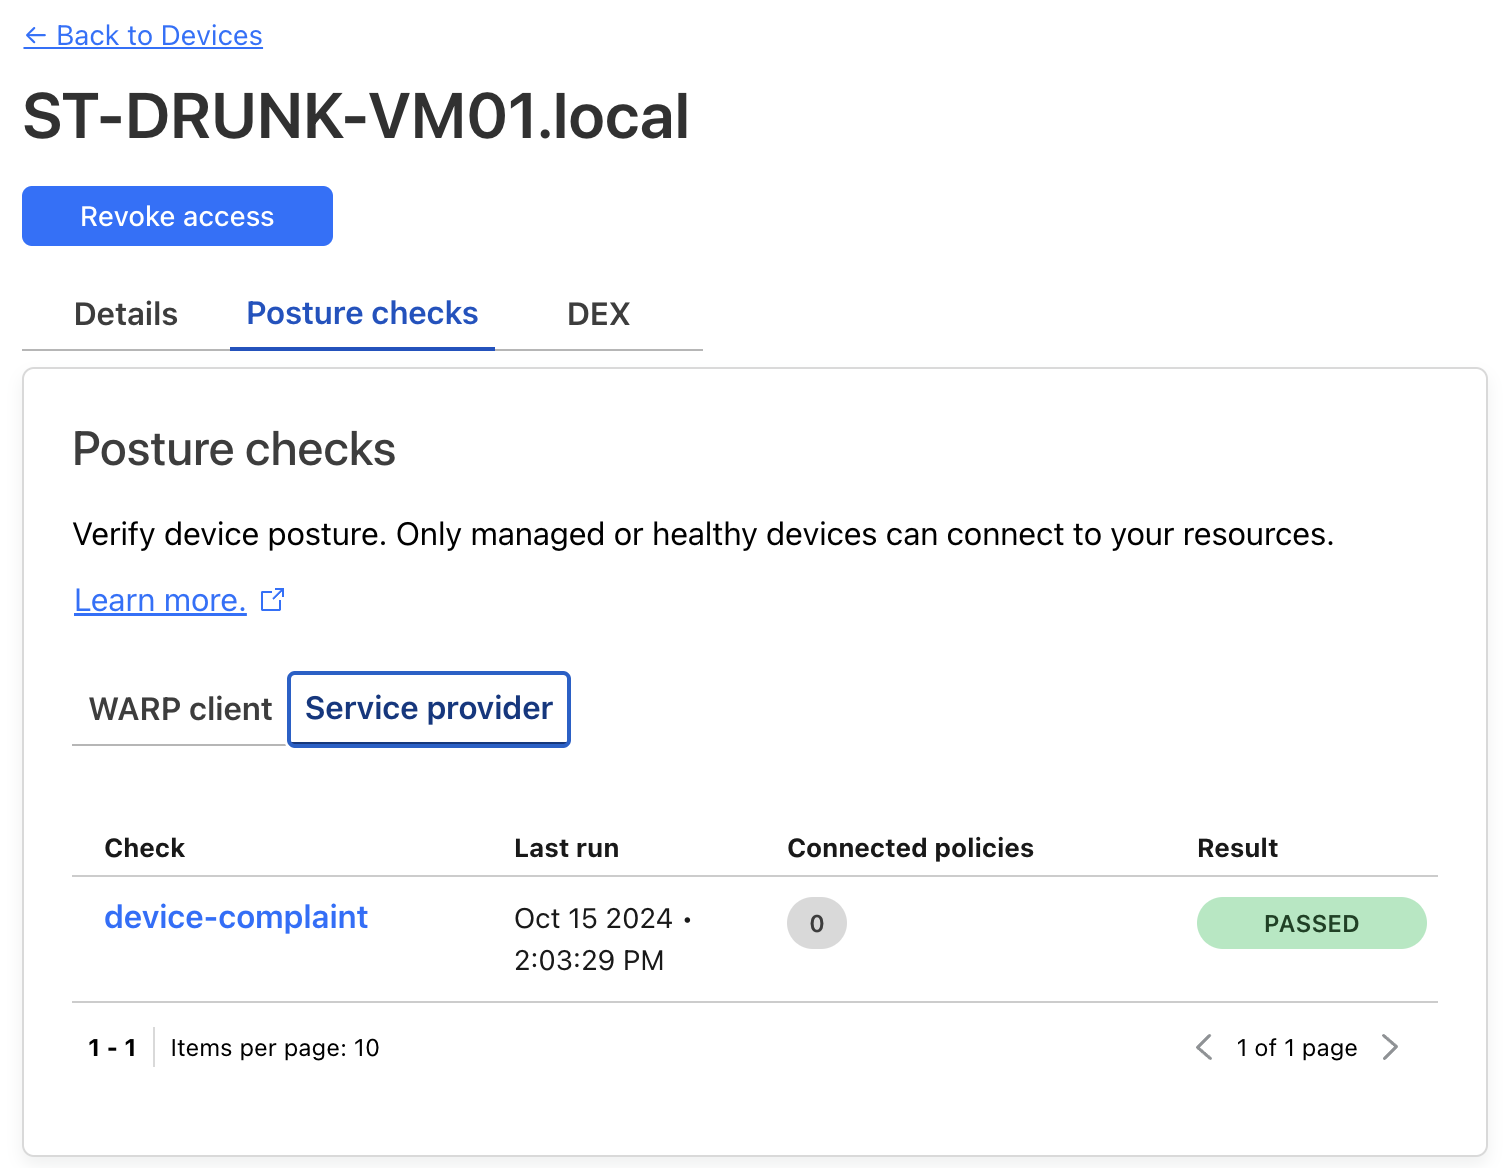
- The device will also appear on the Zero Trust portal under My Team > Devices, with its posture status visible as shown below:
- After installing the WARP client, the Cloudflare icon will appear in the Taskbar/MenuBar, and a browser window will automatically open, prompting users to log in with Azure AD credentials.
Important: Cloudflare Zero Trust is complimentary for up to the first 50 users. Fees apply for additional users. For more information, visit the pricing page.
Network Policy
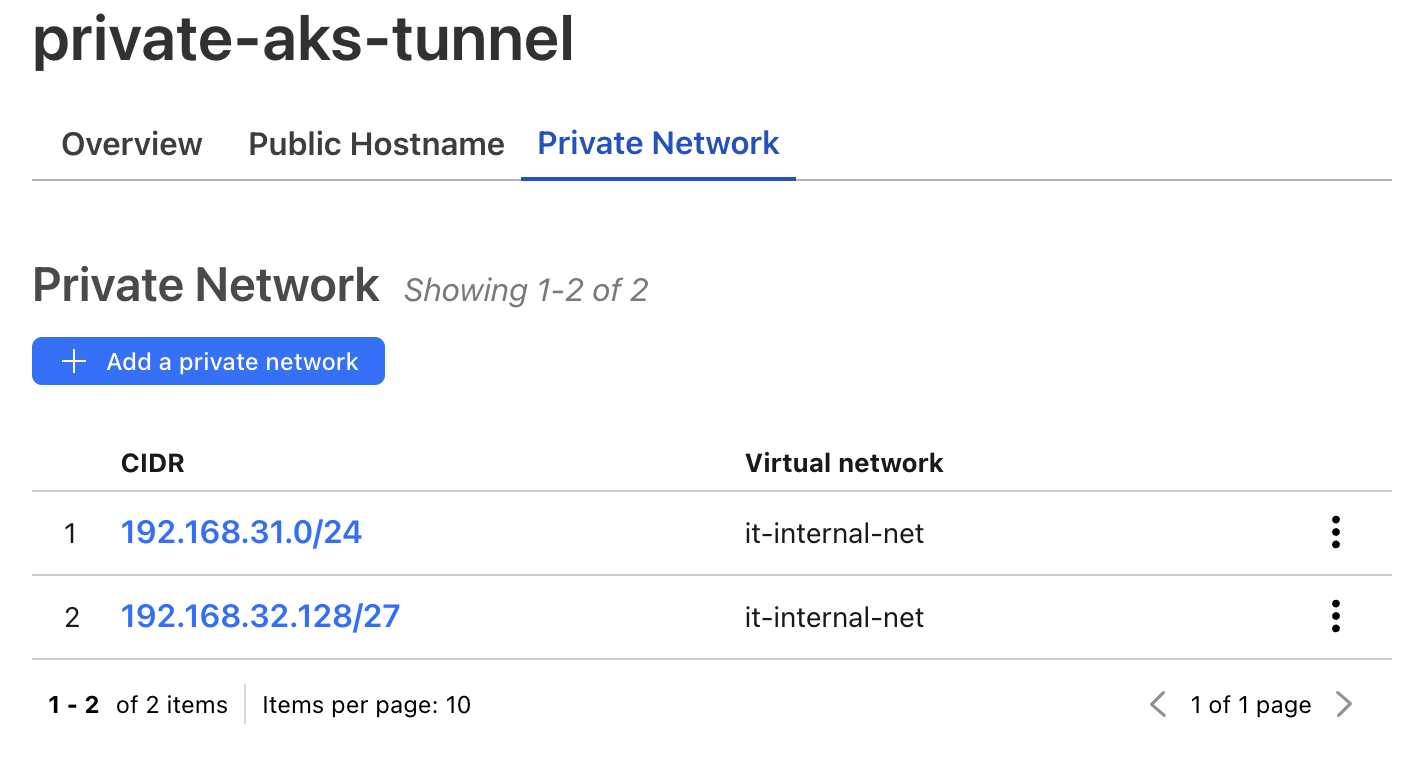
To ensure secure access to the AKS Subnet 192.168.31.0/24 and DevOps Subnet 192.168.32.128/27. Here’s how to set up the necessary network policies to permit only compliant devices:
-
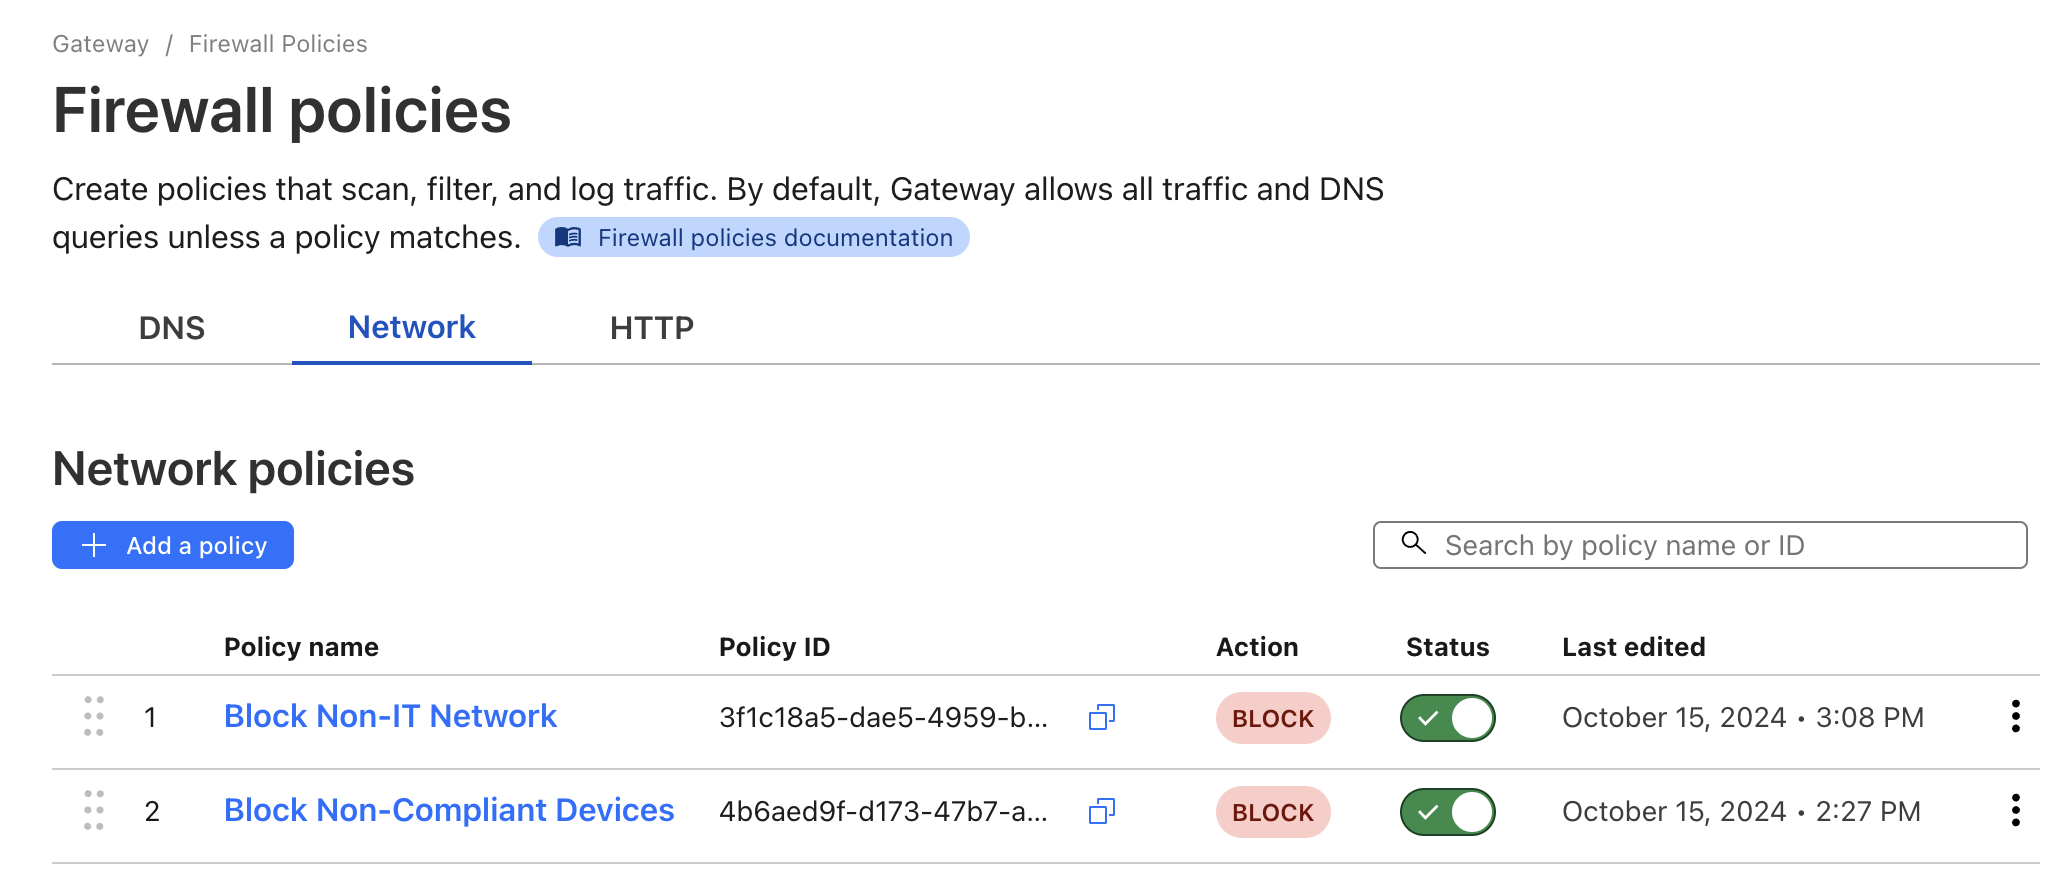
Blocking Non-compliant Devices:
Configure a network firewall policy to restrict access for non-compliant devices. Follow these instructions to establish this rule: Go to Gateway > Firewall Policies and create a new entry named
Block Non-Compliant Deviceswith the parameters below:- Name: Block Non-Compliant Devices
- Traffic:
- Selector:
Destination IP - Operator:
in - Value:
192.168.31.0/24,192.168.32.128/27
- Selector:
- Device Posture:
- Selector:
Passed Device Posture - Operator:
is not - Value:
device-compliant (Intune)
- Selector:
- Action:
Block - Enable Block Notification for WARP Client: Activate this to alert users when their device fails compliance checks.
- Traffic:
- Name: Block Non-Compliant Devices
-
Securing IT Department Access:
We previously established an
it-internal-netspecifically for the IT department. To prevent unauthorized access to this network by non-IT personnel, configure an additional firewall policy:- Create an Entra Group named
DRUNK IT DEVELOPERSwith the ID8a176875-cc7c-4524-86b9-e47573380fe0. - Set up a new policy with the following specifications:
- Name: Block IT Network
- Traffic:
- Selector:
Destination IP - Operator:
in - Value:
192.168.31.0/24,192.168.32.128/27 - AND
- Selector:
Virtual Network - Operator:
is - Value:
it-internal-net
- Selector:
- Identity:
- Selector:
User Group Names - Operator:
not in - Value:
DRUNK IT DEVELOPERS
- Selector:
- Action:
Block - Enable Block Notification for WARP Client: Activate this to notify users who attempt unauthorized access.
- Create an Entra Group named
-
Policy Order: Ensure the policies are applied in the correct sequence as shown in the interface image.
Enhancing Application Access Security Policy
With all previous configurations in place, the tunnel is ready for use. The next crucial step is to enhance the security of the Access application, created earlier, to ensure robust protection.
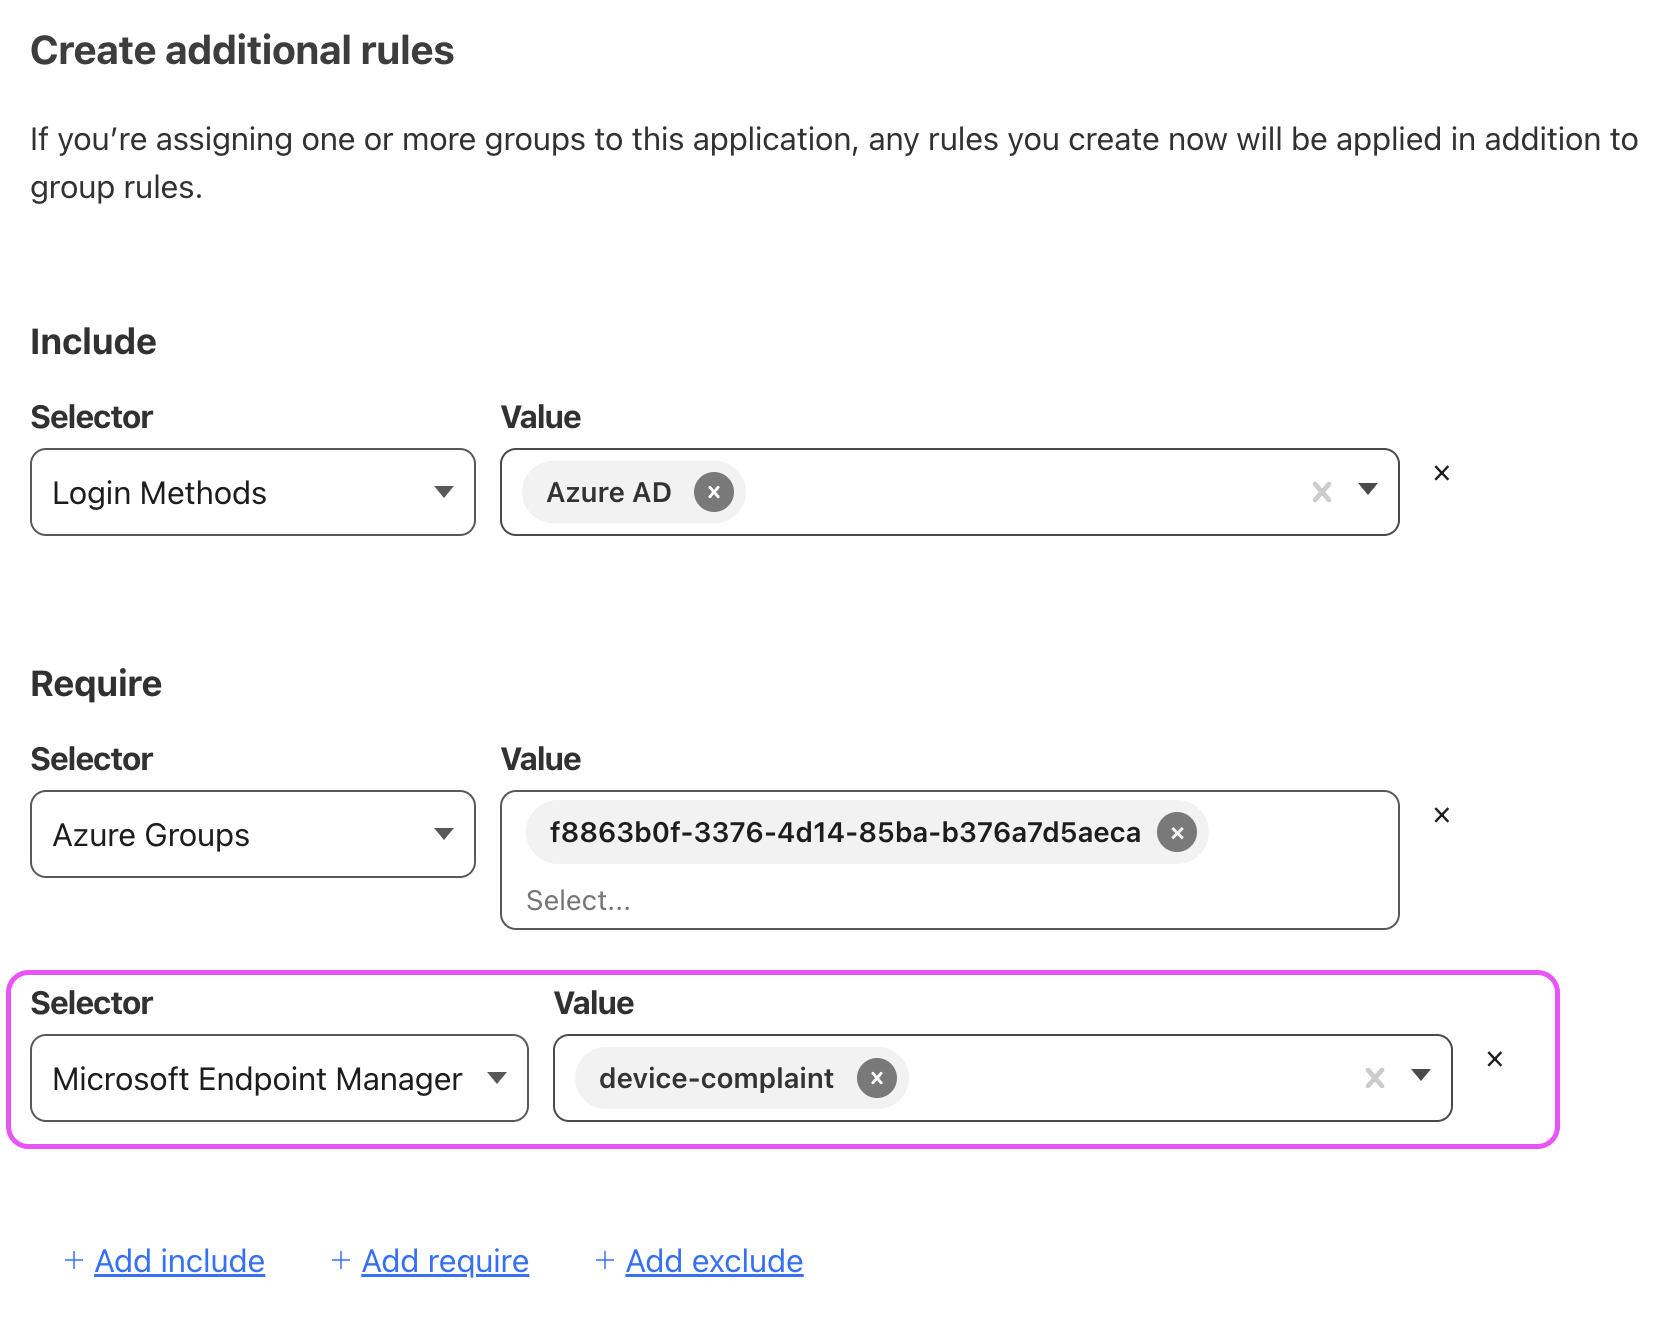
While the existing hello application is secured with Azure AD authentication, it remains accessible from any device as long as users can log into Azure AD. This situation presents a security risk, as compromised user accounts could be exploited.
-
To increase security, we can restrict application access exclusively to corporate-compliant devices. This is achieved by updating the policy, as shown below:
-
Users attempting to access the application from non-compliant devices will receive a blocking message, as illustrated here:
Accessing Private Resources
Accessing private network resources through WARP is a critical feature that I find extremely valuable. By configuring Cloudflare Tunnel, we can enable WARP devices to securely access private network ranges.
-
Configure Private Network Tunnel: To start, navigate to the Cloudflare Tunnel settings. Click “Edit” next to your tunnel, select the “Private Network” tab, and add the specific private IP ranges wish to be exposed. Refer to the screenshot below for guidance:
-
Switch WARP Network: On the WARP-enabled device, switch the network to
it-internal-netto gain access to the designated internal resources.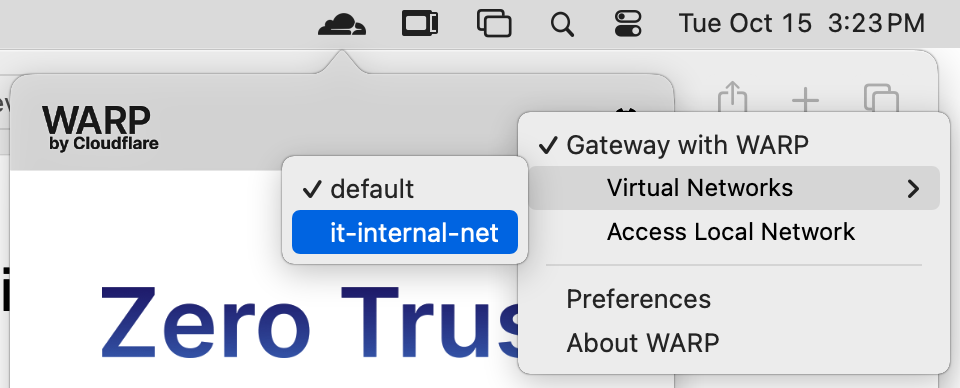
-
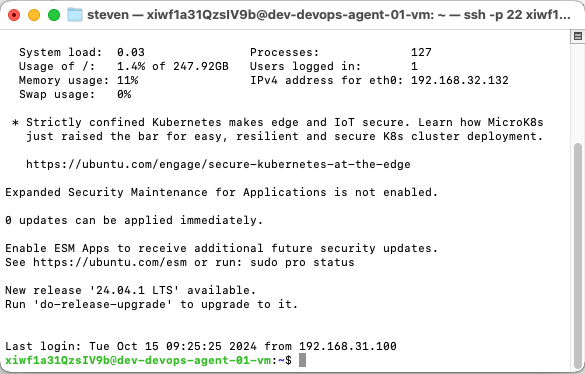
SSH into DevOps Agent: With the WARP device configured, We can now establish an SSH connection to the DevOps virtual machine, as though direct local network.
If you encounter any issues, ensure that your Azure firewall settings, CloudPC Security Group, and Cloudflare Tunnel network policies are properly configured to permit access to the DevOps subnet from the AKS subnet.
Conclusion
In this final tutorial of our series on establishing a private AKS environment on Azure with Pulumi, we’ve successfully integrated Cloudflare Tunnel and WARP into our secure network infrastructure. By leveraging Cloudflare Tunnel and WARP, we’ve been able to strike a balance between enabling seamless developer access and upholding the integrity and security of our corporate network.
The implementation of Cloudflare Tunnel and WARP has provided us with numerous benefits, including:
- Granular web filtering and robust security measures enforced by Cloudflare Gateway
- Zero Trust model for secure, private access to corporate applications
- Enhanced security while minimizing friction for users
- Simplified deployment and management of the WARP client application
Reference
Thank You
Thank you for taking the time to read this guide! We hope it has been helpful. Feel free to explore further, and happy coding! 🌟✨
Steven | GitHub