Starting a new project is both exciting and challenging, especially when it comes to configuring the development environment. Many projects require a mix of technologies, which can lead to time-consuming setup and potential errors. .NET Aspire simplifies this process by offering a framework that helps developers set up a consistent and efficient environment across various projects.
With .NET Aspire, We can create a ready-to-run local environment that integrates seamlessly with Docker, allowing the development team to focus on coding without worrying about complex setup requirements. It supports smooth integration with containers, making it easier to handle dependencies and ensuring that our local environment closely mirrors the development/staging environment setup.
In addition to simplifying environment setup, this guide walks us through writing robust integration tests. These tests ensure all components work well together and catch potential issues early in the development process. We’ll also learn how to incorporate these tests into a continuous integration (CI) pipeline, ensuring the code is consistently validated and error-free before it reaches production.
Why .NET Aspire?
.NET Aspire is designed to improve the experience of building .NET cloud-native applications. It provides a consistent, opinionated set of tools and patterns that help to build and run distributed apps. .NET Aspire assists with:
- Orchestration: Features for running and connecting multi-project applications and their dependencies in local development environments.
- Integrations: NuGet packages for commonly used services, such as Redis or PostgreSQL, with standardized interfaces ensuring they connect consistently and seamlessly with the app.
- Tooling: Project templates and tooling experiences for Visual Studio, Visual Studio Code, and the
dotnetCLI to help to create and interact with .NET Aspire projects.
Table of Contents
Open Table of Contents
Setting Up the Local Environment
Let’s start by creating a simple API project and hosting it with .NET Aspire.
Prerequisites
-
.NET 8 SDK or later
-
Docker Desktop installed and running
-
Aspire workload installed: Install the Aspire workload using the following command:
dotnet workload install aspire
Creating an API Project
Assuming we already have a simple API that utilizes the following technologies:
- MediatR: A library used to implement the command and response pattern at the API level. It helps decouple request handling logic from controllers, making the code more modular and easier to maintain.
- Entity Framework Core (EF Core): An Object-Relational Mapper (ORM) used to manage database access.
- PostgreSQL: Used as the database to store and manage the application’s data.
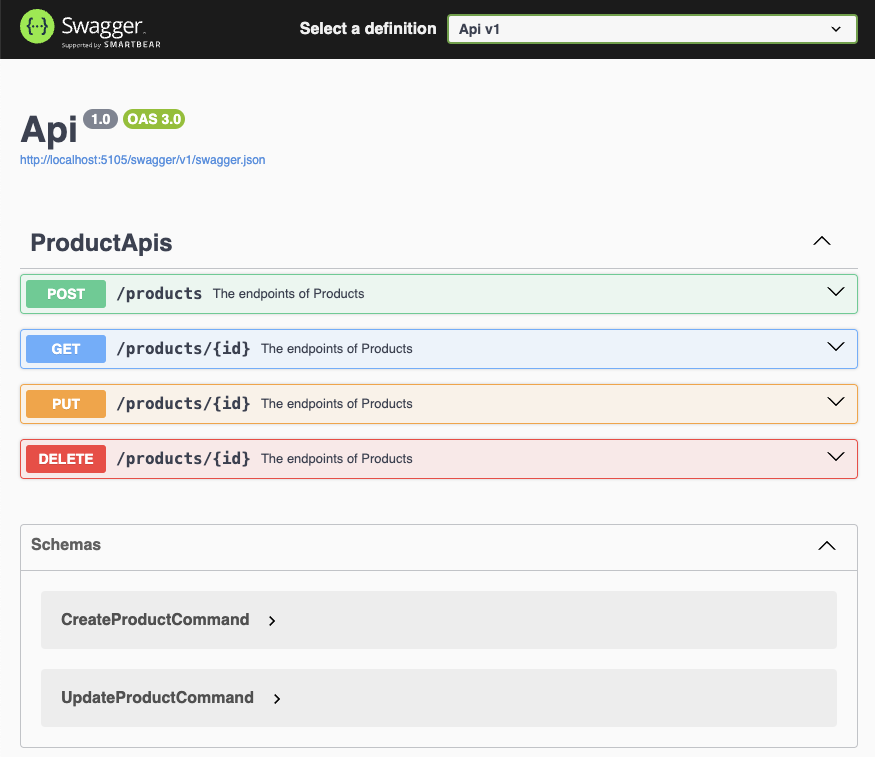
This API has the following endpoints, as displayed in the Swagger UI:
Aspire Templates Explanation
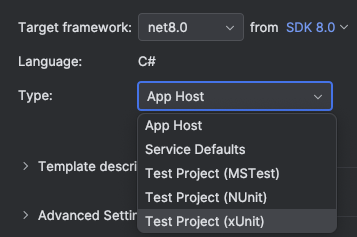
Aspire provides several project templates to help to get started quickly with different aspects of application development and testing:
- App Host: The primary template for creating an Aspire hosting project. It sets up the necessary infrastructure to host the application and its dependencies.
- Service Defaults: Configures essential services for the application, such as
OpenTelemetryfor distributed tracing,DefaultHealthChecksfor monitoring service health, andRequestTimeoutsto manage request durations. While optional, it’s highly recommended for applications hosted on Aspire to ensure robust monitoring and orchestration management. - Test Project (MSTest): Sets up a project for unit testing using the MSTest framework.
- Test Project (NUnit): Sets up a project for unit testing using the NUnit framework.
- Test Project (xUnit): Sets up a project for unit testing using the xUnit framework.
Hosting with Aspire
To host the API above with its dependencies with Aspire, follow these steps:
1. Create Aspire.Host
First, create a new project named Aspire.Host using the App Host template provided by .NET Aspire.
2. Add PostgreSQL Support
Next, install the Aspire PostgreSQL hosting package to add PostgreSQL support to this project.
dotnet add package Aspire.Hosting.PostgreSQLNote: Refer to the .NET Aspire GitHub repository for a full list of hosting components supported by Aspire.
3. Aspire Host with Config as Code
Open Program.cs in the Aspire.Host project and configure the DistributedApplication as shown:
var builder = DistributedApplication.CreateBuilder(args);

//Database
var postgres = builder
    .AddPostgres("postgres")
    .AddDatabase("Db");

//Internal API
builder.AddProject<Projects.Api>("api")
    .WithReference(postgres)
    .WaitFor(postgres);

builder.Build().Run();Explanation:
- AddPostgres(“postgres”): This adds a PostgreSQL service to the Aspire hostwith named as “postgres”.
- AddDatabase(“Db”): This sets up a database named “Db”. This database will be used by the API.
- AddProject<Projects.Api>(“api”): This method adds our API project to the Aspire host named as “api”.
- WithReference(postgres): This references the database service to the API project. It sets up the connection string configuration for the API to connect to the PostgreSQL database.
- WaitFor(postgres): This ensures that the PostgreSQL resource is fully up and running before the API project starts. This is a new functionality added in Aspire 9, ensuring that the API only starts after the database is ready.
4. EF Core Database Migration
Automating database migrations is important when using EF Core to ensure consistency across environments. While we won’t discuss the details here, you can refer to the EF Core Migrations guide compatible with .NET Aspire.
Here is a sample code to run the EfCore migration as a background job when the API started:
Example DbMigrationJob.cs
namespace Api.Configs;

/// <summary>
/// Represents a hosted service that runs database migrations on application startup.
/// </summary>
public class DbMigrationJob : IHostedService
{
    private readonly IServiceProvider _serviceProvider;
    private readonly ILogger<DbMigrationJob> _logger;

    /// <summary>
    /// Initializes a new instance of the <see cref="DbMigrationJob"/> class.
    /// </summary>
    /// <param name="serviceProvider">The service provider used to create and manage services.</param>
    /// <param name="logger">The logger used to log information and errors.</param>
    public DbMigrationJob(IServiceProvider serviceProvider, ILogger<DbMigrationJob> logger)
    {
        _serviceProvider = serviceProvider ?? throw new ArgumentNullException(nameof(serviceProvider));
        _logger = logger ?? throw new ArgumentNullException(nameof(logger));
    }

    /// <summary>
    /// Starts the database migration process.
    /// </summary>
    /// <param name="cancellationToken">A cancellation token used to propagate notification that the operation should be canceled.</param>
    /// <returns>A task that represents the asynchronous start operation.</returns>
    public async Task StartAsync(CancellationToken cancellationToken)
    {
        // Create a scope to manage the lifecycle of the services.
        await using var scope = _serviceProvider.CreateAsyncScope();

        // Get the application database context from the service provider.
        var db = scope.ServiceProvider.GetRequiredService<AppDbContext>();

        try
        {
            // Apply any pending migrations to the database.
            // Note: For demo purposes, EnsureCreatedAsync is used. In production, MigrateAsync should be used instead.
            await db.Database.EnsureCreatedAsync(cancellationToken: cancellationToken);
            _logger.LogInformation("Database migration has been run successfully.");
        }
        catch (Exception ex)
        {
            _logger.LogError(ex, "An error occurred while running the database migration.");
        }
    }

    /// <summary>
    /// Stops the database migration process.
    /// </summary>
    /// <param name="cancellationToken">A cancellation token used to propagate notification that the operation should be canceled.</param>
    /// <returns>A task that represents the asynchronous stop operation.</returns>
    public Task StopAsync(CancellationToken cancellationToken) => Task.CompletedTask;
}
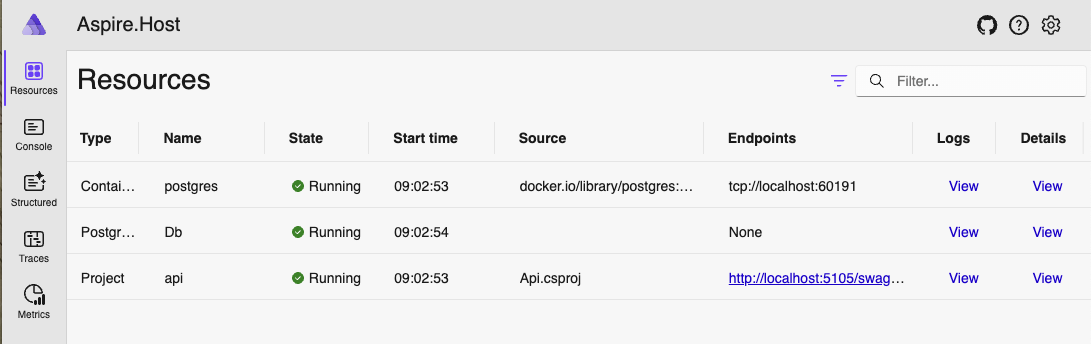
5. Aspire Host Dashboard
Run the Aspire.Host project. The dashboard will display all running components.
Note:
If you are migrating from Aspire version 8 to version 9, ensure that the <Sdk Name="Aspire.AppHost.Sdk" Version="9.0.0"/> element is added to the project file. This ensures compatibility and leverages the latest features and improvements in Aspire 9.
Example Aspire.Host.csproj
<Project Sdk="Microsoft.NET.Sdk">

    <Sdk Name="Aspire.AppHost.Sdk" Version="9.0.0"/>

    <PropertyGroup>
        <OutputType>Exe</OutputType>
        <TargetFramework>net9.0</TargetFramework>
        <ImplicitUsings>enable</ImplicitUsings>
        <Nullable>enable</Nullable>
        <IsAspireHost>true</IsAspireHost>
        <UserSecretsId>1279ebc0-eca4-435e-a5e9-254596a349a8</UserSecretsId>
    </PropertyGroup>

    <ItemGroup>
        <PackageReference Include="Aspire.Hosting.AppHost" Version="9.0.0"/>
        <PackageReference Include="Aspire.Hosting.PostgreSQL" Version="9.0.0" />
    </ItemGroup>

    <ItemGroup>
      <ProjectReference Include="..\Api\Api.csproj" />
    </ItemGroup>

</Project>
.NET Aspire for Testing
Integration tests ensure that different parts of the application work together correctly. However, writing and running them on CI/CD pipelines can be challenging and time-consuming. .NET Aspire simplifies this process by handling much of the setup for us.
1. Create Aspire.Tests
Create a new test project named Aspire.Tests using the Test Project (xUnit) template provided by .NET Aspire. This template sets up the necessary scaffolding for integration tests using xUnit.
Note:
Similar to Aspire.Host project. Ensure that the <Sdk Name="Aspire.AppHost.Sdk" Version="9.0.0"/> element is added to the project file.
Example Aspire.Tests.csproj
<Project Sdk="Microsoft.NET.Sdk">
    <Sdk Name="Aspire.AppHost.Sdk" Version="9.0.0"/>
    <PropertyGroup>
        <TargetFramework>net9.0</TargetFramework>
        <ImplicitUsings>enable</ImplicitUsings>
        <Nullable>enable</Nullable>
        <IsPackable>false</IsPackable>
        <IsTestProject>true</IsTestProject>
        <LangVersion>default</LangVersion>
    </PropertyGroup>

    <ItemGroup>
        <PackageReference Include="Aspire.Hosting.Testing" Version="9.0.0" />
        <PackageReference Include="coverlet.collector" Version="6.0.2"/>
        <PackageReference Include="Microsoft.AspNetCore.Mvc.Testing" Version="9.0.0" />
        <PackageReference Include="Microsoft.NET.Test.Sdk" Version="17.12.0" />
        <PackageReference Include="xunit" Version="2.9.2" />
        <PackageReference Include="xunit.runner.visualstudio" Version="2.8.2"/>
    </ItemGroup>

    <ItemGroup>
        <Using Include="System.Net"/>
        <Using Include="Microsoft.Extensions.DependencyInjection"/>
        <Using Include="Aspire.Hosting.ApplicationModel"/>
        <Using Include="Aspire.Hosting.Testing"/>
        <Using Include="Xunit"/>
    </ItemGroup>

    <ItemGroup>
        <PackageReference Include="Aspire.Hosting.AppHost" Version="9.0.0" />
        <PackageReference Include="Aspire.Hosting.PostgreSQL" Version="9.0.0" />
    </ItemGroup>

    <ItemGroup>
      <ProjectReference Include="..\Api\Api.csproj" />
    </ItemGroup>

</Project>
2. ApiFixture Class
The ApiFixture class sets up the necessary environment for integration tests. It extends WebApplicationFactory<Api.Program> and implements IAsyncLifetime to manage the lifecycle of the test environment.
using Aspire.Tests.Extensions;
using Microsoft.AspNetCore.Mvc.Testing;
using Microsoft.Extensions.Configuration;
using Microsoft.Extensions.Hosting;

namespace Aspire.Tests.Fixtures;

public sealed class ApiFixture : WebApplicationFactory<Api.Program>, IAsyncLifetime
{
    private readonly DistributedApplication _app;
    private readonly IResourceBuilder<PostgresServerResource> _postgres;
    private string? _postgresConnectionString;

    /**
     * Constructor for ApiFixture.
     * Initializes the DistributedApplicationOptions and sets up the PostgreSQL server resource.
     */
    public ApiFixture()
    {
        var options = new DistributedApplicationOptions
        {
            AssemblyName = typeof(ApiFixture).Assembly.FullName,
            DisableDashboard = true
        };
        var builder = DistributedApplication.CreateBuilder(options);

        _postgres = builder.AddPostgres("postgres");
        _app = builder.Build();
    }

    /**
     * Creates and configures the host for the application.
     * Adds the PostgreSQL connection string to the host configuration.
     * Ensures the database is created before returning the host.
     *
     * @param builder The IHostBuilder instance.
     * @return The configured IHost instance.
     */
    protected override IHost CreateHost(IHostBuilder builder)
    {
        builder.ConfigureHostConfiguration(config =>
        {
            config.AddInMemoryCollection(new Dictionary<string, string?>
            {
                { "ConnectionStrings:Db", _postgresConnectionString },
            });
        });

       return base.CreateHost(builder);
    }

    /**
     * Disposes the resources used by the fixture asynchronously.
     * Stops the application host and disposes of it.
     */
    public new async Task DisposeAsync()
    {
        await base.DisposeAsync();
        await _app.StopAsync();
        await _app.DisposeAsync();
    }

    /**
     * Initializes the fixture asynchronously.
     * Starts the application host and waits for the PostgreSQL resource to be in the running state.
     * Retrieve the PostgreSQL connection string.
     */
    public async Task InitializeAsync()
    {
        await _app.StartAsync();
        await _app.WaitForResourcesAsync();
        _postgresConnectionString = await _postgres.Resource.GetConnectionStringAsync();

        // Ensure that the PostgreSQL database is fully initialized before proceeding.
        //And Db migration is rant successfully.
        // This is crucial, especially in CI/CD environments, to prevent tests from failing due to timing issues.
        await Task.Delay(TimeSpan.FromSeconds(10));
    }
}Explanation:
The ApiFixture class is responsible for:
- Setting up a PostgreSQL server resource.
- Configuring the host with the necessary connection strings.
- Ensuring the database is created and testing data prepared before tests run.
- Starting and stopping the application host.
- Cleaning up resources after tests are completed.
3. Test Cases Class
The ProductEndpointsTests class contains integration tests for the product endpoints of the API. It uses the ApiFixture to set up the test environment and HttpClient to make requests to the API.
using System.Net.Http.Json;
using Api.Data;
using Api.Endpoints.Products;
using Aspire.Tests.Fixtures;
using Xunit.Abstractions;

namespace Aspire.Tests;

public class ProductEndpointsTests(ApiFixture fixture, ITestOutputHelper output) : IClassFixture<ApiFixture>
{
    private readonly HttpClient _client = fixture.CreateClient();

    /**
     * Tests the creation of a product.
     * Ensures that the product is created successfully and returns a valid product ID.
     */
    [Fact]
    public async Task CreateProduct_ReturnsCreatedProduct()
    {
        // Arrange
        var command = new CreateProductCommand { Name = "Test Product", Price = 10.99m };
        // Act
        var response = await _client.PostAsJsonAsync("/products", command);

        // Assert
        response.EnsureSuccessStatusCode();
        var productId = await response.Content.ReadFromJsonAsync<int>();
        Assert.True(productId > 0);
    }

    /**
     * Tests the retrieval of a product.
     * Ensures that the product is retrieved successfully and matches the expected values.
     */
    [Fact]
    public async Task GetProduct_ReturnsProduct()
    {
        // Arrange
        var command = new CreateProductCommand { Name = "Test Product", Price = 10.99m };
        var createResponse = await _client.PostAsJsonAsync("/products", command);
        var productId = await createResponse.Content.ReadFromJsonAsync<int>();

        // Act
        var response = await _client.GetAsync($"/products/{productId}");

        // Assert
        response.EnsureSuccessStatusCode();
        var product = await response.Content.ReadFromJsonAsync<Product>();
        Assert.NotNull(product);
        Assert.Equal("Test Product", product.Name);
        Assert.Equal(10.99m, product.Price);
    }

    /**
     * Tests the update of a product.
     * Ensures that the product is updated successfully and returns a NoContent status.
     */
    [Fact]
    public async Task UpdateProduct_ReturnsNoContent()
    {
        // Arrange
        var command = new CreateProductCommand { Name = "Test Product", Price = 10.99m };
        var createResponse = await _client.PostAsJsonAsync("/products", command);
        var productId = await createResponse.Content.ReadFromJsonAsync<int>();

        var updateCommand = new UpdateProductCommand { Id = productId, Name = "Updated Product", Price = 20.99m };

        // Act
        var response = await _client.PutAsJsonAsync($"/products/{productId}", updateCommand);

        // Assert
        response.EnsureSuccessStatusCode();
        Assert.Equal(HttpStatusCode.NoContent, response.StatusCode);
    }

    /**
     * Tests the deletion of a product.
     * Ensures that the product is deleted successfully and returns a NoContent status.
     */
    [Fact]
    public async Task DeleteProduct_ReturnsNoContent()
    {
        // Arrange
        var command = new CreateProductCommand { Name = "Test Product", Price = 10.99m };
        var createResponse = await _client.PostAsJsonAsync("/products", command);
        var productId = await createResponse.Content.ReadFromJsonAsync<int>();

        // Act
        var response = await _client.DeleteAsync($"/products/{productId}");

        // Assert
        response.EnsureSuccessStatusCode();
        Assert.Equal(HttpStatusCode.NoContent, response.StatusCode);
    }
}
Explanation:
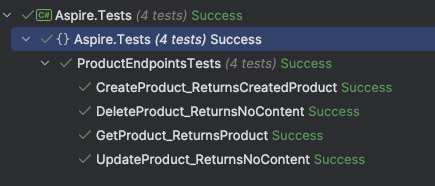
The ProductEndpointsTests class is responsible for testing the CRUD of the product endpoints. It ensures that:
- Creating a product works correctly and returns a valid product ID.
- Retrieving a product returns the expected product details.
- Updating a product successfully applies the changes and returns the appropriate status.
- Deleting a product removes it from the database and returns the correct status code.
4. Testing Results
Here are the reports on Azure DevOps after the pipeline ran successfully.
-
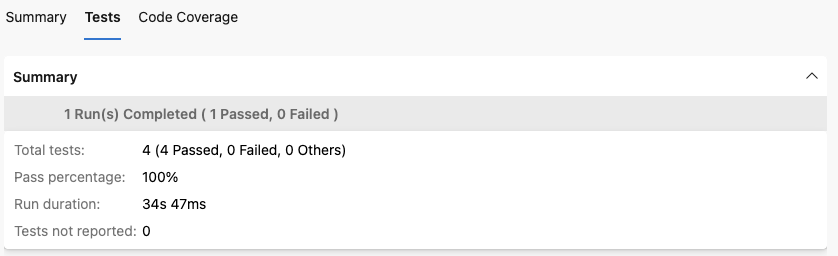
Test Case Results:
The test case results show the outcome of each executed test.
-
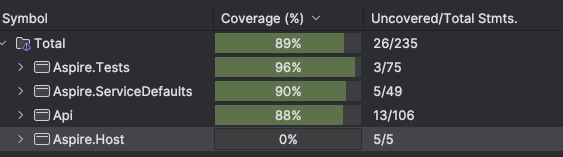
Coverage Results:
Code coverage results provide insights into how much of the codebase is being tested.
Running Tests on Azure DevOps
1. Configuring the Pipeline
To automate testing and code coverage collection, let’s set up a continuous integration (CI) pipeline using Azure DevOps.
In the Azure DevOps project, create a new pipeline that builds the code, runs tests, and collects code coverage data.
Here is an example of what our azure-pipelines.yml file might look like.
trigger:
  - main
  - dev

resources:
  - repo: self

variables:
  BUILDCONFIGURATION: Release
  RestoreBuildProjects: "**/*.csproj"
  TestProjects: "**/*[Tt]ests/*.csproj"

  # Agent VM image name
  vmImageName: "ubuntu-latest"

stages:
  - stage: Build
    displayName: Build and push stage
    jobs:
      - job: Build
        displayName: Build
        pool:
          vmImage: $(vmImageName)
        steps:
          # Use the correct .NET SDK version
          - task: UseDotNet@2
            inputs:
              packageType: 'sdk'
              version: '8.x'

          # Install the necessary .NET workload
          - task: Bash@3
            inputs:
              targetType: "inline"
              script: "dotnet workload install aspire"

          # Build the project
          - task: DotNetCoreCLI@2
            displayName: Build
            inputs:
              projects: $(RestoreBuildProjects)
              arguments: -c $(BuildConfiguration)

          # Run tests and collect code coverage
          - task: DotNetCoreCLI@2
            displayName: Test
            inputs:
              command: "test"
              projects: "$(TestProjects)"
              arguments: '--configuration $(BuildConfiguration) --collect "Code Coverage"'
Explanation:
- UseDotNet@2: Ensures that the correct .NET SDK is installed on the build agent.
- Install Aspire Workload: Installs the Aspire workload needed for the project.
- Build Projects: Builds all the projects specified by the
RestoreBuildProjectsvariable. - Run Tests and Collect Code Coverage: Executes the tests in the projects specified by the
TestProjectsvariable and collects code coverage data.
Note: Ensure that the YAML file includes the UseDotNet@2 task to specify the required .NET SDK version.
Running the Pipeline
Save the pipeline configuration and run it. Monitor the build process to ensure all steps complete successfully.
After the pipeline completes, the test results and code coverage reports should be appeared in Azure DevOps.
-
Test Results:
Displays which tests passed or failed.
-
Code Coverage:
Provides detailed information about which parts of the code were tested.
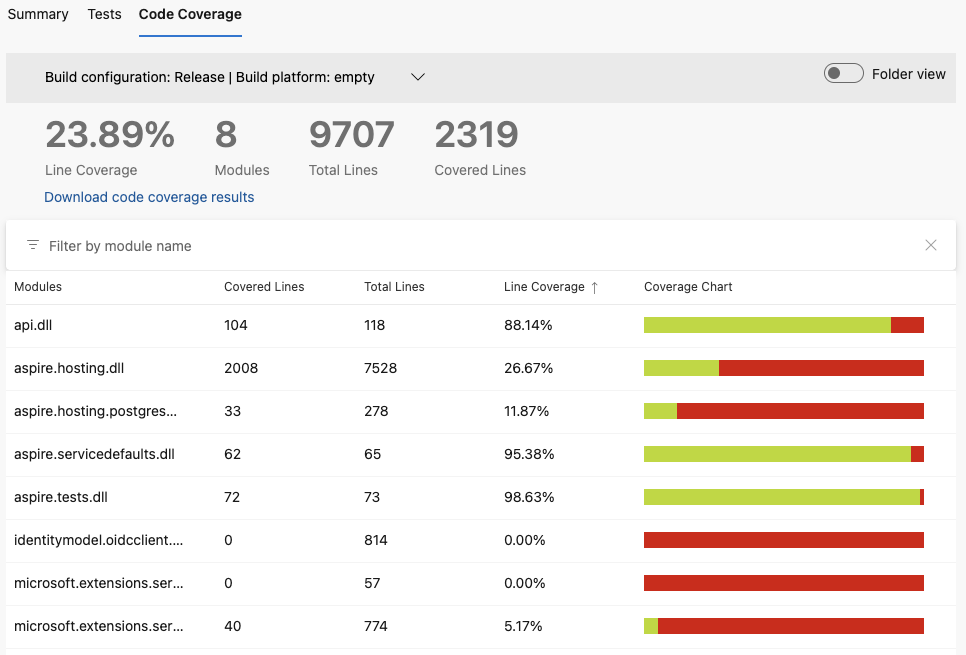
Note: The initial code coverage might be lower than expected. For example, you might see an overall coverage of 23.89%, even though the API component itself has 88.14% coverage. This discrepancy occurs because the coverage report includes all libraries, those not part of the API project.
Improving Code Coverage Reports
To produce a more focused and insightful code coverage report, we can adjust the settings to concentrate on the pertinent components of the project.
1. Add the coverlet.collector NuGet Package
Coverlet is a versatile, cross-platform library designed for code coverage analysis. It supports a variety of code coverage formats and allows for extensive customization options.
Ensure that the coverlet.collector package is added to every testing project in order to generate and compile comprehensive code coverage reports.
dotnet add package coverlet.collector --version latest-
Creating the Coverage Filtering File:
Create a file named
coverage.runsettingsin the project root with the appropriate configuration.
<?xml version="1.0" encoding="utf-8"?>
<RunSettings>
    <DataCollectionRunSettings>
        <DataCollectors>
            <DataCollector friendlyName="XPlat Code Coverage">
                <Configuration>
                    <Include>
                        [Api*]*
                    </Include>
                    <Exclude>

                    </Exclude>
                </Configuration>
            </DataCollector>
        </DataCollectors>
    </DataCollectionRunSettings>
</RunSettings>Explanation:
- The
<Include>section specifies which assemblies to include in the code coverage report. In this case,[Api*]*includes all assemblies starting with “Api”. - The
<Exclude>section can be used to exclude specific assemblies or classes.
-
Updating the Pipeline Configuration:
Modify the
azure-pipelines.ymlfile to use thecoverage.runsettingsfile and publish the code coverage results.
# ... previous configuration ...

# Run tests with coverage filtering
- task: DotNetCoreCLI@2
  displayName: "Test with Coverage Filtering"
  inputs:
    command: "test"
    projects: "$(TestProjects)"
    arguments: '--configuration $(BuildConfiguration) --settings coverage.runsettings --collect "XPlat Code Coverage"'

# Publish the code coverage results to Azure DevOps
- task: PublishCodeCoverageResults@2
  inputs:
summaryFileLocation: "$(Agent.TempDirectory)/**/coverage.cobertura.xml"Explanation:
- Run Tests with Coverage Filtering: Executes tests using the
coverage.runsettingsfile to filter the code coverage data. - Publish Code Coverage Results: Publishes the code coverage results to Azure DevOps for easy visualization.
-
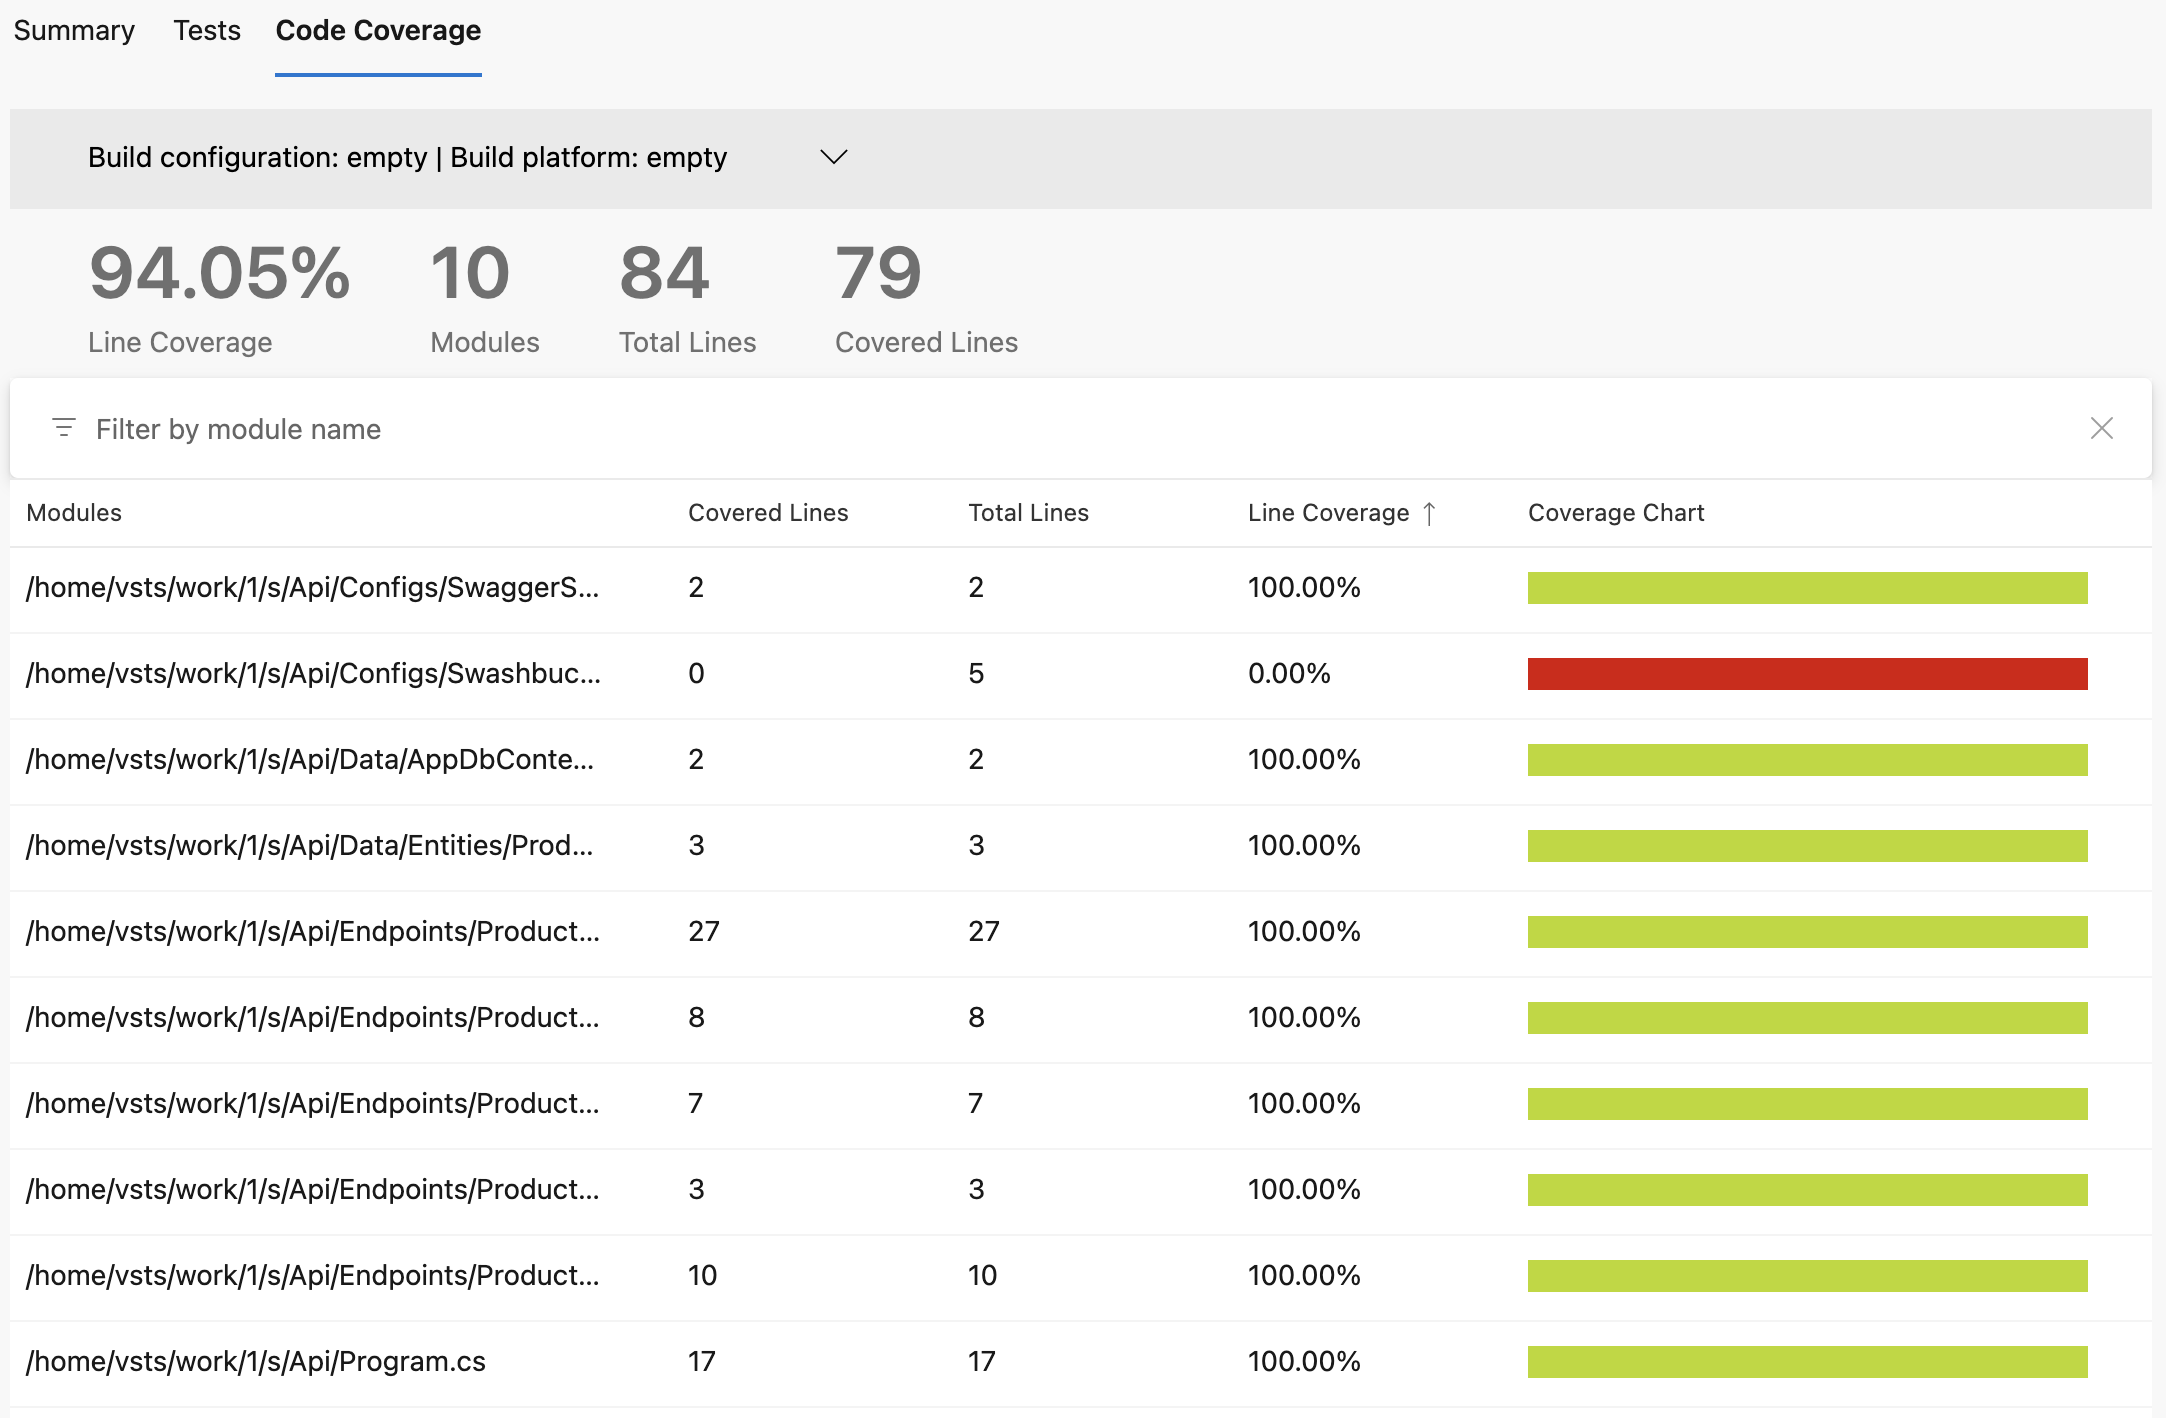
Review the Enhanced Coverage Report:
After running the updated pipeline, We should see an improved code coverage report that focuses on the relevant parts of the project. The coverage results will now provide detailed insights at the class level using the XPlat format.
Conclusion
By utilizing .NET Aspire and Docker, we can create a consistent, isolated environment that streamlines not just Entity Framework integration testing but the entire development lifecycle. .NET Aspire offers a flexible to config as code and sharing ready-to-run environment to all the development teams.
References
Thank You
Thank for taking the time to read this guide! I hope it has been helpful, feel free to explore further, and happy coding! 🌟✨
Steven GitHub