In a previous post, It detailed how to set up Cert Manager on a Raspberry Pi K3s Cluster. That was a great starting point, and in this article, I decided to explore a more complex scenario by deploying Cert Manager within a private Kubernetes cluster on Azure. I’m excited to share the insights and techniques I discovered along the way, hoping they can make your journey a bit smoother.”
Azure Architecture Overview
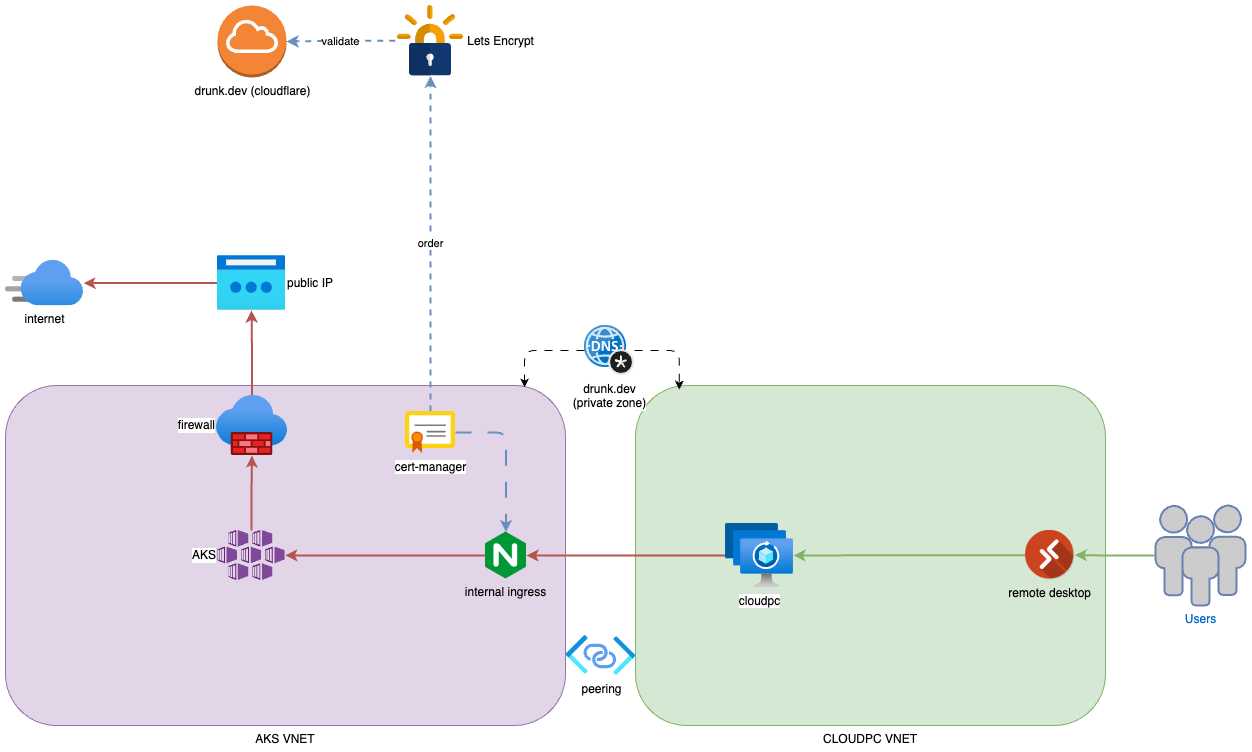
The following diagram illustrates the architecture we’ll be working with:

The setup involves two Virtual Networks (VNETs) that are peered:
-
CloudPC VNET: This is where we host all our Windows 365 Enterprise environments, allowing remote users to securely access the company’s resources.
-
AKS VNET: This VNET hosts our private AKS cluster. To keep things secure, I’ve set up a firewall that controls all outbound traffic, with no direct inbound access from the internet. The public IP is purely for outbound traffic—no inbound ports are left open.
-
NGINX Ingress: This piece allows CloudPC to access applications running on AKS through VNET peering, making sure everything stays within a private network.
The Challenge I Encountered: Securing Internal Traffic
One of the challenges I came across was figuring out how to secure the communication between the applications hosted on AKS and the CloudPC environment, even though it’s all internal within the virtual networks. I wanted to make sure that all data in transit was encrypted using SSL certificates.
How I Solved It: Leveraging Cloudflare DNS and Cert Manager
To address the challenge, I implemented the following approach:
-
Domain Setup with Cloudflare: Let’s assume I have a domain,
drunk.dev, registered with Cloudflare. While this domain isn’t directly used for external-facing services. But, I utilize this domain with Let’s Encrypt to verify and issue SSL certificates for the ingress controllers of my applications within the AKS cluster. -
Internal DNS Configuration on Azure: Internally, I created a private DNS Zone in Azure with the same name (
drunk.dev) and linked this zone to both the CloudPC and AKS VNETs. This setup is critical as it ensures that internal DNS queries for thedrunk.devdomain are resolved correctly within the private network, facilitating secure communication between services.
Installation
-
Create a Cloudflare DNS API Token:
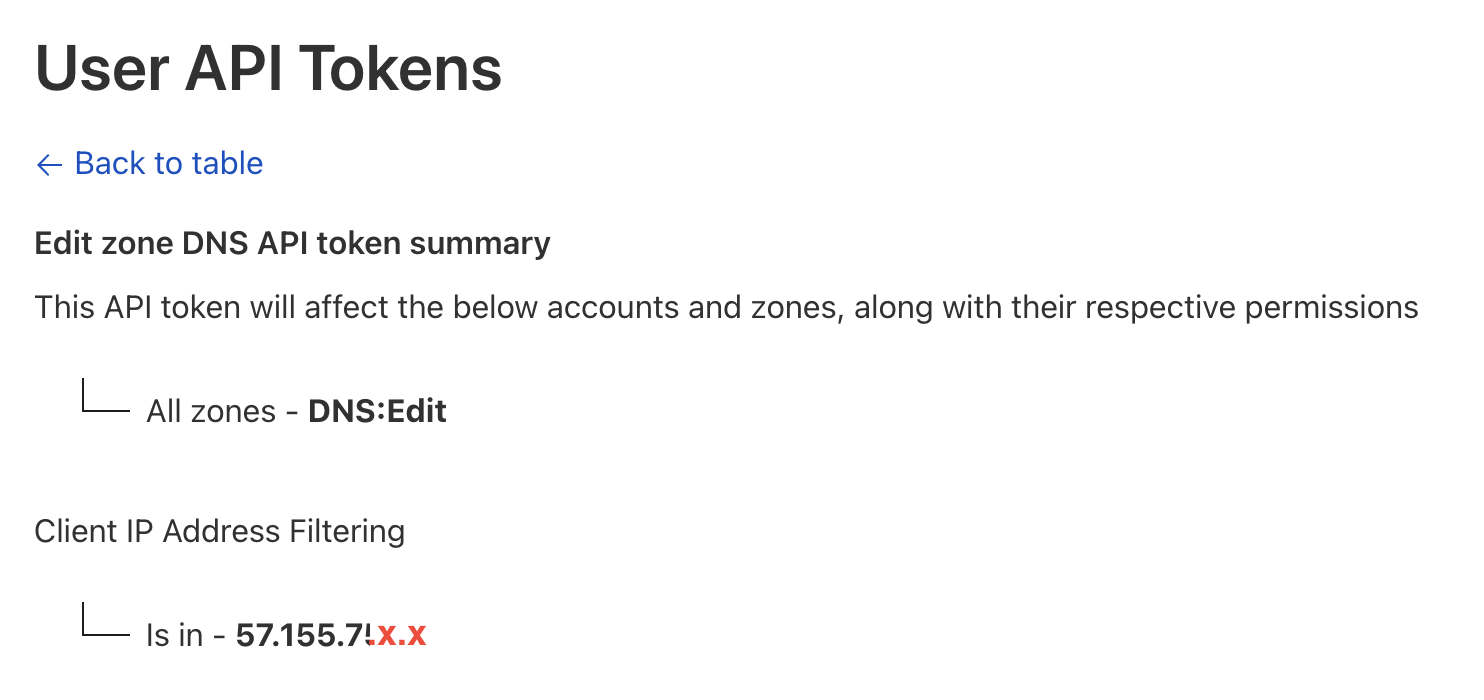
First, navigate to the Cloudflare profile and create an API token by following this link. The API token should have permissions to manage DNS records for the domains.Additionally, for enhanced security, specify the AKS public IP address under
Client IP Address Filteringin Cloudflare. This ensures that the API token is only accessible from the AKS platform, preventing unauthorized access from other locations.
-
Create a Kubernetes Secret for the Cloudflare API Token:
Next, create a Kubernetes secret to securely store the Cloudflare API token within the AKS cluster. This secret will be referenced by Cert Manager during DNS validation.
apiVersion: "v1"
kind: Secret
metadata:
  name: cf-dns-secret
stringData:
  token: "YOUR-CF-DNS-TOKEN"
# Replace 'YOUR-CF-DNS-TOKEN' with the actual API token generated in the previous step.- Cert Manager Installation:
- Create a values.yaml file for Helm Installation: Before installing Cert Manager, create a values.yaml file with the following content. The extraArgs section is important as it directs Cert Manager to use Cloudflare’s DNS resolver for DNS-01 challenge validation.
# auto create CRD resources
installCRDs: true

# Default ingress value
ingressShim:
  defaultIssuerName: "letsencrypt-prod"
  defaultIssuerKind: "ClusterIssuer"
  defaultIssuerGroup: "cert-manager.io"

#extra args is important for Cloudflare DNS validation
extraArgs:
  - --dns01-recursive-nameservers-only
  - --dns01-recursive-nameservers=1.1.1.1:53
This configuration ensures that Cert Manager will only use Cloudflare’s DNS servers (specifically 1.1.1.1:53) to perform DNS-01 challenge validation, which is necessary for issuing SSL certificates.
- Install Cert Manager with Helm: Now, proceed with installing Cert Manager using Helm. The following commands will add the Jetstack Helm repository, update it, and then install Cert Manager with the custom values.yaml configuration file above.
helm repo add jetstack https://charts.jetstack.io
helm repo update

helm install cert-manager jetstack/cert-manager \
  --values values.yaml \
  -n cert-manager \
--create-namespace --cleanup-on-fail- Set Up a ClusterIssuer for Cert Manager: The next step is create a ClusterIssuer resource to define how Cert Manager should obtain SSL certificates. The following template uses the Cloudflare DNS API token stored in the Kubernetes secret created earlier.
apiVersion: cert-manager.io/v1
kind: ClusterIssuer
metadata:
  name: letsencrypt-prod
spec:
  acme:
    server: https://acme-v02.api.letsencrypt.org/directory
    # Replace with the administrator email associated with your domain.
    email: "[email protected]"
    privateKeySecretRef:
      name: letsencrypt-prod
    solvers:
      - dns01:
          cloudflare:
            #Update this accoring to your domain
            email: "[email protected]"
            # Ensure that the name matches the secret you created (cf-dns-secret),
            # and the key references the correct data key within the secret (token).
            apiTokenSecretRef:
              name: cf-dns-secret
key: token- Firewall Whitelisting
Since the AKS cluster’s outbound traffic is managed by a firewall, it’s neededs to whitelist specific external services to ensure that Cert Manager can successfully issue certificates. Without these exceptions, the certificate issuance process will fail.
Here’s what needs to allow in the Firewall rules:
- Allow outbound access to
api.cloudflare.comon port443. - Allow outbound access to
*.api.letsencrypt.orgon port443.
Nginx Ingress Installation
Setting up NGINX Ingress in a private AKS environment involves configuring it to use a private IP address and an internal ingress class.
- Install NGINX Ingress Controller: To deploy NGINX as an internal Ingress controller with a private IP address, create a values.yaml file with the following configuration.
controller:
  hostNetwork: "false"
  useIngressClassOnly: "true"
  watchIngressWithoutClass: "true"
  # the ingress class name is internal
  ingressClass: "internal"
  # The custom ingress class
  ingressClassResource:
    name: "internal"
    enabled: true
    default: true
    controllerValue: k8s.io/ingress-nginx
  service:
    annotations:
      # This annotation to tell Azure to create an internal load balancer.
      service.beta.kubernetes.io/azure-load-balancer-internal: "true"
    externalTrafficPolicy: "Local"
    # update this private IP address accroding to your address spaces.
    loadBalancerIP: "192.168.250.250"
Explanation:
hostNetwork: false ensures that the NGINX pods do not bind directly to the node’s network interfaces, maintaining isolation.useIngressClassOnly: Ensures that only Ingress resources with the specified ingressClass will be processed by this controller.ingressClass: Named internal to distinguish it from other Ingress classes, ensuring it’s used specifically for internal traffic.service.annotations: The key annotation service.beta.kubernetes.io/azure-load-balancer-internal: ‘true’ tells Azure to create an internal load balancer instead of a public one.loadBalancerIP: Assigns a static private IP address (192.168.250.250) to the NGINX load balancer, ensuring it’s accessible only within the internal network. Once NGINX is deployed with this configuration, it will only be accessible from within the internal network via the private IP address192.168.250.250.
Install Nginx with Helm
helm repo add ingress-nginx https://kubernetes.github.io/ingress-nginx
helm repo update

helm nginx ingress-nginx/ingress-nginx \
  --values values.yaml \
  -n  nginx-ingress \
--create-namespace --cleanup-on-fail- Configure DNS for Internal Access
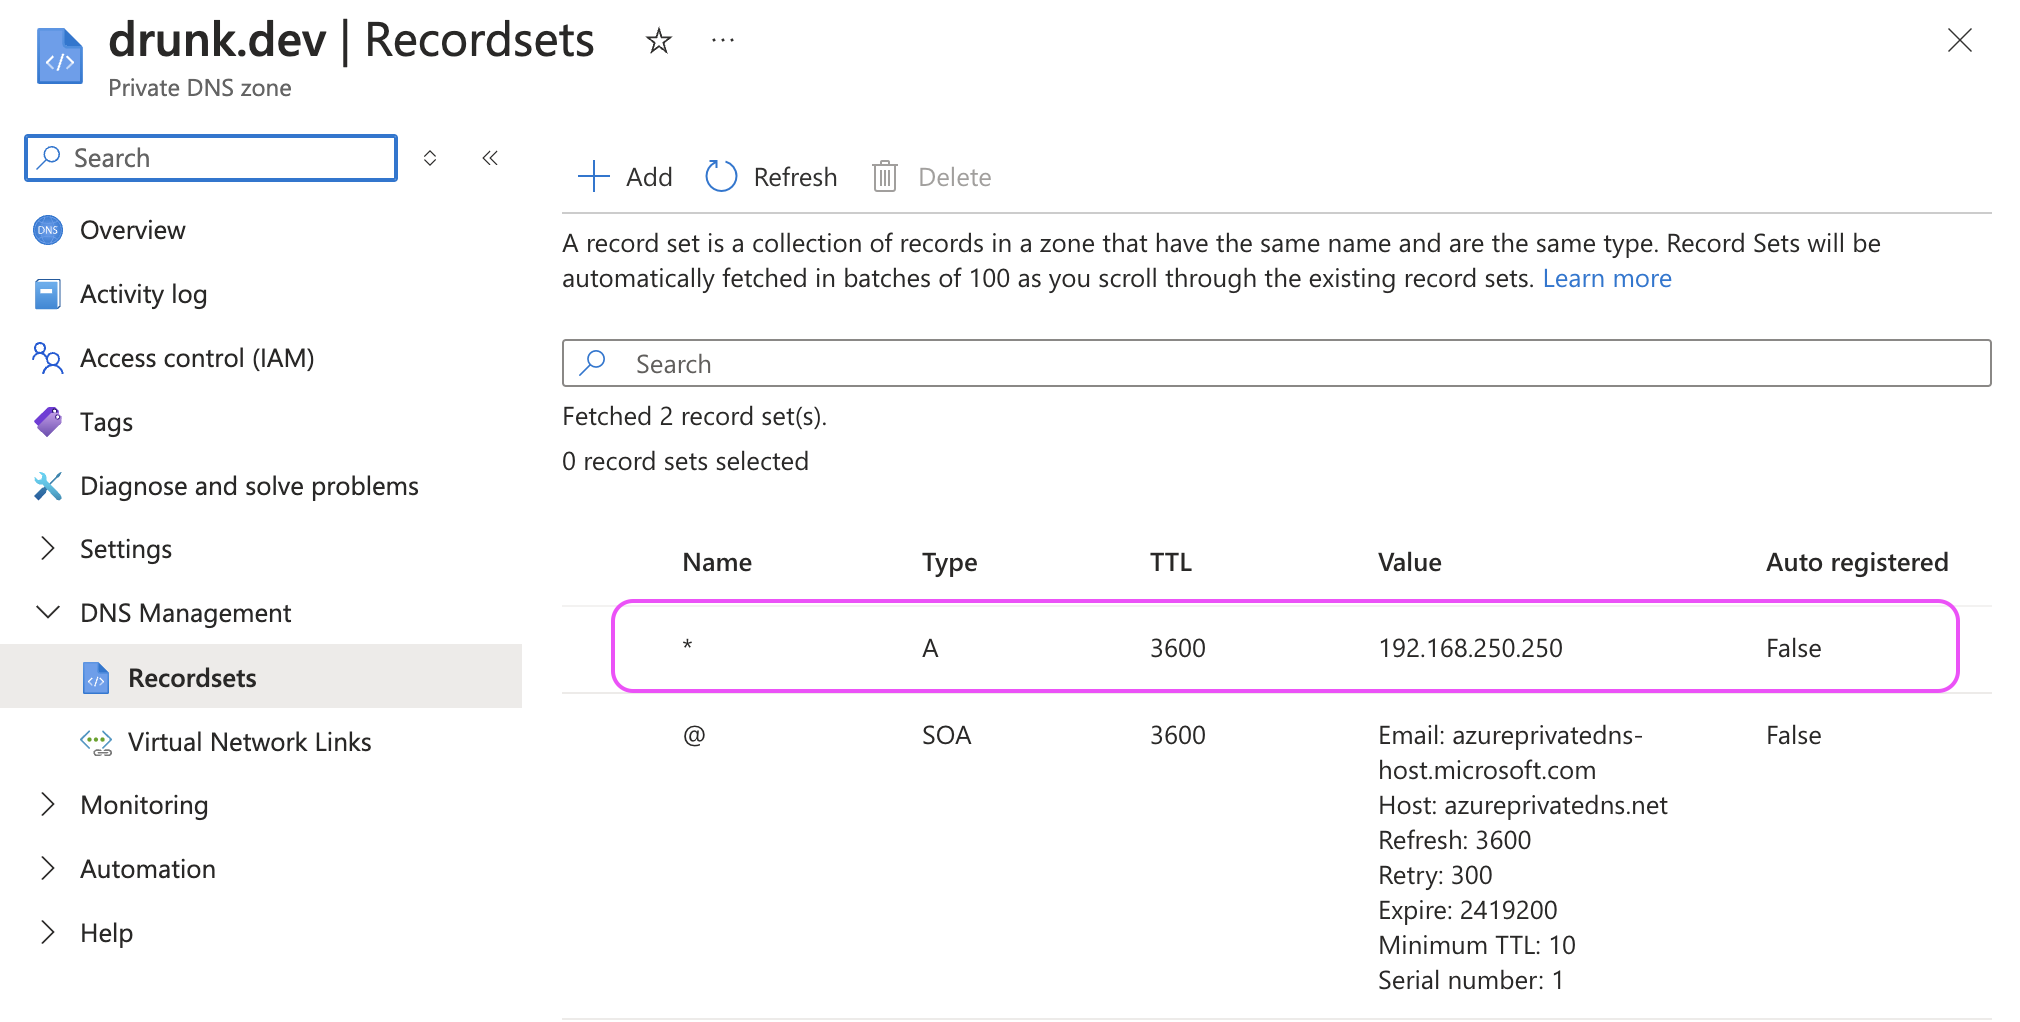
After deploying the NGINX Ingress controller, the next step is to ensure that internal DNS queries resolve to the NGINX private IP. To do this, add an A record in the Azure private DNS zone that created earlier:
- DNS Record: Add an A record pointing to 192.168.250.250 for the internal domain. This ensures that any internal traffic destined for blogs.drunk.dev is routed to the NGINX Ingress controller.

- Create a Secure Ingress with Dynamic TLS Certificate Generation
Now, it’s time to create a secure Ingress resource that uses dynamic TLS certificate generation.
Here’s an example configuration:
apiVersion: networking.k8s.io/v1
kind: Ingress
metadata:
  name: drunk-blog-apps
  namespace: drunk-apps
  annotations:
    kubernetes.io/tls-acme: "true"
    nginx.ingress.kubernetes.io/backend-protocol: HTTP
    ingress.kubernetes.io/force-ssl-redirect: "true"
spec:
  # the name of ingress class percificly here.
  ingressClassName: internal
  # The tls config
  tls:
    - hosts:
        - blogs.drunk.dev
      secretName: tls-blogs-lets
  rules:
    # the host config
    - host: blogs.drunk.dev
      http:
        paths:
          - path: /
            pathType: Prefix
            backend:
              service:
                name: blog-apps
                port:
                  number: 8080
Key Points:
ingressClassName: Specifies that this Ingress resource should be handled by the internal Ingress class, ensuring it’s routed through the private NGINX controller.tls: Configures automatic TLS certificate generation forblogs.drunk.devusing Cert Manager. The certificate will be stored in a Kubernetes secret namedtls-blogs-lets.annotations: The force-ssl-redirect: ‘true’ annotation ensures that all HTTP traffic is redirected to HTTPS, securing the communication.
Once the Ingress resource is created, Cert Manager will automatically issue a TLS certificate for blogs.drunk.dev and bind it to the Ingress. The certificate will be monitored and automatically renewed by Cert Manager before expiration, ensuring continuous security without manual intervention.
Conclusion
So, that’s how I secured internal communications within my private AKS environment using Cert Manager and Cloudflare DNS management. This approach simplified the management of SSL certificates and provided an extra layer of security for internal data transmissions.
I hope you found this walkthrough helpful or at least interesting. If you have any thoughts, questions, or would like to share your own experiences, feel free to reach out. I’m always keen to hear how others are tackling similar challenges!
Thank You
Thank you for taking the time to read this guide! I hope it has been helpful, feel free to explore further, and happy coding! 🌟✨
Steven | GitHub