Introduction
As organizations grow, so does the number of user accounts within their systems. Managing these accounts efficiently is crucial for maintaining security and compliance. In particular, inactive accounts in Azure Entra ID (formerly known as Azure Active Directory) can pose significant security risks. These dormant accounts are potential entry points for malicious actors seeking unauthorized access to sensitive data.
In this comprehensive guide, we’ll walk through how to automate the management of inactive Azure Entra ID accounts using a TypeScript application. We’ll cover everything from setting up an Azure Entra ID application, implementing the TypeScript program, to scheduling the script using Azure DevOps for regular execution.
Table of Contents
Open Table of Contents
- 1. Understanding the Risks of Inactive Accounts
- 2. Creating an Azure Entra ID Application
- 3. Implementing the TypeScript Program
- 4. Scheduling the Script with Azure DevOps
- 5. Conclusion
- Thank You
1. Understanding the Risks of Inactive Accounts
Inactive accounts are user accounts that haven’t been used for a significant period. They can accumulate due to employee turnover, role changes, or users simply forgetting about them. These accounts are risky because:
- Security Vulnerabilities: They might have weak or outdated passwords, making them easy targets.
- Unauthorized Access: If compromised, they can provide unauthorized access to internal systems and data.
- Compliance Issues: Regulations often require the timely removal or deactivation of unused accounts.
Regularly auditing and managing these accounts helps mitigate these risks and ensures compliance with security best practices.
2. Creating an Azure Entra ID Application
To interact with Azure Entra ID programmatically, we’ll create an App Registration. This application will authenticate and manage user accounts via the Microsoft Graph API.
Steps to Create an App Registration
1. Navigate to Azure Entra ID
- Log in to the Azure portal.
- In the left-hand navigation pane, select Azure Entra ID.
2. Create a New App Registration
- Click on “App registrations” in the sidebar.
- Click on “New registration” at the top.
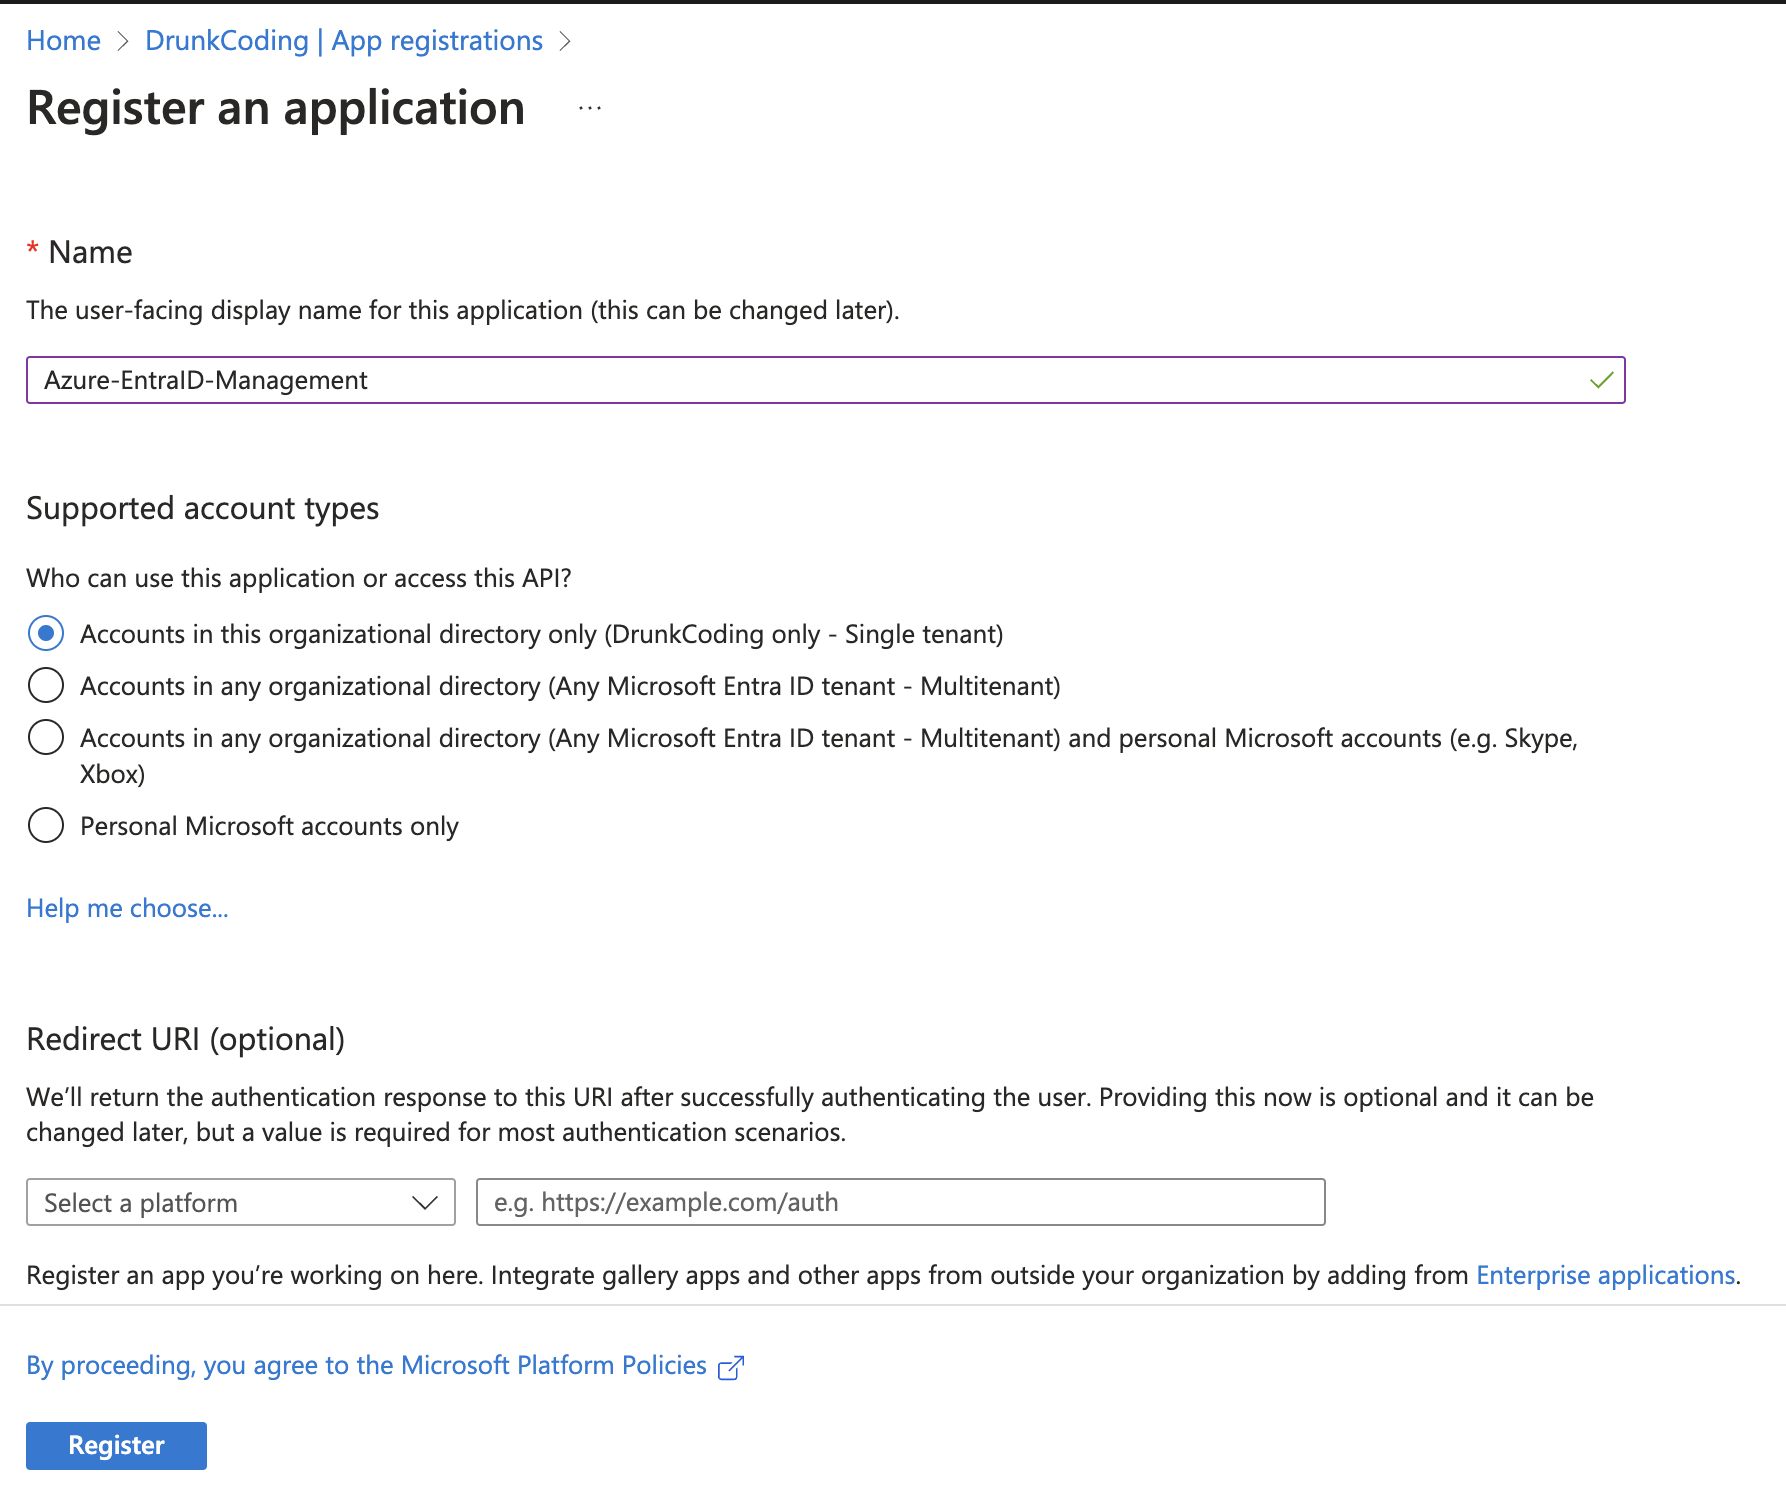
3. Configure the App Registration
- Name: Enter a meaningful name, e.g.,
Azure-EntraID-Managementapp. - Supported account types: Choose “Accounts in this organizational directory only (Single tenant)”.
- Redirect URI: This is not required for our application, so you can leave it blank.
- Click “Register” to create the app.
Adding API Permissions
After creating the app registration, we need to grant it permissions to access the Microsoft Graph API.
1. Navigate to API Permissions
- In the app registration’s overview page, click on “API permissions” in the sidebar.
2. Add Permissions
- Click on “Add a permission”.
- Select “Microsoft Graph”.
- Choose “Application permissions” since this app will run as a background service or daemon.
3. Select Required Permissions
Search for and select the following permissions:
AuditLog.Read.All: Allows the app to read all audit log data.User.Read.All: Allows the app to read user profiles.User.ReadWrite.All: Allows the app to read and write user profiles.
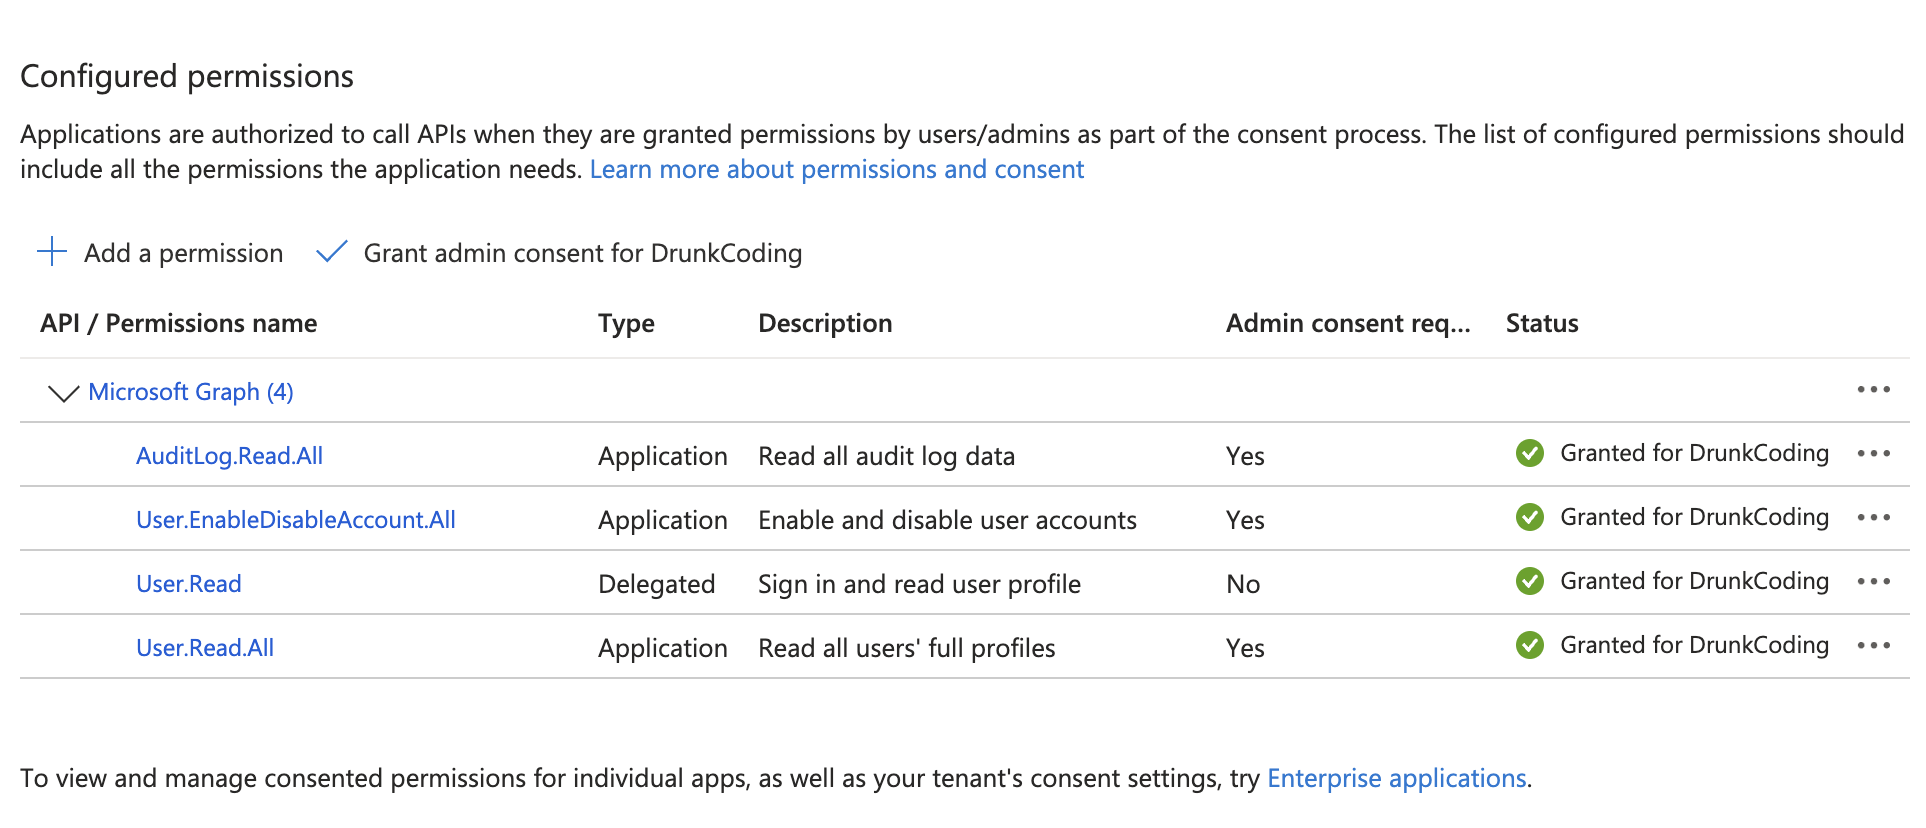
Note: The
User.ReadWrite.Allpermission is required to enable or disable user accounts.
4. Grant Admin Consent
- After adding the permissions, click on “Grant admin consent for [Your Tenant Name]”.
- Confirm by clicking “Yes” in the prompt.
5. Create a Client Secret
- Navigate to “Certificates & secrets”.
- Click on “New client secret”.
- Provide a description and set an expiration period.
- Click “Add”.
- Copy the Value of the client secret and store it securely. You won’t be able to view it again.
Collect Necessary Information
You’ll need the following information for your application:
- Tenant ID: Found in Azure Entra ID > Properties.
- Client ID: Found in your app registration’s Overview page.
- Client Secret: The value you just created.
3. Implementing the TypeScript Program
We’ll create a TypeScript program that:
- Authenticates with Azure Entra ID using the app registration.
- Retrieves inactive user accounts based on their last sign-in date.
- Disables these inactive accounts.
- Generates a report of all disabled accounts.
Setting Up the Project
1. Initialize the Project
Create a new directory for your project and initialize npm:
mkdir azure-entra-id-management
cd azure-entra-id-management
npm init -y
2. Install Dependencies
Install the required packages:
npm install @azure/identity @microsoft/microsoft-graph-client dayjs
npm install --save-dev typescript ts-node@azure/identity: Provides Azure authentication methods.@microsoft/microsoft-graph-client: Allows interaction with Microsoft Graph API.dayjs: A lightweight library for date manipulation.typescriptandts-node: Required for compiling and running TypeScript code.
3. Configure TypeScript
Create a tsconfig.json file:
{
  "compilerOptions": {
    "module": "commonjs",
    "esModuleInterop": true,
    "target": "es6",
    "moduleResolution": "node",
    "sourceMap": true,
    "outDir": "dist"
  },
  "lib": ["es2015"],
  "files": ["index.ts"]
}
Writing Code
1. Create the Source File and Import Required Modules
At the top of index.ts, import the necessary modules:
import { DefaultAzureCredential } from "@azure/identity";
import { Client } from "@microsoft/microsoft-graph-client";
import { TokenCredentialAuthenticationProvider } from "@microsoft/microsoft-graph-client/authProviders/azureTokenCredentials";
import dayjs from "dayjs";Note: The
isomorphic-fetchimport is necessary for environments wherefetchis not available globally.
2. Set Configuration Variables
Define the configuration variables and excluded accounts:
// Configuration
const INACTIVITY_THRESHOLD_MONTHS = 2; // Adjust as needed
const EXCLUDED_ACCOUNTS = ["[email protected]", "[email protected]"];

// Azure AD App Credentials - Replace with your actual credentials or use environment variables
const TENANT_ID = process.env.AZURE_TENANT_ID;
const CLIENT_ID = process.env.AZURE_CLIENT_ID;
const CLIENT_SECRET = process.env.AZURE_CLIENT_SECRET;
Security Tip: Never hard-code credentials. Use environment variables or secure credential management.
3. Set Up Authentication and Client
Create a ClientSecretCredential and initialize the Microsoft Graph client:
if (!TENANT_ID || !CLIENT_ID || !CLIENT_SECRET) {
  throw new Error(
    "Please ensure AZURE_TENANT_ID, AZURE_CLIENT_ID, and AZURE_CLIENT_SECRET are set."
  );
}

/** 1. Setup Credentials and Microsoft Graph client */
const client = Client.initWithMiddleware({
  debugLogging: false,
  authProvider: new TokenCredentialAuthenticationProvider(
    // This DefaultAzureCredential will detect the credentials from environment variables above automatically.
    new DefaultAzureCredential(),
    {
      scopes: ["https://graph.microsoft.com/.default"],
    }
  ),
});
4. Define Types
Define types for the Azure AD user and result:
type AzResult<T> = { value: Array<T> };
type AdUser = {
  userPrincipalName: string;
  id: string;
  accountEnabled: boolean;
};
5. Implement Functions
a. Retrieve Inactive Accounts
async function getInactiveAccounts(cutoffDate: Dayjs): Promise<AdUser[]> {
  /** Query all the accounts that has signInActivity date before the expected parameter date */
  const accounts = (await client
    .api("/users/")
    .filter(`signInActivity/lastSignInDateTime lt ${cutoffDate.toISOString()}`)
    .select("id,userPrincipalName,accountEnabled")
    .get()) as AzResult<AdUser>;

  /** Filter the enabled account only here
   * as the API filter has limitation that not allows to query based on both signInActivity and accountEnabled */
  return accounts.value.filter(m => m.accountEnabled);
}Note: The Microsoft Graph API may paginate results. The loop ensures all pages are retrieved.
b. Disable Accounts
async function disableAccounts(users: AdUser[]): Promise<void> {
  return await Promise.all(
    accounts.map(async u => {
      /* Check and keep the account if found in the excludedAccounts */
      if (
        EXCLUDED_ACCOUNTS.find(a =>
          u.userPrincipalName.toLowerCase().includes(a.toLowerCase())
        )
      ) {
        console.log(
          `User account ${u.userPrincipalName} has been excluded from disabling.`
        );
        return;
      }

      // Perform the account disabling
      await client.api(`/users/${u.id}`).update({
        accountEnabled: false,
      });

      console.log(
        `User account with ID ${u.userPrincipalName} has been disabled.`
      );
    })
  );
}
c. Retrieve Disabled Accounts
async function getDisabledAccounts(): Promise<AdUser[]> {
  /** Query all the accounts that has accountEnabled is false */
  const rs = (await client
    .api("/users/")
    .filter(`accountEnabled eq false`)
    .select("id,userPrincipalName,accountEnabled")
    .get()) as AzResult<AdUser>;

  return rs.value;
}
d. Print Accounts
function printAccounts(message: string, accounts: AdUser[]): void {
  console.log(message);
  accounts.forEach((user, index) => {
    console.log(
      `${index + 1}. ${user.userPrincipalName} (Enabled: ${user.accountEnabled})`
    );
  });
}
6. Main Execution Function
Finally, create the main function to orchestrate the process:
(async () => {
  try {
    //1. Scanning account that inactive for more than 2 months
    const cutoffDate = dayjs().subtract(INACTIVITY_THRESHOLD_MONTHS, "month");
    console.log(
      `Scanning for accounts inactive since before ${cutoffDate.format("YYYY-MM-DD")}...\n`
    );

    // Retrieve inactive accounts
    const inactiveAccounts = await getInactiveAccounts(cutoffDate);
    printAccounts(
      `Found ${inactiveAccounts.length} inactive account(s):`,
      inactiveAccounts
    );

    // Disable inactive accounts
    if (inactiveAccounts.length > 0) {
      await disableAccounts(inactiveAccounts);
    } else {
      console.log("No inactive accounts to disable.");
    }

    // Retrieve and print disabled accounts
    const disabledAccounts = await getDisabledAccounts();
    printAccounts(`\nCurrently disabled accounts:`, disabledAccounts);
  } catch (error) {
    console.error("An error occurred:", error);
  }
})();
7. Running the Program
Ensure the environment variables are set:
export AZURE_TENANT_ID=your_tenant_id
export AZURE_CLIENT_ID=your_client_id
export AZURE_CLIENT_SECRET=your_client_secret
Compile and run the program:
npx ts-node src/index.ts4. Scheduling the Script with Azure DevOps
To automate the execution of the script, we’ll use Azure DevOps to schedule it as part of a pipeline.
Steps to Schedule the Script
1. Commit the Code to a Repository
- Create a Git repository in Azure DevOps.
- Commit all your code, including the
package.json,tsconfig.json, andsrcdirectory.
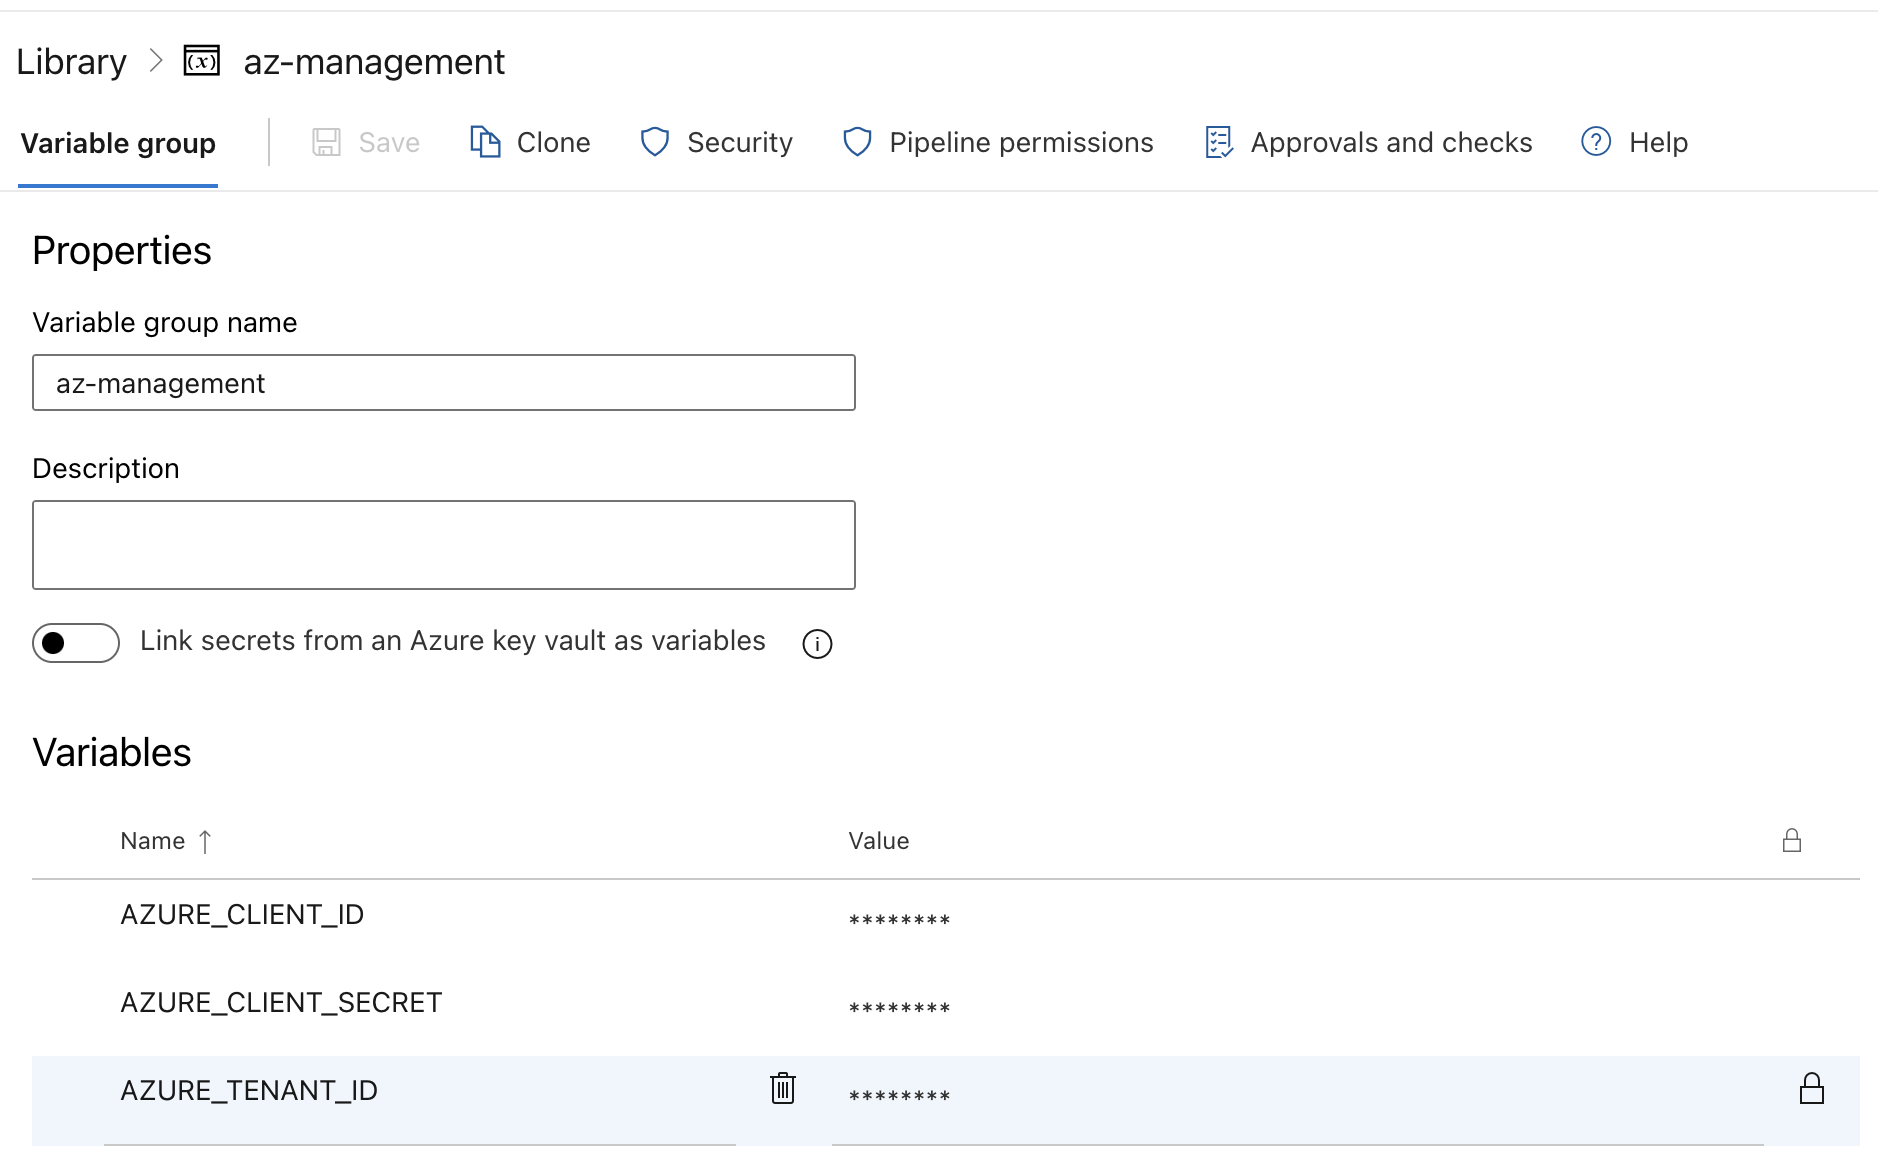
2. Create a Variable Group
Navigate to Pipelines > Library in Azure DevOps.
- Click “Variable groups” and then “Add variable group”.
- Name the variable group, e.g.,
AzureEntraIDCredentials. - Add the following variables:
AZURE_TENANT_IDAZURE_CLIENT_IDAZURE_CLIENT_SECRET
- For each variable, enter the corresponding value and mark it as secret.
- Save the variable group.
3. Create the Pipeline
In Pipelines, click “Create Pipeline” and follow the prompts to set up a YAML pipeline.
a. Define the YAML Pipeline
Create a azure-pipelines.yml file in your repository with the following content:
trigger: none

schedules:
  - cron: "0 0 * * 0" # Runs at midnight every Sunday
    displayName: "Weekly Sunday Run"
    branches:
      include:
        - main
    always: true
    batch: false

pool:
  vmImage: "ubuntu-latest"

variables:
  - group: AzureEntraIDCredentials

steps:
  - task: NodeTool@0
    inputs:
      versionSpec: "14.x" # Adjust Node.js version as needed
    displayName: "Install Node.js"

  - script: |
      npm ci
      npx ts-node src/index.ts
    displayName: "Install dependencies and run script"
    env:
      AZURE_TENANT_ID: $(AZURE_TENANT_ID)
      AZURE_CLIENT_ID: $(AZURE_CLIENT_ID)
      AZURE_CLIENT_SECRET: $(AZURE_CLIENT_SECRET)
b. Pipeline Explanation
- Trigger: Set to
noneto prevent automatic builds on code changes. - Schedules: Configured to run every Sunday at midnight.
- Pool: Uses the latest Ubuntu VM image.
- Variables: Includes the variable group with your credentials.
- Steps:
- NodeTool: Ensures Node.js is available on the agent.
- Script: Installs dependencies and runs the script.
4. Run and Monitor the Pipeline
- Save and run the pipeline manually to test it.
- Monitor the pipeline’s execution in the Pipelines section.
- Ensure that the script runs successfully and performs the expected actions.
5. Secure the Pipeline
- Permissions: Ensure only authorized personnel can modify the pipeline and variable group.
- Secret Variables: Keep your credentials secure by marking them as secrets and avoiding logging sensitive information.
5. Conclusion
Automating the management of inactive Azure Entra ID accounts enhances your organization’s security posture by reducing potential attack surfaces. By leveraging TypeScript and Azure DevOps, you can create a scalable and maintainable solution that integrates seamlessly with your existing workflows.
You can refer the Full Working Source Code here: drunkcoding public code
Key Takeaways
- Security First: Regularly auditing and managing inactive accounts is critical for security and compliance.
- Automation: Automating tasks reduces manual effort and the likelihood of human error.
- Scalability: Using TypeScript and Azure DevOps allows for easy updates and scalability as your organization grows.
Next Topic
- Enhancements: Extend the script to send email notifications before disabling accounts.
- Logging: Integrate logging mechanisms for better auditing and monitoring.
- Policy Compliance: Ensure the solution complies with your organization’s policies and any applicable regulations.
Important: Accessing certain Microsoft Graph API endpoints requires appropriate licensing. Ensure you have the necessary Microsoft Entra ID P2 or equivalent licenses to use the AuditLog API and other premium features.
Thank You
Thank you for taking the time to read this guide! I hope it has been helpful, feel free to explore further, and happy coding! 🌟✨
Steven | GitHub