Introduction
In our previous article, we covered the process of importing Docker images into a private Azure Container Registry (ACR). Building on that foundation, this guide will walk you through creating Helm charts for nginx-ingress and cert-manager, and setting up a comprehensive Helm deployment pipeline for your private Azure Kubernetes Service (AKS) cluster using Azure DevOps.
Table of Contents
Open Table of Contents
Configuring an Azure DevOps Agent
To streamline the deployment process of your Helm charts, it’s crucial to set up and configure an Azure DevOps agent on the virtual machine (VM) provisioned by the az-04-cloudPC project. This setup ensures that your CI/CD pipeline functions smoothly within a private network environment.
Installing the Azure DevOps Agent
- Log into your virtual machine using Windows 365 Virtual Desktop Infrastructure (VDI).
- Follow the detailed instructions in the Microsoft documentation to install the Azure DevOps agent on a Linux-based VM.
- Once installed, assign the agent to the
aks-agentspool to optimize resource allocation.
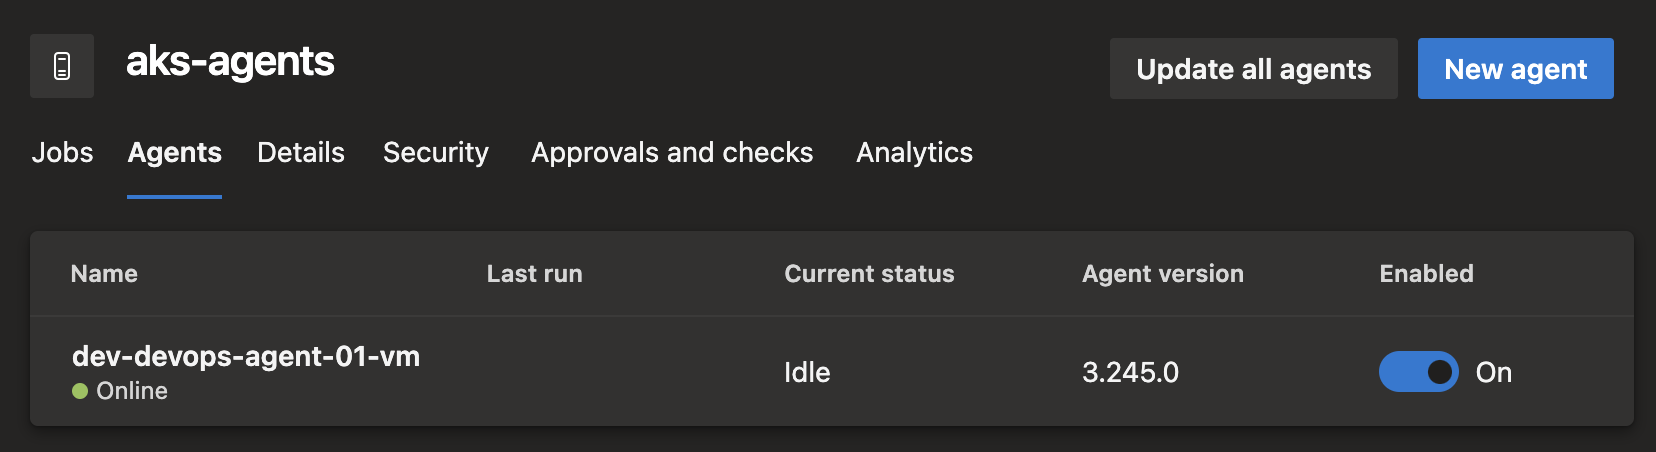
After installed, the agent should be listed under Azure DevOps project’s agents as below:
Installing Essential Tools
For effective Helm chart deployment, ensure the following tools are installed on the agent:
- Azure CLI: Required for managing Azure resources. Follow the installation guide here.
- KubeLogin: This is a client-go credential plugin implementing azure authentication and required for pipeline deployment to authenticate with AKS using Service Principal. Refer here.
- Helm CLI: Essential for managing Kubernetes applications. Refer to the installation instructions here.
- Kubectl: Necessary for Kubernetes cluster management. Installation guidance is available here.
Note: After installing these tools, restart the VM to ensure that the installations are correctly applied and effective.
Azure DevOps Extensions
To facilitate our deployment process, we’ll be using the Replace Tokens extension for Azure Pipelines. This task replaces tokens in text-based files with actual variable values, allowing for dynamic configuration of our Helm charts. Ensure this extension is installed in your Azure DevOps environment before proceeding with the pipeline setup.
Nginx and Cert Manager Helm Chart
Our Helm chart is designed to deploy three essential parts:
- Nginx Ingress Controller: This internal ingress controller will service traffic at the IP address
192.168.31.250, using the internal domaindrunkcoding.net. - Cert-Manager: This component is responsible for generating SSL certificates for all internal subdomains. It also monitors certificate expiration and handles timely renewals.
- Let’s Encrypt ClusterIssuer: The chart includes templates to deploy a Let’s Encrypt ClusterIssuer, enabling Cert-Manager to issue free SSL certificates from Let’s Encrypt.
View the Chart.yaml file
[inline](https://github.com/baoduy/drunk-azure-pulumi-articles/blob/main/pipeline/ingress-helm/Chart.yaml#1-1000)
Env-Variables Values
We’ve created a values-dev.yaml file to configure our development environment.
- Chart Variables: Tokens in the format
${{Name}}are placeholders for variables that will be populated from the pipeline during deployment. These variables can be sourced from library groups, Azure Key Vault, or inline variables. - Chart Images: All chart images are configured to be pulled from our internal Azure Container Registry (ACR), which was set up in the previous topic.
View the values-dev.yaml file
# https://github.com/kubernetes/ingress-nginx/blob/main/charts/ingress-nginx/values.yaml
nginx:
  enabled: true
  controller:
    image:
      registry: '${{acrName}}.azurecr.io'
      image: 'ingress-nginx/controller'
      tag: "v1.11.1"
      digest: ''
    admissionWebhooks:
      patch:
        image:
          registry: '${{acrName}}.azurecr.io'
          image: 'ingress-nginx/kube-webhook-certgen'
          tag: 'v1.4.1'
          digest: ''
    hostNetwork: 'false'
    useIngressClassOnly: 'true'
    watchIngressWithoutClass: 'true'
    ingressClass: 'internal'
    ingressClassResource:
      name: 'internal'
      enabled: true
      default: true
      controllerValue: k8s.io/ingress-nginx
    allowSnippetAnnotations: 'false'
    service:
      annotations:
        #This is important to tell azure load balancer that this is an internal IP address
        service.beta.kubernetes.io/azure-load-balancer-internal: 'true'
      externalTrafficPolicy: 'Local'
      loadBalancerIP: '${{private-ip}}'
    config:
      useForwardedHeaders: 'true'
      computeFullForwardedFor: 'true'
      useProxyProtocol: 'true'
      use-forwarded-headers: 'true'
      disable-access-log: 'true'
      proxy-buffer-size: '800k'
      client-header-buffer-size: '800k'
      client_max_body_size: '10m'
      annotation-value-word-blocklist: 'load_module,lua_package,_by_lua,location,root,proxy_pass,serviceaccount,{,},\\'

#===========Cert-manager=======================
certmanager:
  enabled: true
  # cert-manager controller
  image:
    repository: '${{acrName}}.azurecr.io/jetstack/cert-manager-controller'
    tag: v1.15.2
  # cert-manager webhook
  webhook:
    image:
      repository: '${{acrName}}.azurecr.io/jetstack/cert-manager-webhook'
      tag: v1.15.2
  # cert-manager cainjector
  cainjector:
    image:
      repository: '${{acrName}}.azurecr.io/jetstack/cert-manager-cainjector'
      tag: v1.15.2
  # Configuration for the domain
  installCRDs: true
  ingressShim:
    defaultIssuerName: "letsencrypt-prod"
    defaultIssuerKind: "ClusterIssuer"
    defaultIssuerGroup: "cert-manager.io"
  extraArgs:
    - --dns01-recursive-nameservers-only
    - --dns01-recursive-nameservers=1.1.1.1:53

#===========lets-encrypt-issuer=======================
letsencrypt:
  # the first deployment this need to be 'false'
  # after cert-manager deployed then enable this to deploy 'lets-encrypt' cluster issuer.
  enabled: true
  email: 'admin@${{cf-domain}}'
  cfToken: '${{cf-dns-token}}'
Setting Up an Azure DevOps Pipeline
With our Helm charts prepared, it’s time to create an Azure DevOps pipeline to deploy these to our secure AKS cluster.
Pipeline Preparation:
- First, go to your Git repository and start a new pipeline. Choose “Existing pipeline” and choose the
ingress-helm.azure-pipelines.ymlfile. - Next, We’ll need to set up some variables for this pipeline:
cf-dns: This group includes two key details:cf-domain: This is the Cloudflare domain, used here for SSL verification since we are managing DNS internally.cf-dns-token: A token from Cloudflare that lets us edit DNS; it has certain permissions. You can refer here for guidance on setting this up.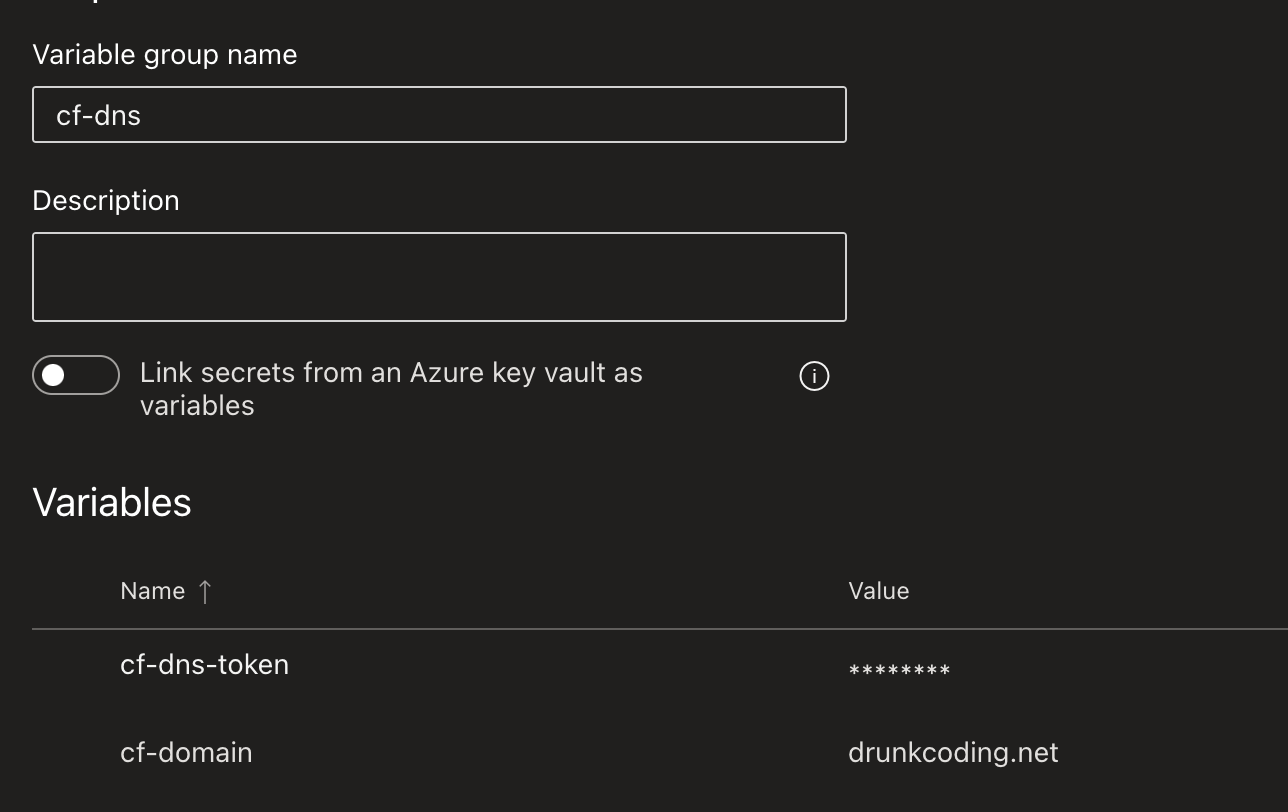
env_name: This should be the name of the branch from which the pipeline building.azureSubscription: The name of your Azure subscription, set as az-pulumi from previous steps. Make sure this account can manage Helm deployment and is part of theAZ ROL DEV-AKS-ADMINgroup within AKS Admin Active Directory.rsGroup: The name of the Azure resource group that contains your AKS cluster.aksName: The name given to your AKS cluster.acrName: The name of the Azure Container Registry.private-ip: A dedicated private IP for the ingress controller.valueFile: The specific Helm values file name only.chart: The location of Helm chart.releaseName: The name of the Helm release.
Pipeline Deployment:
-
Once the deployment is successful:
-
We’ll find that the pods are now active within the
nginx-ingressnamespace.
View the values-dev.yaml here
trigger: none
# uncomment this to enable auto trigger.
# branches:
# include:
# - releases/*
# exclude:
# - main
pr: none
variables:
- group: cf-dns
- name: env_name
value: $(build.sourceBranchName)
- name: azureSubscription
value: 'az-pulumi'
- name: rsGroup
value: 'dev-03-aks72e74d22'
- name: aksName
value: 'dev-aks-clusterfe073605'
- name: acrName
value: 'devaksacreb86a9ea'
- name: private-ip
value: '192.168.31.250'
- name: valueFile
value: 'values-dev.yaml'
- name: chart
value: '$(Build.SourcesDirectory)/pipeline/ingress-helm'
- name: releaseName
value: 'nginx-ingress'
pool:
# As our AKS is a private cluster. We need to use the private agent pool.
name: aks-agents
steps:
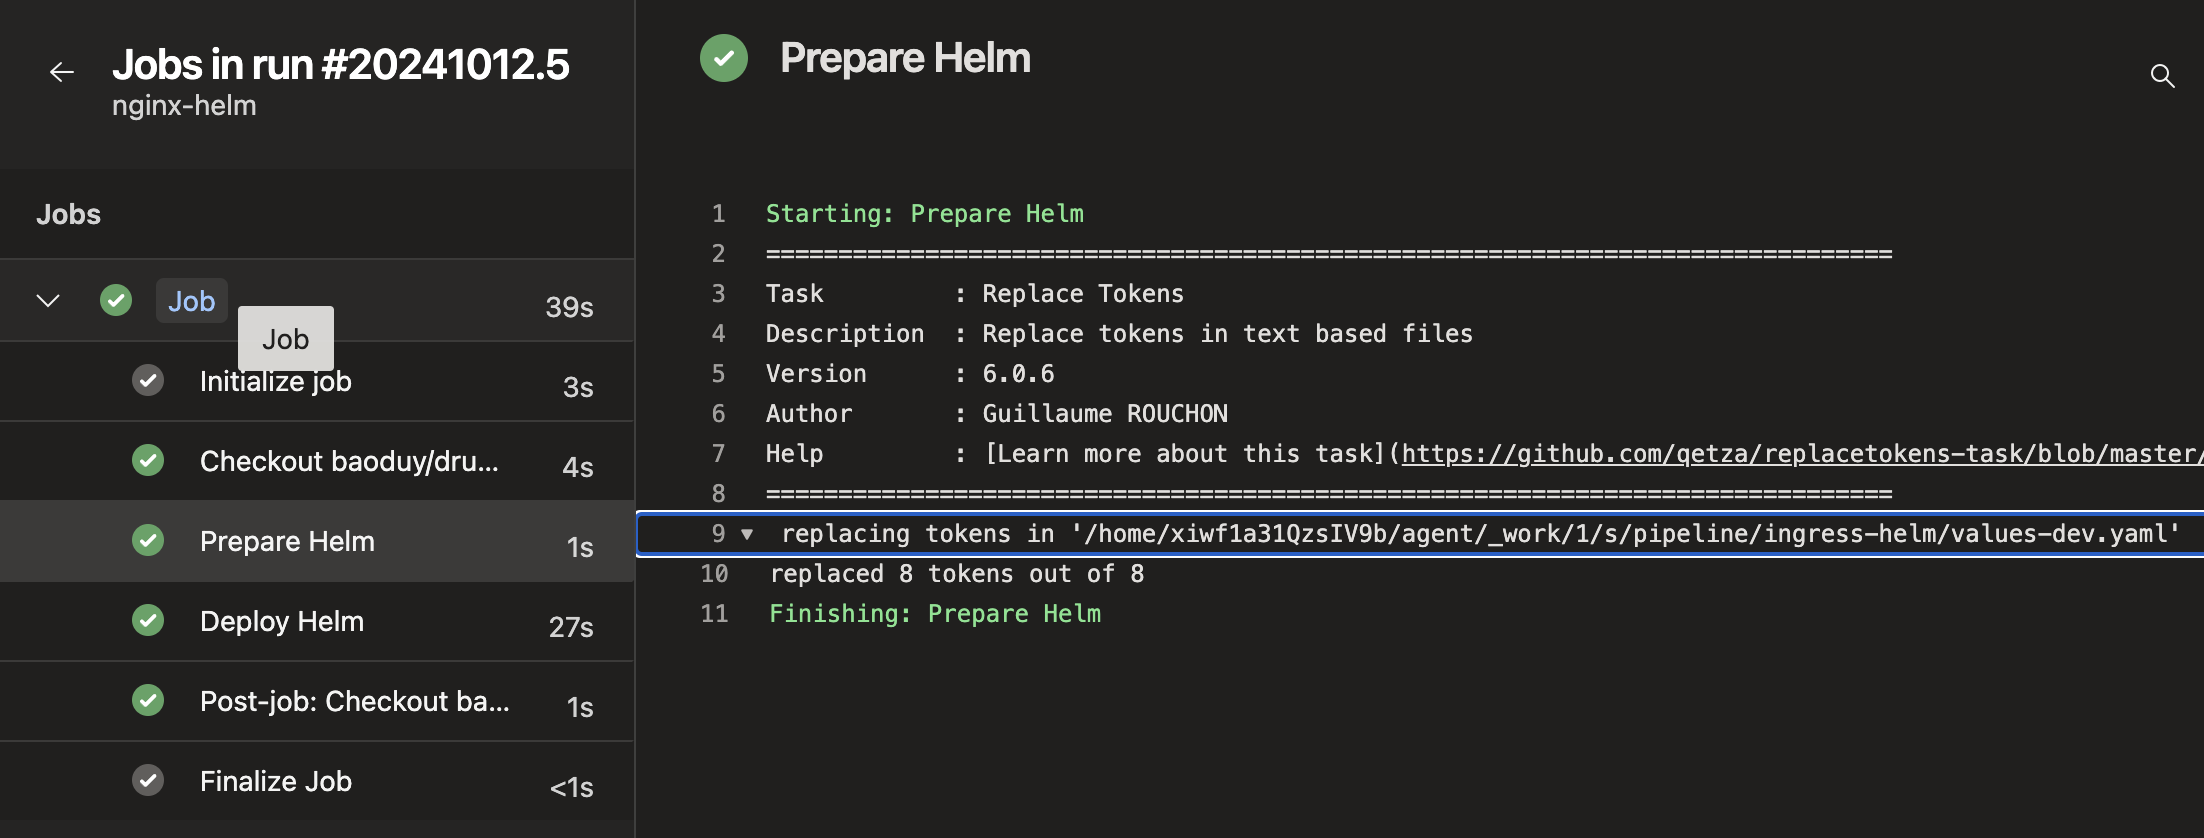
# This step will replace all ${{}} tokens from YAML file by the pipeline variables (either from the variable group, key vault or inline variables above).
# It will raise error to stop the pipeline if any variables are not found.
- task: replacetokens@6
displayName: 'Prepare Helm'
inputs:
sources: '$(chart)/$(valueFile)'
tokenPattern: 'githubactions'
caseInsensitivePaths: false
includeDotPaths: false
missingVarLog: 'error'
ifNoFilesFound: 'error'
# Deploy Helm to AKS using Service Principal
- task: AzureCLI@2
displayName: 'Deploy Helm'
inputs:
azureSubscription: '$(azureSubscription)'
scriptType: 'bash'
scriptLocation: 'inlineScript'
inlineScript: |
# login to AKS using Service Principal
az aks get-credentials --resource-group $(rsGroup) --name $(aksName) --overwrite-existing --public-fqdn
kubelogin convert-kubeconfig -l azurecli
# Deploy Helm Chart
helm upgrade --namespace $(releaseName) --install --values '$(chart)/$(valueFile)' --create-namespace --cleanup-on-fail --history-max 5 --insecure-skip-tls-verify $(releaseName) $(chart)Application Helm Chart
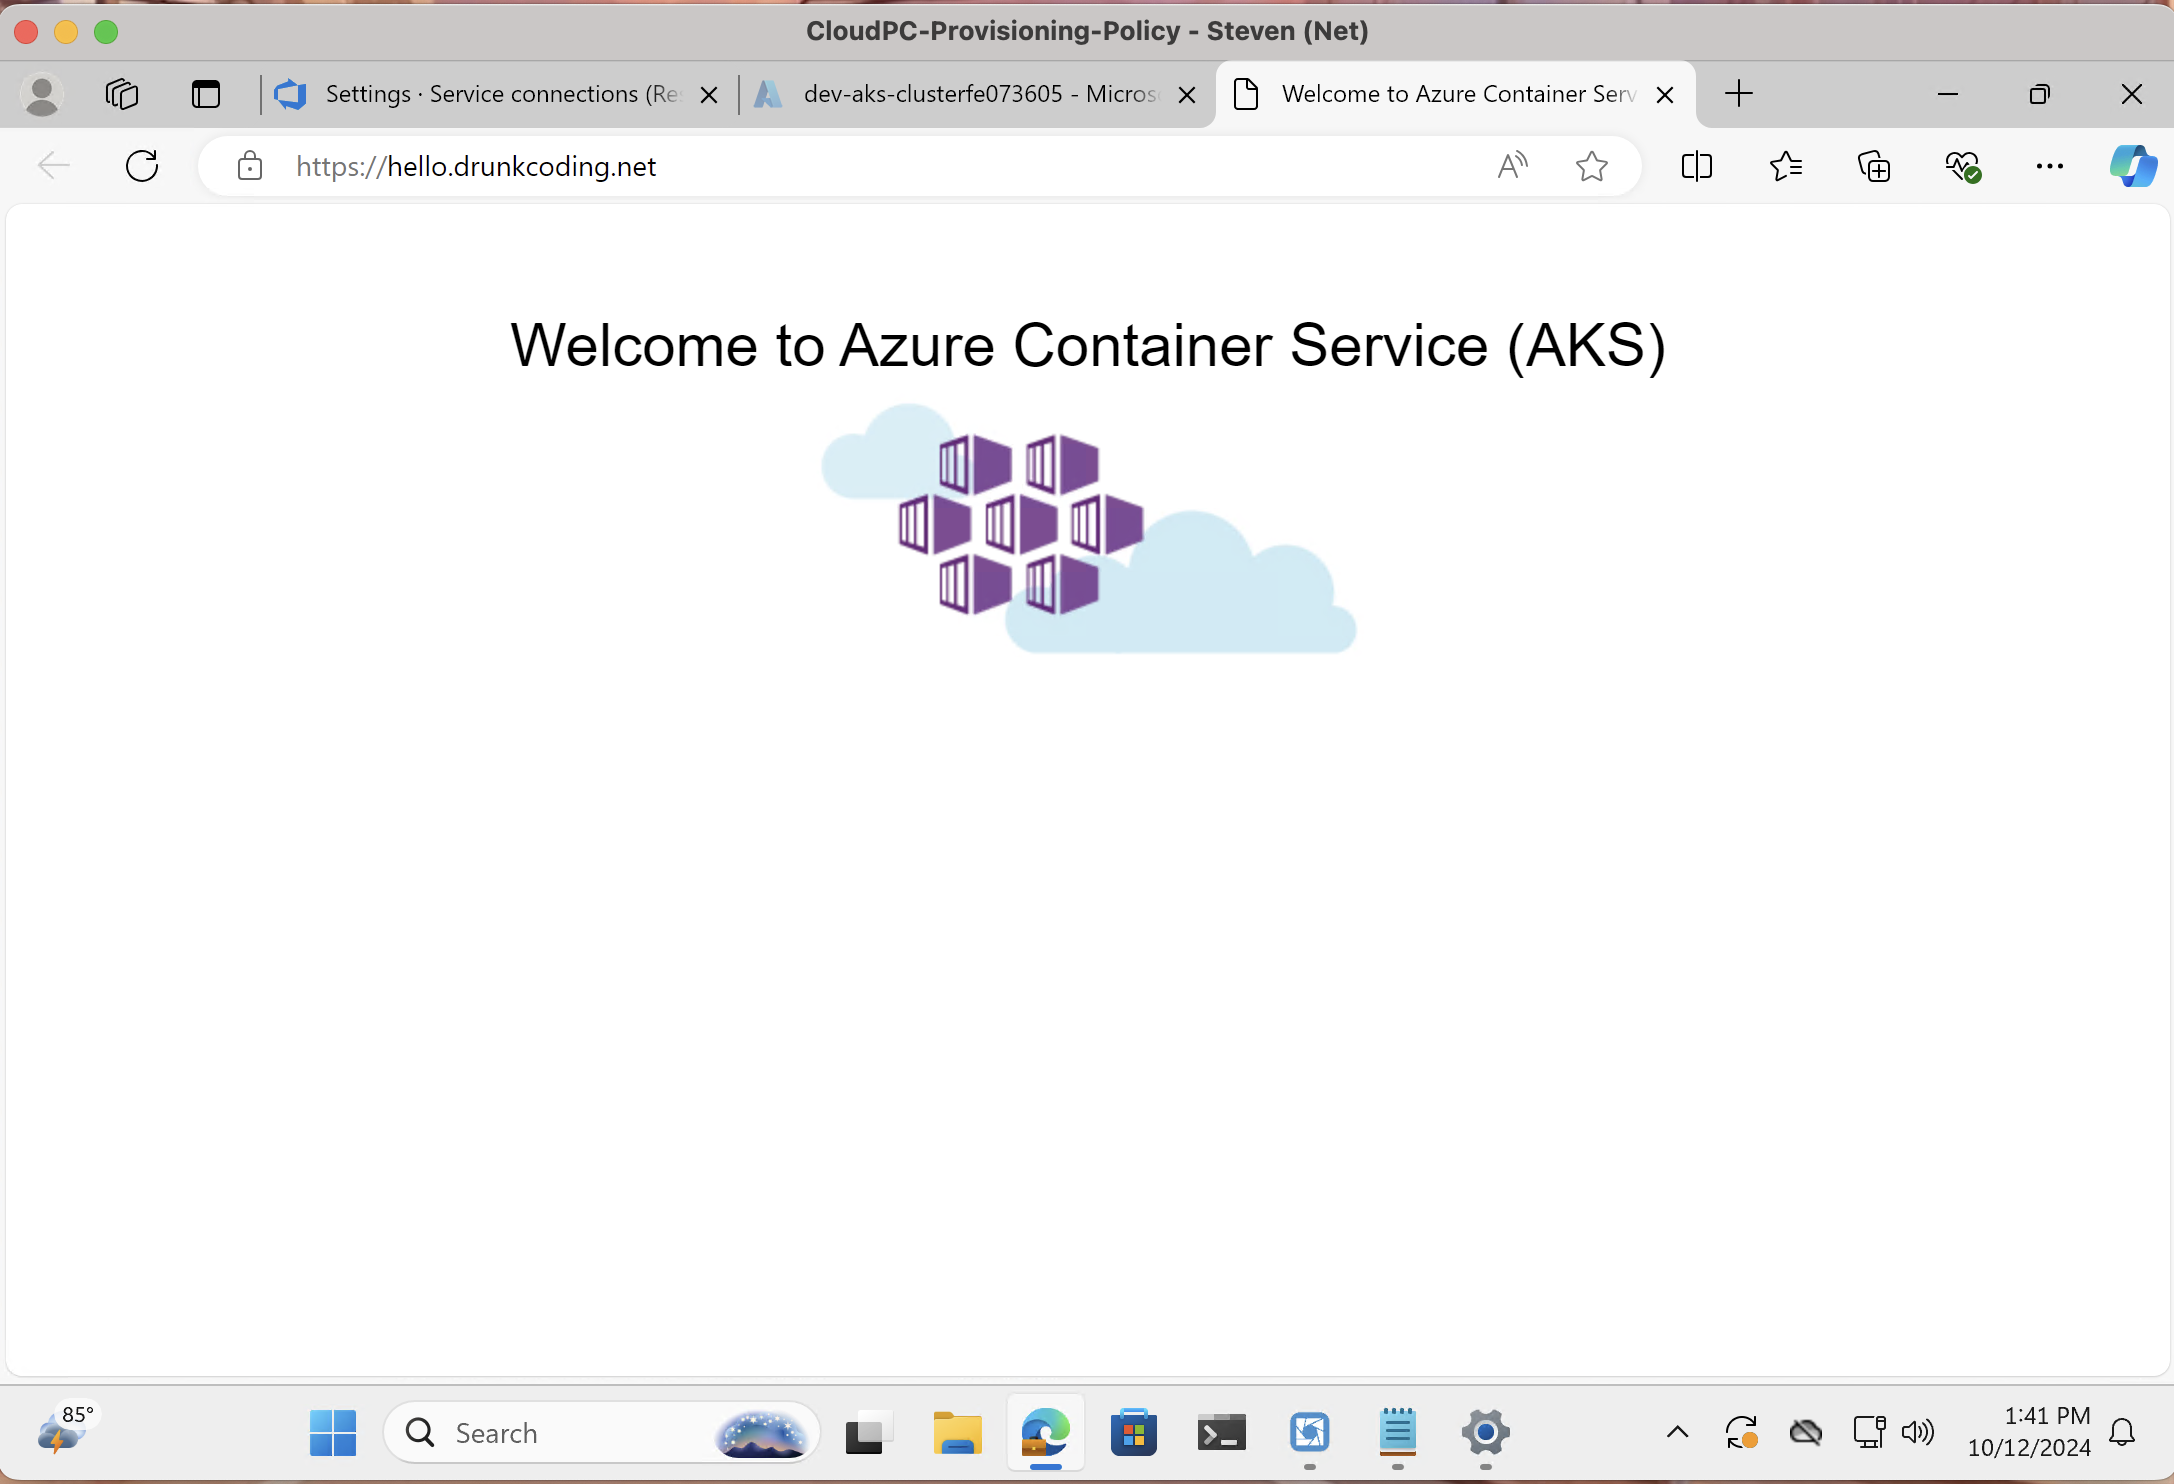
Now, let’s create another Helm chart to deploy our applications. For this example, we’ll use a Helm chart to deploy the azuredocs/aks-helloworld:v1 image, provided by the Microsoft AKS team for demonstration purposes. Once deployed, the cert-manager will automatically issue an SSL certificate for the subdomain hello.drunkcoding.net, enabling us to access the application via Windows 365 VDI.
Pipeline Deployment:
-
Upon successful deployment:

-
The application pods should now be active within the
drunk-appsnamespace.
-
The SSL certificate
tls-hello-world-letsshould be successfully issued and stored in thedrunk-appsnamespace’s secrets.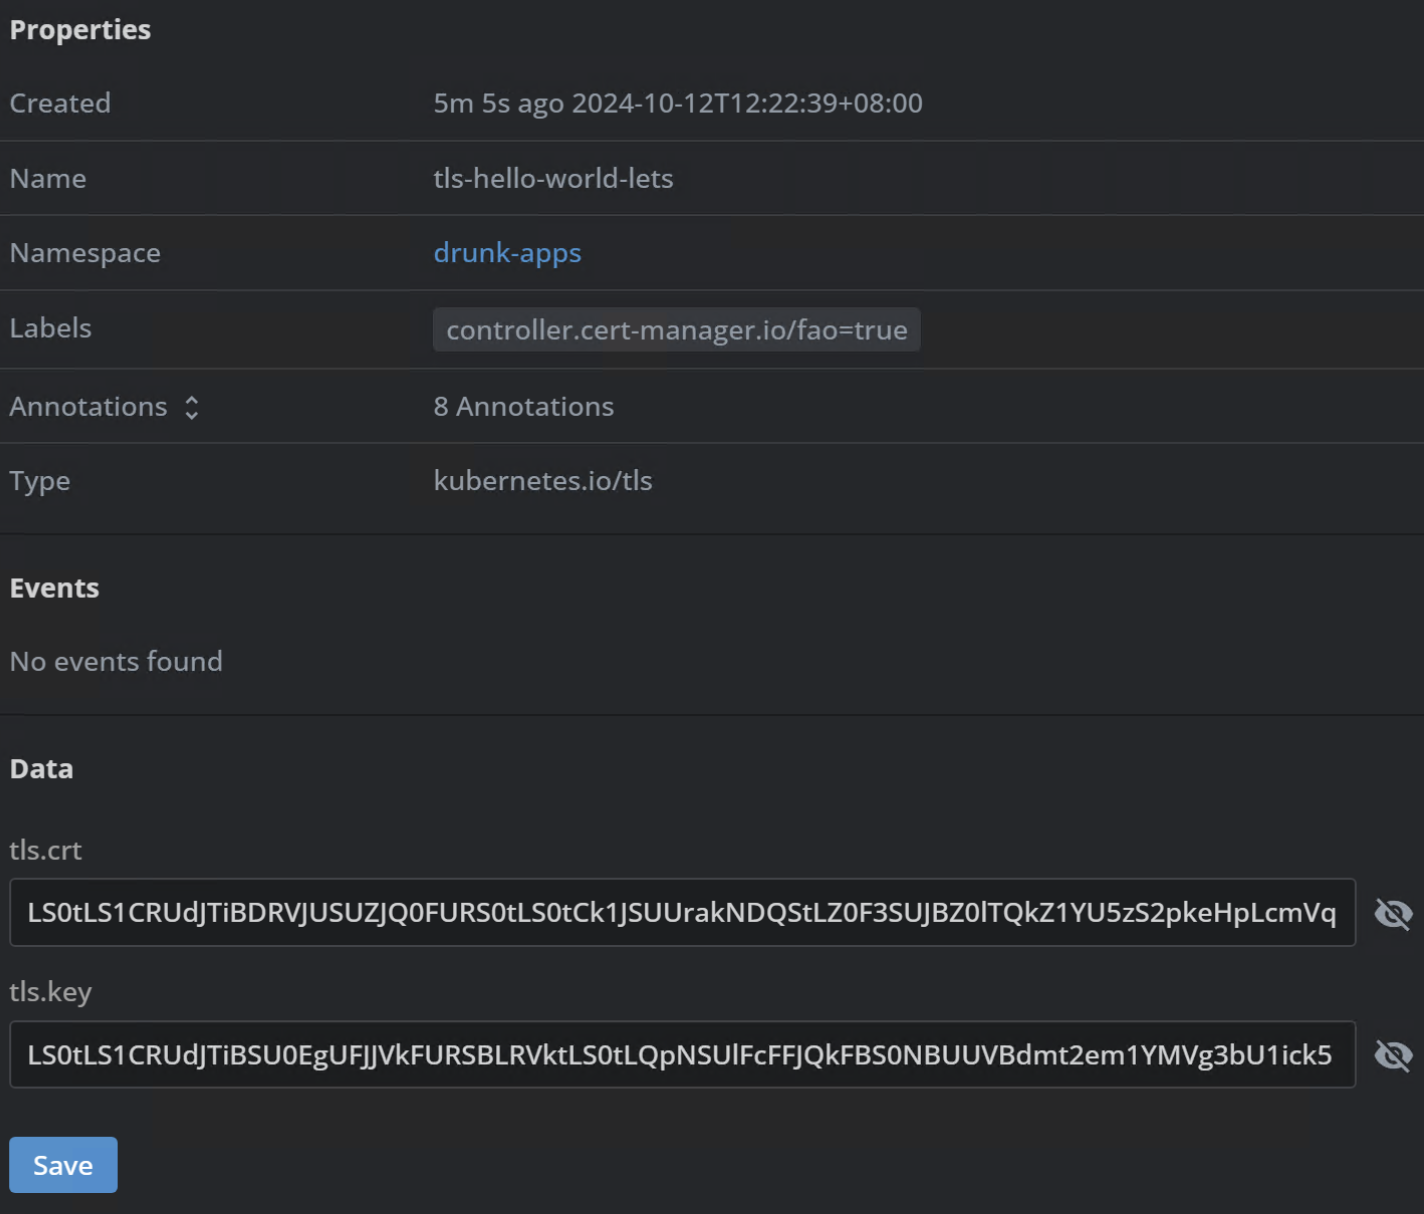
Application Access:
- Access the app via Windows 365 VDI:
View the app helm chart here
trigger: none
# uncomment this to enable auto trigger.
#  branches:
#    include:
#    - releases/*
#    exclude:
#    - main
pr: none

variables:
- name: env_name
  value: $(build.sourceBranchName)
- name: azureSubscription
  value: 'az-pulumi'
- name: rsGroup
  value: 'dev-03-aks72e74d22'
- name: aksName
  value: 'dev-aks-clusterfe073605'
- name: acrName
  value: 'devaksacreb86a9ea'
- name: valueFile
  value: 'values-dev.yaml'
- name: chart
  value: '$(Build.SourcesDirectory)/pipeline/drunk-apps-helm'
- name: releaseName
  value: 'drunk-apps'

pool:
  # As our AKS is a private cluster. We need to use the private agent pool.
  name: aks-agents

steps:
  # This step will replace all ${{}} tokens from YAML file by the pipeline variables (either from the variable group, key vault or inline variables above).
  # It will raise error to stop the pipeline if any variables are not found.
  - task: replacetokens@6
    displayName: 'Prepare Helm'
    inputs:
      sources: '$(chart)/$(valueFile)'
      tokenPattern: 'githubactions'
      caseInsensitivePaths: false
      includeDotPaths: false
      missingVarLog: 'error'
      ifNoFilesFound: 'error'

  # Deploy Helm to AKS using Service Principal
  - task: AzureCLI@2
    displayName: 'Deploy Helm'
    inputs:
      azureSubscription: '$(azureSubscription)'
      scriptType: 'bash'
      scriptLocation: 'inlineScript'
      inlineScript: |
        # login to AKS using Service Principal
        az aks get-credentials --resource-group $(rsGroup) --name $(aksName) --overwrite-existing --public-fqdn
        kubelogin convert-kubeconfig -l azurecli

        # Deploy Helm Chart
        helm upgrade --namespace $(releaseName) --install --values '$(chart)/$(valueFile)' --create-namespace --cleanup-on-fail --history-max 5 --insecure-skip-tls-verify  $(releaseName) $(chart)
Conclusion
In this guide, we’ve walked through the process of creating Helm charts for nginx-ingress and cert-manager, and setting up an Azure DevOps pipeline to deploy these charts to a private AKS cluster. This approach allows for easy management and deployment of these critical components in your Kubernetes infrastructure.
By leveraging Helm and Azure DevOps, We can ensure consistent and repeatable deployments across your environments, making it easier to manage and scale your applications in a private AKS cluster.
Remember to always follow security best practices, such as using Azure Key Vault for storing sensitive information and regularly updating your deployments with the latest security patches.
References
- Nginx Helm Chart
- Drunk Apps Helm Chart
- Self-hosted Linux agents
- Helm Documentation
- Nginx Ingress Controller Documentation
- Cert-Manager Documentation
- AzureDevOps Replace Token Extension
Next
Day 11: Exposing a Private AKS Application via Cloudflare Tunnel.
In the next article, We demonstrate how to securely expose an application running on a private AKS cluster to the internet using Cloudflare Tunnel, without the need for public IP addresses or open ports. We’ll also show how to apply authentication to all exposed applications and centralize access control using Azure Entra ID Groups, ensuring only authorized users have access.
Thank You
Thank you for taking the time to read this guide! We hope it has been helpful in setting up your Helm deployment pipeline for a private AKS cluster. Feel free to explore further and happy deploying! 🚀🌟
Steven | GitHub